background image

User Guide 

It is also possible to mount the panel on the leg of a tripod, but this 
may limit the range of angles at which the panel can be set. 

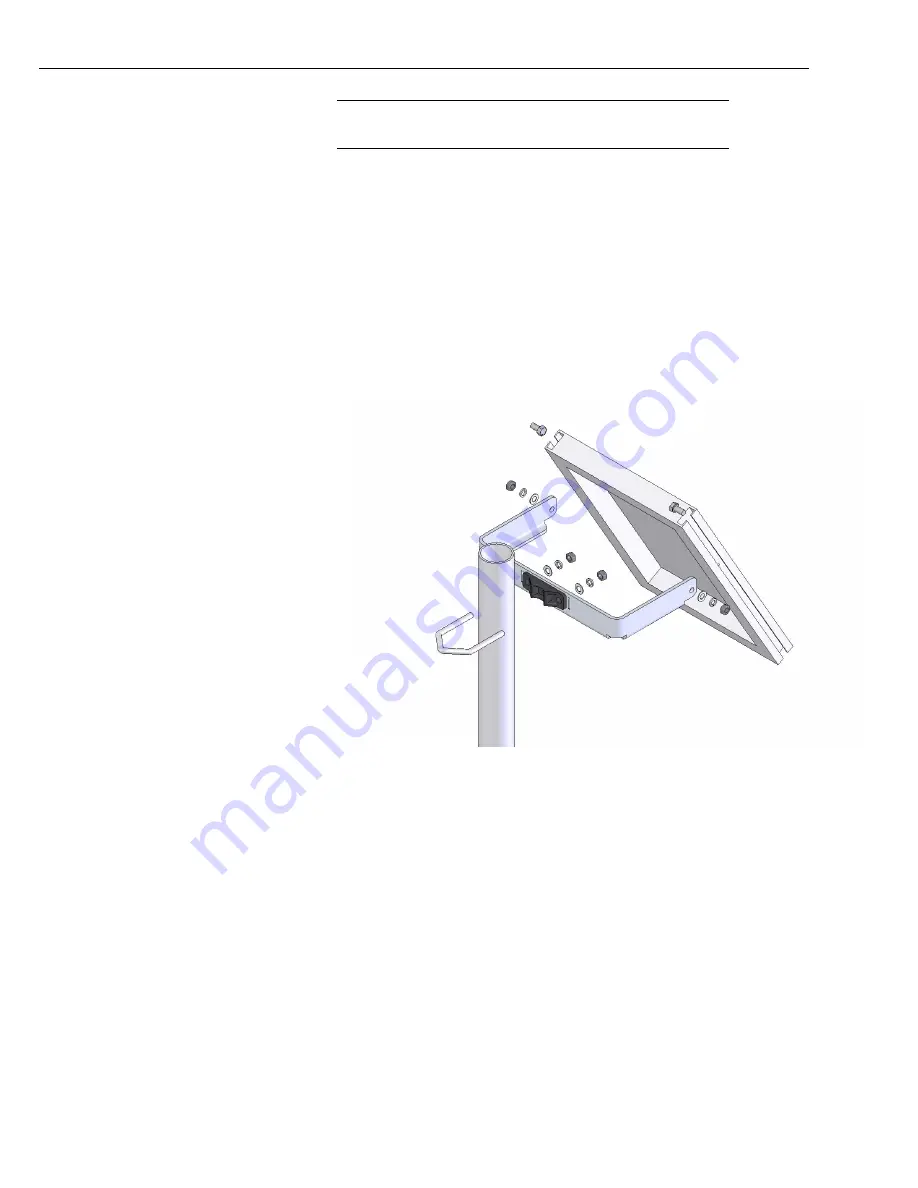
The SP5/SP10 bracket is not fitted to the Solar Panel before shipping and should 
be attached as follows (see Figure 2): 

1.


Assemble the M8 bolts through the bracket, and through the holes in the side of 
the Solar Panel.  

The panels have slotted side-channels. Slide the head of the bolt into the 
channel, spring open the bracket to let the bolt come out through the hole in the 
bracket and fit the nuts outside the bracket. Use the washers in the same order. 

2.


Fit the bracket to the mast using the M8 ‘V’ bolts and fasteners. 

3.


Position the Solar Panel at the desired angle and tighten. It is advisable to use a 
thread locking compound on the M8 nuts if extreme weather conditions may be 
encountered. 


Figure 2.  Assembly details of bracket for the SP5 and SP10 

The SP30 and larger standard panels are supplied with a Solar Panel Multi-Fit 
bracket (Part number 006607). This is a substantial bracket that fits many different 
sizes of panels using small clamps fitted under the rear lip of the frame at either 
side of the panel (it works with panels up to 500 mm internal width). This allows 
easy exchange of the panel in the field, e.g. to upgrade to a larger size panel. 
 
One bracket is supplied as standard with each panel. For exposed sites, especially 
with the larger panels, e.g. the SP100, a second bracket can be used to allow the 
panel to be mounted on two vertical tubes rather than one. Those tubes could be 
the two sides of a large tower or user-supplied poles which are fixed into the 
ground. Each bracket has two `V’ bolt fittings for poles in the range of 25-54 mm 
diameter. Optional band clamps are available to allow the brackets to be fitted to 
larger poles. The bracket is supplied preassembled but needs to be mounted on the 
back of the panel as shown in Figure 3. 


NOTE 

Summary of Contents for SP10

Page 1: ...Solar Panels Issued 20 5 15 Copyright 2010 2015 Campbell Scientific Ltd CSL 60 USER GUIDE ...

Page 2: ......

Page 3: ...her the repair is under guarantee or not Please state the faults as clearly as possible and if the product is out of the guarantee period it should be accompanied by a purchase order Quotations for repairs can be given on request It is the policy of Campbell Scientific to protect the health of its employees and provide a safe working environment in support of this policy a Declaration of Hazardous...

Page 4: ......

Page 5: ...nt for recycling Any batteries contained within the product or used during the products life should be removed from the product and also be sent to an appropriate recycling facility Campbell Scientific Ltd can advise on the recycling of the equipment and in some cases arrange collection and the correct disposal of it although charges may apply for some items or territories For further advice or su...

Page 6: ......

Page 7: ...fore beginning work Wear a hardhat and eye protection and take other appropriate safety precautions while working on or around tripods and towers Do not climb tripods or towers at any time and prohibit climbing by other persons Take reasonable precautions to secure tripod and tower sites from trespassers Use only manufacturer recommended parts materials and tools Utility and Electrical You can be ...

Page 8: ......

Page 9: ...acid batteries 7 3 4 Using solar panels with the CH150 and CH200 chargers 8 3 5 Using solar panels with Morningstar regulators 8 4 Optimum Battery Size 8 5 Precautions 10 6 Maintenance 10 Figures 1 General View of SP5R SP10R with a Typical Mounting Bracket 2 2 Assembly Details of bracket for the SP5 and SP10 3 3a Assembly Drawing for fitting the multi mount bracket to a larger panel 4 3b Solar pan...

Page 10: ......

Page 11: ...h consumes a significant amount of power e g an Eddy Covariance system the SP60 or SP100 panel is normally specified Under these conditions the battery capacity should also be increased to suit e g using a leisure battery of 70 100 Ah 1 Specifications SP5 SP10 SP30 SP60 SP100 Typical peak power W 4 5 10 10 10 30 5 60 5 100 5 Voltage at peak power 16 5 16 8 17 5 17 5 18 0 Current at peak power A 0 ...

Page 12: ...lamp provided The panel should face due South North in the southern hemisphere and the angle of the panel should generally be adjusted according to the following considerations For best performance in short term installations the panel can be set perpendicular to the solar beam at midday For longer term use over many months the optimum angle from the horizontal is the latitude of the site plus 15 ...

Page 13: ...ly details of bracket for the SP5 and SP10 The SP30 and larger standard panels are supplied with a Solar Panel Multi Fit bracket Part number 006607 This is a substantial bracket that fits many different sizes of panels using small clamps fitted under the rear lip of the frame at either side of the panel it works with panels up to 500 mm internal width This allows easy exchange of the panel in the ...

Page 14: ...Solar Panels 4 Figure 3a Assembly drawing for fitting the multi mount bracket to a larger panel Figure 3b Solar panel mounted on pole using the multi mount bracket ...

Page 15: ...s will vary with the model and make of panel supplied Smaller panels such as the SOP5 are fitted with a flying lead that is moulded into the back of the panel Larger panels have junction boxes on the back of the panel to which Campbell Scientific will normally fit a two core lead Newer designs of panels have a junction box which is fitted with industry standard single core leads with MC3 solar pan...

Page 16: ...ve to be wired into cables connecting the panel to the battery The wires of the shunt regulators are clearly identified Connect the shunt regulator as shown in Figure 5 Solar Panel Solar Batt VE VE VE 12V Battery Lead Acid To Datalogger Shunt Regulator Figure 5 Connection of Shunt Regulator for SP10R Panels Observe the correct polarity when making connections to the shunt regulator Failure to do s...

Page 17: ...S200 and CR6 manuals regarding their LED indicators The CR200X does not have an LED The LED only indicates that a voltage is being generated by the panel it does not necessarily indicate that the batteries are being adequately charged 3 2 1 Dataloggers with built in chargers the CR200X CR3000 and CR6 Any of the smaller solar panels can be connected directly to the built in charging circuit of the ...

Page 18: ...egulators Please refer to the instruction supplied with those regulators Please note that the quiescent consumption of the regulator may be quite high e g 8 10 mA Please note the fuse warning below 4 Optimum Battery Size The batteries fitted inside the rechargeable CR3000 and the PS power supplies and the BP7 have a capacity of 7Ah These batteries are suitable for operation with solar panels at mo...

Page 19: ...st effective to opt for a much larger battery to cover several months in the winter than to buy a much larger panel to give positive charging at all times If a larger battery is to be used with an existing power supply system e g a PS power supply either disconnect the existing supply altogether or connect the external battery to the existing supply using a diode resistor connection technique see ...

Page 20: ...ctly 2 It is important to match panel output to battery capacity and current drain Although an incorrect choice of components can lead to undercharging of the batteries in overcast conditions there is little danger of overcharging even if a large panel is used with low capacity batteries at very low current drain Some care may however be needed to prevent the battery cell temperature from rising i...

Page 21: ......

Page 22: ...ientific Centro Caribe S A CSCC 300N Cementerio Edificio Breller Santo Domingo Heredia 40305 COSTA RICA www campbellsci cc info campbellsci cc Campbell Scientific Ltd CSL 80 Hathern Road Shepshed Loughborough LE12 9GX UNITED KINGDOM www campbellsci co uk sales campbellsci co uk Campbell Scientific Ltd France 3 Avenue de la Division Leclerc 92160 ANTONY FRANCE www campbellsci fr info campbellsci fr...

Reviews: