background image

17

ENGLISH

9. Updating the firmware

Step 1

Step 2

From time to time it happens that the firmware of the control unit needs to be updated 
(e.g. in case of a frequency change of the satellite operator or a general improvement of 
the control unit).

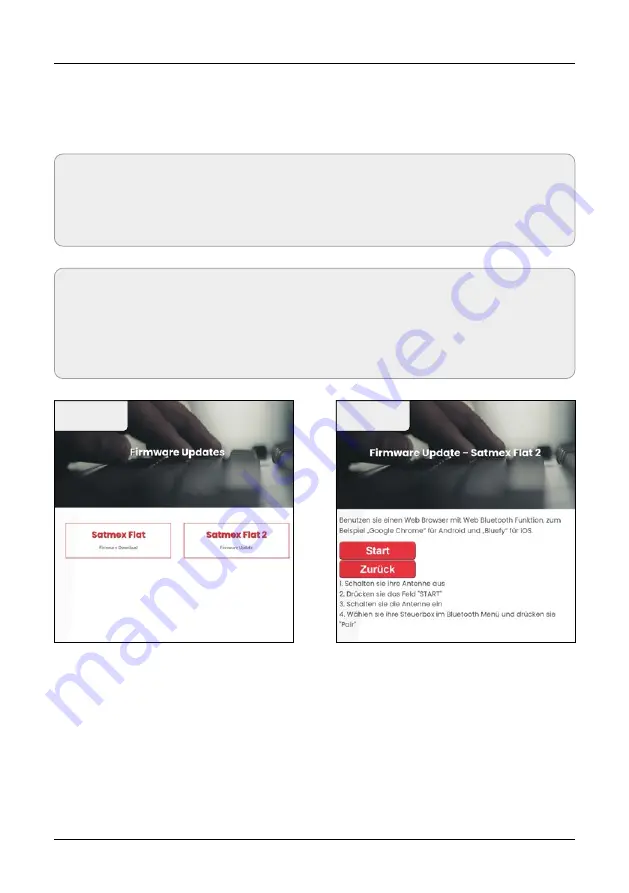
1.  Go to the following website: 

www.camping-first.de

2.  Click on 

Support

3.  Click on

 Firmare Updates

4.  Select 

Satmex Flat 2

1.  Switch off the antenna.
2.  Press the 

Start

 field.

3.  Switch on the antenna.

Note 1:

For a firmware update, you absolutely need a smartphone, tablet or notebook with 
Bluetooth function. The connection with the control unit is established directly via 
Bluetooth.

Note 2:

To connect via Bluetooth, you need the following browsers on your smartphone, 
tablet or notebook: 
For Android devices: Google Chrome 
For iOS devices: Bluefy

Summary of Contents for Satmex Flat 2

Page 1: ...Satmex Flat 2 Bedienungsanleitung...

Page 2: ...lation auf dem Dach 06 2 3 Klebeanleitung 06 2 4 Installation im Innenbereich 08 2 5 Anschluss der Komponenten 09 3 Steuerger t 3 1 Frontansicht 10 3 2 R ckansicht 10 4 Satelliten bertragung 11 5 Sate...

Page 3: ...nen Falls Sie schon hnliche Produkte installiert haben muss die Vorgehensweise mit diesem Produkt nicht bereinstimmen Dieses Ger t ist eine der innovativsten und technologisch fortschrittlichsten Sate...

Page 4: ...Antenne und Receiver geschaltet und versorgt die Antenne mit Strom Hinweis Die Antenne besitzt zus tzlich einen weiteren Anschluss f r einen zweiten Receiver F r den korrekten Anschluss der Komponent...

Page 5: ...ten Sie bitte auch dass sich durch die Antenne die Fahrzeug h he entsprechend ndert Bitte halten Sie sich unbedingt an die einzelnen Punkte der Montageanweisung Allgemeines Sorgen Sie f r einen geeign...

Page 6: ...hres Fahrzeugs ausreichend stabil ist Bei ungen gender oder zweifelhafter Dachstabilit t ist ein ca 2mm starkes Blech mit ca 100x100cm auf der Dachau enhaut zu befestigen Erkundigen Sie sich dazu bei...

Page 7: ...ung des Klebers kann eine Abdich tungsfuge um die Montageplatte gezogen werden Wichtig Die Antenne muss mit der Motoreinheit in Fahrtrichtung zeigen Wichtig Verkleben Sie nicht die Anschluss buchse de...

Page 8: ...re um einen Kabel brand bei Kurzschluss zu vermeiden Das gelbe Kabel wird an dem Z ndungsplus des Fahrzeuges angeschlossen und ebenfalls mit einer Sicherung von 7 Ampere abgesichert Dieses Kabel muss...

Page 9: ...V ber Batterie Pluspol Dau erversorgung ROT oder optionales 230V 12V DC Netzteil Keine Lade ger te Achten Sie darauf dass eine Stromst rke von mind 5 Ampere ge w hrleistet ist 1 Koaxialkabel 10m Plusp...

Page 10: ...schalter Satelliten Satellitenauswahl rechts links Grundposition Best tigung LED Anzeigen SEARCH Suche SIGNAL Signal gefunden ERROR Fehlfunktion BLUETOOTH Bluetooth Funktion Anschluss am TV Receiver A...

Page 11: ...rdert eine klare Sicht auf den Satelliten um den Signa lempfang maximal auszunutzen Objekte wie B ume Br cken und gro e H user die sich im Einfallswinkel des Satelliten befinden f hren zu einem Verlus...

Page 12: ...L Leuchtet bei gefundenem Satelliten ERROR Leuchtet bei einer Fehlfunktion BLUETOOTH Leuchtet bei Verbindung Satelliten LED Astra 1 19 2 Ost Satelliten LED Astra 4 4 Ost Satelliten LED Eutelsat 9E 9 O...

Page 13: ...hsel nur m glich wenn die Antenne zuvor einen Satelli ten gefunden hat 5 Best tigen Sie die Satellitenauswahl mit der OK Taste oder warten Sie 3 5 Sekunden bis sich der Satellit automatisch einloggt 6...

Page 14: ...14 DEUTSCH 6 Ausleuchtzone Hinweis In den Randgebieten der Ausleuchtzone kann es zu Empfangsst rungen kommen Astra Hotbird Empfangsreichweite...

Page 15: ...t einer H he von max 14cm vorhanden sein ohne die Rotation der Emp fangseinheit zu st ren siehe roter Bereich der Grafik Im gelben Bereich d rfen keine Aufbauten vorhanden sein Fahrtrichtung 29 cm 31...

Page 16: ...en Sie auch die Koaxialkabel auf evtl Knicke Ausleuchtzone des Satelliten Satelliten sind in festen Positionen ber dem quator im Orbit positioniert Um die TV Signale zu empfangen muss der Empfangsort...

Page 17: ...Support 3 Klicken Sie auf Firmare Updates 4 W hlen Sie Satmex Flat 2 1 Schalten Sie die Antenne aus 2 Dr cken Sie auf das Feld Start 3 Schalten Sie die Antenne ein Hinweis 1 F r ein Firmware Update b...

Page 18: ...U P1 Das Steuerger t ist nun bereit f r das Firmware Update Klicken Sie auf Start Update um zu starten Anschlie end klicken Sie auf das Feld Pair um die Verbindung zwischen Mo bilger t und Steuerger t...

Page 19: ...nschlie end klicken Sie auf das Feld Pair um die den Update Vorgang zu starten Das Update ist erfolgreich abgeschlos sen Sie k nnen nun die Antenne wie gewohnt nutzen Die Aktualisierung kann einige Mi...

Page 20: ...upport downloads Hinweis Gewicht und Abmessungen sind nicht die absolut exaktenWerte Technische Daten k nnen ohne vorherige Ank ndigung jederzeit ge ndert werden Antennen Typ Flachantenne Anzahl der T...

Page 21: ...21 DEUTSCH Notizen...

Page 22: ...Version 1 1 New Line Trading UG haftungsbeschr nkt Nelkenweg 23 D 98617 Oberma feld Grimmenthal Technische nderungen Druckfehler und Irrt mer vorbehalten 70592344 705923...

Page 23: ...Satmex Flat 2 user manual...

Page 24: ...2 Installation on the roof 06 2 3 Gluing instructions 06 2 4 Indoor installation 08 2 5 Connecting the components 09 3 Control unit 3 1 Front view 10 3 2 Rear view 10 4 Satellite transmission 11 5 Sa...

Page 25: ...of the procedures in this manual If you have not performed similar operations on comparable equipment do not attempt to perform these procedures The satellite antenna system is the most innovative an...

Page 26: ...top box and sup plied the antenna with electricity Note The antenna also has another connection for a second set top box For the cor rect connection of the components refer to the wiring diagram on p...

Page 27: ...Warning Please also note that the antenna changes the vehicle height accor dingly Please be sure to follow the individual points of the installation instruc tions General Makesureyouhaveasuitableplac...

Page 28: ...vehicle is sufficiently stable In the case of insufficient or doubtful roof stability a sheet of approx 2 mm thick with approx 100 x 100 cm must be fastened to the roof outer skin Inquire with your ve...

Page 29: ...on of the adhesive a sealing joint can be pulled around the antenna base Important The antenna must point with the motor unit in the direction of travel Important Do not glue the connection socket of...

Page 30: ...of a short circuit The yellow cable is connected to the ignition plus of the vehicle and also secured with a fuse of 7 amps this cable only needs to be connected if the antenna is to start automatical...

Page 31: ...in succession 12V DC via battery positive perma nent systems or optional DC power supply 230V 12V no charger Ensu re that a current is assured of at least 5 amps Coax cable 10m Positive pole Coax cabl...

Page 32: ...ht Main power Satellites Satellite selection up down Home position Confirm LED displays SEARCH Search SIGNAL Signal found ERROR Error BLUETOOTH Bluetooth function Connection for TV set top box Connect...

Page 33: ...ite to maximize the signal reception Objects such as large houses bridges and trees that block this view will cause a loss of signal The signal will be quickly restored once the antenna has a clear li...

Page 34: ...ights up when a satellite is found ERROR Lights up in the event of a malfunction BLUETOOTH Lights up when connected Satellite LED Astra 1 19 2 East Satellite LED Astra 4 4 East Satellite LED Eutelsat...

Page 35: ...Later a change is only possible if the antenna has found a satellite beforehand 5 Confirm the satellite selection with the OK button or wait 3 5 seconds until the satellite logs in automatically 6 Aft...

Page 36: ...Astra Hotbird Empfangsreichweite 14 ENGLISH 7 Foot print Note In the outlying areas of the footprint there may be interference...

Page 37: ...ght of max 14 cm without disturbing the rotation of the receiving unit see red area of the graphic In the yellow area no superstructures may be present Direction of travel 29 cm 31 cm Max pivoting ran...

Page 38: ...Also check the coaxial cable for kinks Footprint of the satellite Satellites are in fixed positions above the equator in orbit In order to receive the TV signals the receiving location must be within...

Page 39: ...st de 2 Click on Support 3 Click on Firmare Updates 4 Select Satmex Flat 2 1 Switch off the antenna 2 Press the Start field 3 Switch on the antenna Note 1 For a firmware update you absolutely need a s...

Page 40: ...k here on Smart IDU P1 The control unit is now ready for the firmware update Click on Start Update to start Then click on the Pair field to establish the connection between the mobile de vice and the...

Page 41: ...pdating the firmware Then click on the Pair field to start the update process The update has been successfully com pleted You can now use the antenna as usual The update may take a few minutes Step 7...

Page 42: ...l unit 236 x 31 x 135 mm W H D 10 Specifications Excerpt from the Declaration of Conformity Hereby New Line Trading UG haftungsbeschr nkt declares that the following product is in compliance with the...

Page 43: ...21 ENGLISH Notes...

Page 44: ...Version 1 1 New Line Trading UG haftungsbeschr nkt Nelkenweg 23 D 98617 Oberma feld Grimmenthal Technical changes misprints and errors reserved 70592344 705923...

Reviews: