background image

www.camplux.com

1

9

Visit Us: Camplux.com

support@camplux.com

3330-A Marathon Ct Charleston, SC 29418

1(844) 538-7475

Care Instructions

Using warm soapy water with a mild detergent wipe down all surfaces and areas 

of the appliance, taking care not to allow water to enter the burner outlets or 

aeration holes located in the burner tube.

DO NOT

 submerge the appliance in a sink or bowl.

DO NOT

 use abrasive cleaners or bleach.

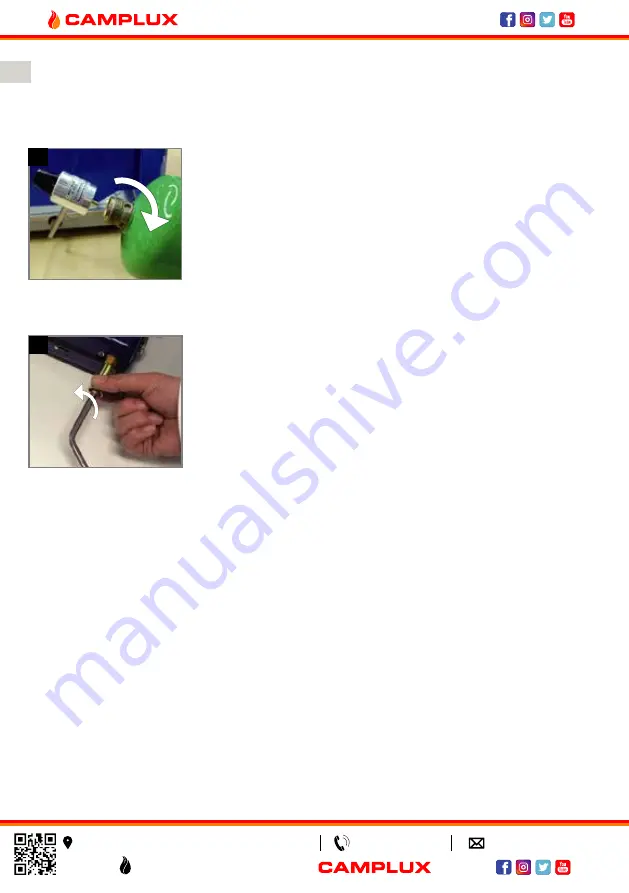
4. Disconnect gas cylinder and 

    gas regulator

Step 1.   Hold the gas regulator by hand, and hold 

             the 1 lb of gas cylinder by other hand. Screw 

             it anticlockwise to remove the gas cylinder.

Step 2.  Hold the gas inlet connector of the gas 

             regulator by hand, and hold the appliance by 

             the other hand, and screw it anticlockwise 

             until the gas inlet connector can be pulled 

             out.

2

1

Summary of Contents for JK-6320

Page 1: ...NT Read these instructions for use carefully Familiarise yourself with the appliance before connecting it to a gas container Keep these instructions for future reference Visit Us Camplux com support camplux com 3330 A Marathon Ct Charleston SC 29418 1 844 538 7475 MC 273087 ...

Page 2: ...utes before relighting the appliance again Failure to follow these instructions could result in fire or explosion which could cause property damage personal injury or death FOR YOUR SAFETY Do not store or use gasoline or other liquids with flammable vapors in the vicinity of this or any other appliance DANGER CARBON MONOXIDE HAZARD This appliance can produce carbon monoxide which has no odor Using...

Page 3: ...h the standard ANSI NFPA 58 This appliance must only be serviced by an authorised service agent return to your place of purchase for service and repair DANGER During operation all surfaces will be extremely hot and should not be touched or handled Do not use the appliance if it is leaking damaged or does not operate properly Handle with care even after brief use always pick up using the legs not t...

Page 4: ...ng or moving the appliance Appliance is to be used on a stable level flat non flammable surface The appliance should be protected from direct drafts and in a well ventilated place Only cooking vessels with a minimum diameter of 7 8inch and a maximum of 8 7inch are to be used with this appliance Take care that the primary air intakes located on the burner tube of this appliance are not obstructed o...

Page 5: ... or incorrect operation If symptoms such as flaring of the burner issues with lighting damages to hoses or connections or leaks from seals or gas controls are identified do not attempt to repair contact with your dealer for service and maintenance Changing Gas Cylinder To check if gas remains in the cylinder disconnect from the appliance and hold the cylinder in a vertical position then shake from...

Page 6: ...t with no overhead cover B Within a partial enclosure that includes an overhead cover and no more than two walls C Within a partial enclosure that includes an overhead cover and more than two walls the following must apply 1 At least 25 of the total wall area is completely open 2 30 or more in total of the remaining wall side back and front wall areas is open and unrestricted 3 In the case of balc...

Page 7: ...Visit Us Camplux com support camplux com 3330 A Marathon Ct Charleston SC 29418 1 844 538 7475 Understanding Your Appliance Gas Inlet Gas Regulator Gas Control Wind Shield Gas Inlet Trivet Piezo Ignition Burner Drip Tray ...

Page 8: ...lly designed LP gas regulator assembly supplied with the appliance Step 1 Attach the gas cylinder to the regulator Step 2 Check that the gas controls are in the OFF position Step 3 Take the regulator and attach to the gas inlet on the appliance tighten up using fingers Step 4 Check the connections for leaks with soapy water if a leak is detected remove the gas cylinder wait for any excess gas to d...

Page 9: ...urn Step 2 Depress the piezo button firmly and look for a spark from the electrode positioned above the burner Step 3 If the burner does not ignite turn the gas control in the clockwise direction to the OFF position and allow the residual gas to disperse before attempting to reignite the burner 3 Adjusting Flame Step 1 Turn the gas control in an anti clockwise direction to achieve a higher flame a...

Page 10: ...eration holes located in the burner tube DO NOT submerge the appliance in a sink or bowl DO NOT use abrasive cleaners or bleach 4 Disconnect gas cylinder and gas regulator Step 1 Hold the gas regulator by hand and hold the 1 lb of gas cylinder by other hand Screw it anticlockwise to remove the gas cylinder Step 2 Hold the gas inlet connector of the gas regulator by hand and hold the appliance by t...

Page 11: ...a stove shall be constructed and marked in accor dance with the specifications for LP gas cylinders of the U S Department of Transportation or Transport Canada the Standard for Cylinders Spheres and Tubes for the Transportation of Dangerous Goods CAN CSA B339 F When the LP gas supply cylinder is not disconnected from the stove the stove and cylinder shall be stored outdoors in a well ventilated sp...

Page 12: ...Visit Us Camplux com support camplux com 3330 A Marathon Ct Charleston SC 29418 1 844 538 7475 ...

Page 13: ...PORTANT Lisez bien les instructions d utilisation Familiarisez vous avec l appareil avant de le brancher avec le conteneur à gaz Gardez ces instructions comme référence dans le futur Visit Us Camplux com support camplux com 3330 A Marathon Ct Charleston SC 29418 1 844 538 7475 MC 273087 ...

Page 14: ...pareil encore une fois Ne pas suivre ces instructions pourrait provoquer un incendie une explosion qui pourrait entrainer des dommages de propriétés des blessures physiques ou le décès POUR VOTRE SÉCURITÉ Ne stockez pas et n utilisez pas de l essence ou tous autres liquides contenants des vapeurs inflammables au voisinage de cet appareil ou de tout autre appareil DANGER RISQUE DU MONOXYDE DE CARBO...

Page 15: ...aration DANGER Durant le fonctionnement toutes les surfaces seront extrêmement chaudes et ne doivent pas être touchées ou manipulées N utilisez pas l appareil en cas de fuite dommage ou mal fonctionnement Manipulez l appareil délicatement après une utilisation brève soulevez le toujours à l aide des poignées et non pas le bouteille Il est possiblement risqué d essayer de brancher d autres types de...

Page 16: ...manipulant ou en déplaçant l appareil L appareil doit être utilisé sur une surface stable équilibrée et non inflammable L appareil devrait être protégé des courants d air directs et doit être placé dans un endroit bien ventilé Seul les ustensiles de cuisine ayant un diamètre minimum de 7 8 pouces et un diamètre maximum de 8 7 pouces peuvent être utilisés sur cet appareil Assurez vous que les tuyau...

Page 17: ... symptômes tels que le torchage du gaz des problèmes de briquet des dégâts des tuyaux ou des connexions ou fuites des joints du contrôleur de gaz n essayez pas de les réparer contactez votre prestataire de service et de maintenance Changement De La Bouteille A Gaz Afin de vérifier s il reste du gaz à l intérieur de la bouteille débranchez la de l appareil et maintenez la bouteille verticalement pu...

Page 18: ...s sans plafond B Au sein d un espace partiellement clos qui inclut un plafond mais qui n a pas plus que deux murs C Au sein d un espace partiellement clos qui inclut un plafond et plus de deux murs ce qui suit doit être respecté 1 Au moins 25 de la totalité des murs doit être complétement ouverte 2 30 du reste de la totalité des zones à côté en avant et en arrière des murs représentent des zones o...

Page 19: ...pport camplux com 3330 A Marathon Ct Charleston SC 29418 1 844 538 7475 Comprendre Le Fonctionnement De l Appareil Gas Inlet Gas Regulator Régulation de gaz Pare brise Entrée de gaz Trépied Allumage sous pression Brûleur Disque de gouttelette ...

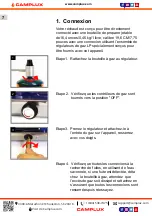
Page 20: ...conçus pour être fournis avec cet appareil Etape1 Rattachez la bouteille à gaz au régulateur Etape 2 Vérifiez que les contrôleurs de gaz sont tournés vers la position OFF Etape3 Prenez le régulateur et attachez le à l entrée du gaz sur l appareil resserrez avec vos doigts Etape 4 Vérifiez que toutes les connexions à la recherche de fuites en utilisant de l eau savonnée si une fuite est détectée dé...

Page 21: ...ton piézo fermement et recherchez une étincelle au niveau de l électrode positionné au dessus du bruleur Etape3 Si le bruleur ne s allume pas tournez le contrôleur de gaz dans le sens des aiguilles d une montre vers la position OFF et laissez le gaz résiduel se disperser avant d essayer de rallumer le bruleur 3 Ajuster La Flamme Etape 1 Tournez le contrôleur de gaz dans le sens contraire aux aigui...

Page 22: ...rant le fonctionnement si on note que la flamme d un bruleur est instable est en train de changer de couleur du bleu au jaune ou possède une odeur distinguée il est primordial que vous emmenez l appareil chez votre agent local autorisé à réparer les appareils à gaz pour qu il soit inspecté 4 Débrancher La Bouteille à Gaz Régulateur de Gaz Etape1 Prenez le régulateur de gaz dans une main et prenez ...

Page 23: ...our les bouteilles d acier au gaz de pétrole liquéfié normes applicables aux bouteilles d acier Ballons et tubes de transport de marchandises dangereuses CAN CSA B339 F Lorsque les bouteilles d alimentation en gaz à basse pression ne sont pas coupées du four le four et la bouteille doivent être entreposés à l extérieur de la pièce dans des espaces bien ventilés et dans des endroits où les enfants ...

Page 24: ...Visit Us Camplux com support camplux com 3330 A Marathon Ct Charleston SC 29418 1 844 538 7475 ...

Reviews: