background image

Connect the water filling pipe to the machine correctly as described in the following 

instructions.

Connect filling tube to a water outlet with a ¾ threaded gas mouth. Make sure you

tighten it all the way down.  It should be connected to a cold water fitting. Make sure you 
place the provided filter "A". Use a pair of pliers to tighten the ring nut all the way down. In 
models with AQUASTOP th filter is included in the threaded ring nut. 

Connection with hot water is not always advisable especially when washing very dirty 

dishes, since the cycle duration is shortened.

With the use of hot water (max. 60°C) the duration of the programmes is considerably 

shorter.

If the filling pipe is too short, contact a technical service centre for an extension or for 

a new pipe

If the pressure in the plumbing circuit exceeds 10 bar a pressure reducer will be 

required upstream from the filling pipe

After each cycle, it is advisable to close the water tap. If the appliance will not be 

used for a long period of time, unplug it and close the water tap. 

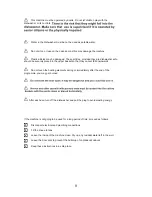
The machine can also be supplied with hot water up to a temperature of 60°C.

NO

YES

YES

6

Summary of Contents for DW814EW

Page 1: ...USE AND MAINTENANCE INSTRUCTIONS FOR BUILT IN DISHWASHERS ISTRUZIONI D USO E MANUTENZIONE PER LAVASTOVIGLIE AD INCASSO ...

Page 2: ......

Page 3: ...uickly and safely Give special attention to observance of safety suggestions Keep this book for future reference In the event of sale or transfer of the machine to another user ensure that the booklet always goes with the machine so that the new user can use it safely The following symbols are used in the booklet DEAR CUSTOMER EXPLANATION OF SYMBOLS USED Attention electrical voltage Danger of deat...

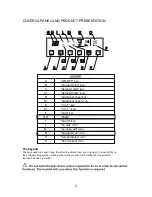
Page 4: ... recorded ON OFF key programming key delayed start key delayed start icon additional rinse key additional rinse icon 3 in 1 key 3 in 1 icon start key digits alarm icon no salt icon no rinse aid icon programmes icon temperatures icon door locked icon A B C C1 E D D1 F E1 G H I N L M P O CONTROL PANEL AND PRODUCT PRESENTATION ON OFF 65 50 40 70 A B C1 D1 E1 I L G H M N O P C D E F The keypad 2 ...

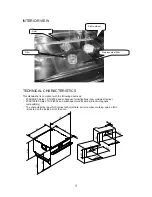
Page 5: ...bsequent modifications Low voltage directive magnetic compatibility TECHNICAL CHARACTERISTICS 558 460 450 560 560 560 560 85 90 85 90 85 90 598 448 457 450 548 20 The characteristics tag which carries technical data serial number marking and so forth is located on the inside part of the door 3 2004 108 EC dated 15 12 2004 and subsequent modifications Electro ...

Page 6: ...t the power cord so that the appliance can no longer be used Disable the door lock so that children cannot get trapped inside All of the machines are carefully checked in the factory by means of a complete functional check Therefore traces of water may be left in the tub Width 558 mm Height 447 mm Max depth 54 5 mm Dimensions Depth with door open 960 mm Voltage 230V Electrical connection Frequency...

Page 7: ...nd that the diameter of the attachment hole is at least 4 cm If you use the end fitting make sure it is secured to the sink and or tie it with a cord The end must not be immerged in the water to prevent the backflow of water into the tub see figure see figure Drain connection Make sure that the connection to the plumbing system is easily accessible To avoid the risk of clogging or damage if the pi...

Page 8: ...s not always advisable especially when washing very dirty dishes since the cycle duration is shortened With the use of hot water max 60 C the duration of the programmes is considerably shorter If the filling pipe is too short contact a technical service centre for an extension or for a new pipe If the pressure in the plumbing circuit exceeds 10 bar a pressure reducer will be required upstream from...

Page 9: ... at the plug end Contact an authorized technical service centre Make sure that during installation the cord does not come into contact with hot surfaces Connect the machine to a power outlet with a suitable earth connection connected to an AC electrical network at 230 V 6 Make sure that the electrical system that the appliance is connected to is sized for the maximum power as shown on the characte...

Page 10: ...on again the cycle will continue normally after about a minute This dishwasher is intended only for washing household dishes and cutlery Do not use it for purposes other than those for which it was designed Unauthorized use may cause damage A damaged appliance is dangerous Cut off both the electrical and the water supply and call technical service The appliance is manufactured in compliance with s...

Page 11: ... that they cannot fall downwards Do not touch the heating elements during or immediately after the end of the programme you may get burned After each use turn off the dishwasher and pull the plug to avoid wasting energy If the machine is not going to be used for a long period of time proceed as follows Disconnect electrical and plumbing connections Fill the rinse aid tank Leave the inside of the m...

Page 12: ...pplied to the appliance Contact your local water company or technical service To keep rust from forming add salt prior to starting a wash cycle Always use since other salts such as table salt contain insoluble additives that may damage the water softener The container holds about 1 kg of salt Open the door all the way At this point the plug of the salt container will be uncovered Detach the basket...

Page 13: ...The mixture of water and detergent must not get into the salt container as this would compromise the operation of the regeneration system In this case the guarantee would no longer be valid Re insert the basket and attach it to the door liner placing it in the housing see figure Immediately start a short programme e g quick wash This will remove all traces of salt in the tub see programme setting ...

Page 14: ...d prevents the formation of stains and calcium deposits Rinse aid is required to make sure that water does not adhere and leave stains on dishes during drying The rinse aid tank is located on the inside of the door see figure ed on the door of the dishwasher and is Rinse aid is poured into the special container locat picked up automatically see figure The container has a capacity of approximately ...

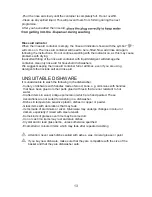
Page 15: ... unadvisable to wash the following in the dishwasher Cutlery or dishware with handles made of wood bone e g old knives with handles that have been glued or other parts glued with resin that are not resistant to hot water Crafted items in wood antique porcelain or which are hand painted These decorations are not suited for washing in a dishwasher Dishes in temperature sensitive plastic dishes in co...

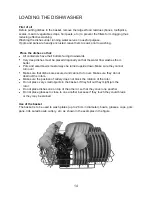
Page 16: ...Pots and salad bowls must always be turned upside down Make sure they cannot turn over Make sure that dishes are secured and cannot turn over Make sure they do not obstruct the rotors Make sure the position of cutlery does not block the rotation of the rotor Do not place very small objects in the basket If they fall out they might jam the rotor Do not place dishes one on top of the other or so tha...

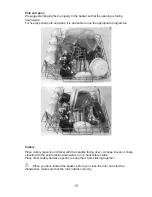
Page 17: ...ots and pans Cutlery Place cutlery spoons and forks with the handles facing down Arrange knives or sharp utensils with the points facing downwards or in a horizontal position Place other cutlery between spoons to keep them from sticking together When you have loaded the basket before you close the door and start the dishwasher make sure that the rotor rotates correctly 15 ...

Page 18: ...ss of the city water exceeds that indicated by the detergent manufacturer it is essential to add salt and rinse aid in the appropriate dispensers to prevent white streaks on the dishes or on the tub If you use only these products it is normal that the salt and rinse aid indicator lights remain on steady after a certain number of cycles When you use these products in addition to the selected progra...

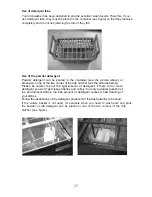
Page 19: ...rgent tabs they must be placed in the container see figure so that they dissolve completely and do not risk jamming the rotor if they fall If the cutlery basket is not used for example when you need to wash pots and pans the powder or tab detergent can be placed in one of the two corners of the drip catcher see figure ...

Page 20: ...l go off and the machine will then be ready for operation Do not touch the keypad during this brief period Open the water ta The display will light up and will show P0 The machine is now ready to be programmed Select water hardness Adjustment of regeneration phase To learn how to adjust the water softener refer to the following water hardness table Close the door a mechanical click will let you kn...

Page 21: ...hwasher leaves the factory set at phase 2 The sequence of operations is the following 1 Door closed 2 Push button 3 Selection of regeneration phase this usually occurs during the first cycle after product installation 4 Selection of the rinse aid dosing 5 The user chooses the program by pushing the programming button until the chosen 6 The dishwasher leaves the factory set at phase A1 This operati...

Page 22: ...ws steady In this case the entire programming sequence must be repeated Once the programme has been set press the key The corresponding icon will come on Elimination of this option when the machine is not yet running is possible by pressing the same key The corresponding icon goes off Check the programme table to see when this option is feasible If you use powder or tab detergent with the 3 in 1 f...

Page 23: ...ing the door the cycle will resume where it left off after a delay of about 50 seconds If the door is not opened and you press the ON OFF key by accident press ON OFFto start the cycle again Proceed as in the previous phase After closing the door press the ON OFFbutton to restart the machine The delayed start function will not be deactivated Do not force opening by grasping the sides of the stainl...

Page 24: ...m number of programmes and the options that are possible For setting them refer to the paragraph on Starting the dishwasher Programmes Display visuals Programme 1 P1 Programme 2 P2 Programme 3 P3 Programme 4 P4 Programme 5 P5 Programmes P1 P2 P3 Description 50 C Eco 70 C Intensive 65 C Normal Programme running Washing at 50 C Hot rinse at 68 C Drying Washing at 70 C Intermediate rinse Intermediate...

Page 25: ... off When the display is off by pressing the ON OFF button the display will show 0 indicating the end of the programme By pressing the ON OFF button again the machine will be switched off At this point if the icon is switched off you can open the door see previous instructions close the water tap and wait a few minutes before extracting the dishes since they are hot which will also offer improved ...

Page 26: ...ne off and back on again using the ON OFFbutton Then proceed with re programming Before proceeding with this operation make sure that the dishwasher is disconnected from the electrical power supply and that a wash cycle has not just ended otherwise the inside of the tub might still be hot To keep the dishwasher working efficiently you will need to clean the filter assembly regularly To clean the f...

Page 27: ...e door When the door is opened the drip catcher plate is extracted along with the chest and prevents water from dripping onto the floor and furniture Before opening the door comply with the instructions and warnings contained elsewhere in the booklet The drip catcher plate Extraction of the basket from the dishwasher and removal of drip catcher If you need to extract the basket from the dishwasher...

Page 28: ...Reposition the drip catcher plate by putting the wheels into their special guides on the bottom of the tank slide the drip catcher inside with its plates stacked closed by inclining it so that the plastic teeth can cross the rim of the tank making sure that the plastic teeth are secured to the stop limit on the edge of the tank take out the second plate fasten the drip catcher to the door check th...

Page 29: ...since there may be a build up of food residues which could cause unpleasant odours For internal cleaning do not use solvents or abrasive substances as they may damage the tub Use a cloth soaked in lukewarm water and neutral soap or a special product for dishwashers If during cleaning of the filter and micro filter you find fat or tartar deposits in the well it is advisable to wash it thoroughly wi...

Page 30: ...e by following these instructions If your water distribution system is suited for it this dishwasher can be connected to a hot water supply source max 60 C for further savings Make sure the basket is full without being overloaded and without any empty spaces for more economical washing Use the right amount of detergent Choose the programme that is best suited to the type of load The choice of prog...

Page 31: ...ave done the following take note of the message displayed by the diagnostics system plug the plug out of the socket close the water tap E0 Check that the water tap is open the filter in the water fill pipe is not clogged the water fill pipe does not have any chokes E1 Check that the water tap is open the filter in the water fill pipe is not clogged the water fill pipe does not have any chokes E2 T...

Page 32: ... the excess liquid with a cloth Possible causes Power outage No water arrives Possible causes A whining sound of the pump is insignificant There may be too much detergent or a detergent without phosphates If it persists contact technical service Possible causes The rotor strikes the dishes Dishes have not been properly arranged in the baskets Possible causes Generated by water distribution it has ...

Page 33: ...re not suitable for machine washing Possible causes The dishes were removed from the machine prior to the end of the drying cycle The dishes were in the dishwasher too long Possible causes The glasses are not suitable for machine washing Possible causes Insufficient amount of detergent Wash cycle temperature too low Detergent is old hardened or of poor quality Possible causes The covers are not ma...

Page 34: ...If the problem persists after these checks contact the nearest authorized service centre Provide the appliance model the defect discovered and the serial number printed on the characteristics tag 32 ...

Page 35: ...Normalized load of basket NOTES ON COMPARATIVE TESTING 2 1 3 2 4 2 4 4 5 4 8 1 3 1 5 3 5 1 3 1 3 7 2 1 2 5 4 5 4 5 2 3 33 ...

Page 36: ...34 ...

Page 37: ...truzioni attentamente esse danno informazioni sulla sicurezza sul fun zionamento e sulla sua manutenzione Osserva particolarmente i consigli di sicurezza Conserva questo libretto in modo da poterlo consultare in seguito In caso di vendita o di trasferimento trasloco della macchina ad altro utilizzato re assicurati che il libretto accompagni sempre la macchina per permettere al nuovo proprietario d...

Page 38: ...chiesto per impo stare funzioni particolari All interno del libretto troverai quando questa funzio ne è richiesta LEGENDA A tasto ON OFF B tasto PROGRAMMAZIONE C tasto PARTENZA RITARDATA C1 icona PARTENZA RITARDATA D tasto RISCIACQUO SUPPLEMENTARE D1 icona RISCIACQUO SUPPLEMENTARE E tasto 3 IN 1 E1 icona 3 IN 1 F tasto START G H DIGITS I icona ALLARME L icona MANCANZA SALE M icona MANCANZA BRILLAN...

Page 39: ...ttiva bassa tensione 2004 108 EC del 15 12 2004 e successive modifiche Compatibilità elettromagnetica La targhetta caratteristiche con i dati tecnici numero di serie marcatura ecc si trova posizionata nella parte interna della porta 558 448 457 450 598 548 20 560 85 90 560 560 560 460 450 85 90 85 90 Girante Filtro Contenitore del sale Filtro inox 37 ...

Page 40: ...ntazione in modo che l apparecchio non possa essere riutilizzato Rendi non funzionante il bloccoporta in modo che i bambini non possano acciden talmente chiudersi all interno Smaltimento delle vecchie apparecchiature In caso di smaltimanto di una vecchia apparecchiatura consegnala ad un centro di raccolta differenziata in conformità art 44 D L G S N 22 97 Tutte le macchine vengono accuratamente co...

Page 41: ...endo le istruzioni citate nel foglio di installazio ne in modo particolare assicurati che non sia piegato che non sia in contatto con superfici calde che l altezza da terra sia corretta e che il diametro del foro di attacco sia almeno di 4 cm Se utilizzi il terminale di raccordo assicurati che sia agganciato al lavello e o provvedere a legarlo con un cordino L estremità non deve essere immersa in a...

Page 42: ...hina può essere alimentata anche con acqua calda fino a 60 C L allacciamento ad acqua calda non è sempre consigliabile specie se si lava no stoviglie molto sporche in quanto la durata dei programmi è accorciata Con l utilizzo dell acqua calda max 60 C la durata dei programmi è sensibil mente più corta Se il tubo di carico è corto rivolgiti ad un centro di assistenza per una even tuale prolunga o ca...

Page 43: ... scollegare la spina dalla presa a muro Assicurati che durante tutto il periodo dell installazione la presa di corrente sia scollegata Fai attenzione che durante l installazione il cavo non vada in contatto con superfici ad alta temperatura In caso di danneggiamento del cavo di alimen tazione fallo sostituire da un Tecnico Qualificato Allaccia la macchina ad una presa munita di contatto di terra con...

Page 44: ... l operazione è fatta correttamente il ciclo proseguirà regolarmente dopo circa un minuto di attesa Se l operazione di apertura porta viene eseguita con la lavastoviglie pro grammata con partenza ritardata dopo aver chiuso la porta per riavviare la macchina è necessario premere il tasto ON OFF La funzione non verrà disattivata Questa lavastoviglie è destinata esclusivamente per il lavaggio di stov...

Page 45: ...avastoviglie dovrebbero se possibile essere piazzati sicuramente nella ra strelliera in modo che non possano cadere Non toccare la resistenza durante o direttamente dopo la fine del programma ti potresti bruciare Non lasciare la porta aperta perché potrebbe costituire un ostacolo sul quale potresti inciampare Coltelli e altri utensili con estremità appuntite devono essere caricati nel ce stello por...

Page 46: ...noscere la durezza dell acqua di rete a cui è allacciata la macchina Chiamate quindi la compagnia della distribuzione dell acqua o rivolgetevi al Servizio Assistenza Tecnica Riempimento del contenitore del sale all avvio della macchina Per evitare formazioni di calcare carica il sale prima di iniziare il primo ciclo di lavaggio Utilizza sempre sale grosso adatto per lavastoviglie poiché altri sali...

Page 47: ...ttatura del contenitore dal sale che eventualmente è traboccato dal contenitore Avvita il tappo con cura La miscela di acqua e detersivo residua sul fondo della vasca non deve penetrare nel serbatoio del sale poiché ciò comprometterebbe il funzionamento dell impianto di rigenerazione In questo caso la garanzia non è valida Reinserire il cestello ed agganciarlo alla controporta collocandolo nell ap...

Page 48: ...illanti perché migliora l asciugatura ed impe disce la formazione di macchie e depositi calcarei Esso è necessario per assicu rare che l acqua non aderisca e lasci macchie sulle stoviglie durante il processo di asciugatura Il serbatoio del brillantante è posto all interno della porta vedi foto Il brillantante è versato nell apposito contenitore posto sulla porta della lavastovi glie ed è prelevato...

Page 49: ...o detersivi che contengono sale e brillantante 3 in 1 STOVIGLIE INADEGUATE E sconsigliato di lavare in lavastoviglie posate o stoviglie con manici in legno osso es vecchi coltelli con manico che è stato incollato o altre parti incollate con resine non resistenti alla temperatura dell acqua oggetti di artigianato in legno porcellane antiche o dipinte a mano Queste deco razioni non sono adatte per i...

Page 50: ...re devono essere sempre capovolte ed assicurati che non si possano rovesciare Assicurati che stoviglie siano ben ferme e non possano ribaltarsi e che non osta colino la rotazione della girante Assicurati che la posizione delle posate non sia tale da bloccare la rotazione della girante Non introdurre nel cestello stoviglie o oggetti di dimensioni ridotte possono ca dere dal cestello o fuoriuscire d...

Page 51: ...ramma apposito Posate Sistema le posate cucchiai e forchette con i manici rivolti verso il basso Sistema i coltelli o utensili appuntiti con le punte rivolte verso il basso o in posizione oriz zontale Intercalare cucchiai con altre posate per evitare che si addossino fra loro Dopo aver caricato il cestello inseriscilo nella lavastoviglie prima di chiudere la porta assicurati la corretta rotazione ...

Page 52: ...ersivo sale e brillantante Questo tipo di detersivo è utilizzabile fino ad una durezza dell acqua di rete di circa 20dH 35df Se la durezza dell acqua di rete è superiore a quanto indicato dal produttore di detersivo è indispen sabile aggiungere sale e brillantante negli appositi contenitori per evitare la formazione di striature bianche sulle stoviglie o sulla vasca Se si usano solo questi prodotti...

Page 53: ...modo da permette re un completo scioglimento ed evitare che cadendo possano bloccare la girante Utilizzo del detersivo in polvere Detersivi in polvere possono essere versati sia nella vaschetta del portaposate vista sopra oppure direttamente in uno dei due angoli del gocciolatoio vedi foto Dosare la giusta quantità di detersivo se si eccede non si otterranno stoviglie più pulite solo maggiore inqu...

Page 54: ...si accendono tutti i segmenti per circa 2 secondi Successivamente si spegne e la macchina è pronta per il suo funzionamento Ti raccomandiamo di non toccare la tastiera durante questo breve periodo La prima operazione Chiudere la porta un clic meccanico ti segnalerà la chiusura corretta Aprire il rubinetto dell acqua premere il pulsante ON OFF Il display si illumina e indicherà P0 a questo punto la...

Page 55: ...a durezza dell acqua vedere in capitolo Problemi e soluzioni La terza operazione Selezione del brillantante La lavastoviglie esce dalla fabbrica impostata sulla fase A1 Avviene esclusivamente con porta chiusa e con display indicante P0 tramite la pressione prolungata 3 circa del tasto partenza ritardata Display mostra A1 Per variare i parametri della quantità di brillantante in aumento premere il ...

Page 56: ... possibile con programma non ancora avviato tra mite la pressione del tasto corrispondente e la ripetizione delle operazioni Per cancellare la partenza ritardata a macchina avviata premere il tasto partenza ritardata la lavastoviglie parte normalmente eseguendo il programma precedentemente avviato Rince plus o risciacquo aggiuntivo Una volta impostato il programma sfiorando il tasto rince plus si a...

Page 57: ...emere il tasto ON OFF e spegnere la macchina Poi utilizza l apposita maniglia situata sul fronte della macchina Apertura della porta a programma già avviato operazione sconsigliata Premere il tasto ON OFF a lungo circa 3s il display mostrerà P più il programma selezionato lampeggiante Attendere lo spegnimento dell icona e poi agisci l apposita maniglia situata sul fronte della macchina Dopo la ric...

Page 58: ... l apertura ti permetterà di afferrare la maniglia interna apri la porta tirando la maniglia verso l esterno per la chiusura ripeti le operazioni in senso inverso Nota per quanto riguarda avvertenze ed accorgimenti attenersi ai paragrafi prece dentemente descritti in effetti il funzionamento elettromeccanico rimane lo stesso PROGRAMMI DI LAVAGGIO In questa tabella riassuntiva figurano il numero mass...

Page 59: ...mali Residui abbondanti anche essiccati da non usare per pezzi delicati Residui anormali o abbondanti da non usare per pezzi delicati Programmi P4 P5 Descrizione Quick wash 40 C Forte 70 C Svolgimento del programma Lavaggio a 40 C Risciacquo intermedio Risciacquo caldo a 70 C Asciugatura Lavaggio a 70 C Risciacquo intermedio Risciacquo caldo a 70 C Asciugatura Detersivo SI SI Brillantante SI SI Op...

Page 60: ...erà la macchina A questo punto se l icona è spenta è possibile aprire la porta vedere istruzioni citate in precedenza chiudere il rubi netto dell acqua attendere qualche minuto prima di estrarre le stoviglie in quanto scottano e nello stesso tempo si otterrà una miglior asciugatura Mancanza di alimentazione elettrica In caso di mandanza di alimentazione elettrica il programma si interrompe e al ri...

Page 61: ...a scollegata dall alimentazione elettrica e che non sia terminato da poco un ciclo di lavaggio l interno della vasca potrebbe risultare ancora caldo Filtro e microfiltro Per avere la lavastoviglie sempre efficiente è necessario pulire il gruppo filtrante regolarmente Per pulire il gruppo filtrante procedere come segue ruota in senso antiorario il filtro ed estrarlo dalla sua sede estrai e togliere il fi...

Page 62: ...lie Per una maggior sicurezza è agganciato direttamente alla porta Con l apertura della porta il piatto gocciolatoio viene estratto unitamente al cestello ed evita il gocciola mento di acqua verso il pavimento e verso i mobili Prima di aprire la porta attenersi alle istruzioni ed alle avvertenze citate in prece denza Estrazione del cestello dalla lavastoviglie e sganciamento gocciola toio Qualora ...

Page 63: ... si deve riposizionare nella lava stoviglie non introdurre nella lavastoviglie il cestello senza il piatto gocciolatoio Riposiziona il piatto gocciolatoio facendo si che le ruote appoggino nelle apposite guide sistemate sul fondo della vasca infilare il gocciolatoio con i piani accatastati chiusi inclinandolo fino a far oltre passare la soglia della vasca i denti di plastica facendo si che i denti i...

Page 64: ...tanto in tanto con una spugna umida le guarnizioni in quanto c è possibi lità di ristagno di residui di cibo causano cattivi odori La pulizia interna Per la pulizia interna non impiegare ne solventi ne sostanze abrasive in quanto potrebbero danneggiare la vasca Utilizza un panno imbevuto di acqua tiepida e sapone neutro o con un prodotto specifico per lavastoviglie Se durante la pulizia del filtro e...

Page 65: ...uo utilizzo di acqua ed ener gia potrai ottenere il massimo dal tuo apparecchio seguendo queste istruzioni se il tuo sistema di distribuzione dell acqua è adatto questa lavastoviglie può essere collegata all alimentazione di acqua calda max 60 C per ulteriore economia assicurati che il cestello sia completo senza sovraccarico o senza spazi vuoti per un lavaggio più economico utilizza una corretta ...

Page 66: ... se guente modo prendere nota del messaggio visualizzato dal sistema di autodiagnosi staccare la spina dalla presa di corrente elettrica chiudere il rubinetto di erogazione acqua Codice anomalia Descrizione E1 Manca acqua Verificare che il filtro presente nel tubo di carico acqua non sia ostruito il tubo di carico acqua non presenti strozzature E2 La lavastoviglie non scarica Verificare che il tubo fl...

Page 67: ...rante scontra le stoviglie Le stoviglie non sono sistemate bene nei cestelli Rumore di battito della valvola du rante il caricamento dell acqua Generato dalla distribuzione dell acqua non ha alcuna inci denza sul funzionamento meccanico dell apparecchio Rime diare a questo tipo di rumore è impossibile La rotazione della girante è difficile La girante è bloccata per residui di alimentazione Resta de...

Page 68: ...qua di risciacquo è troppa Il tappo del sale non è stretto Stoviglie e bicchieri danneggiati Natura e processo di fabbricazione dei bicchieri e delle stovi glie Inadeguate per il lavaggio in macchina Composizione chimica del detersivo utilizzate detersivo nel cui imballo è indicato per l utilizzo in lavastoviglie Temperatura dell acqua e durata del programma scelto Selezionate un programma più cor...

Page 69: ...NOTE PER LE PROVE COMPARATIVE Metodologia di caricamento secondo EN 50242 Carico normalizzato del cestello 67 ...

Page 70: ...llo 1 Cucchiaini da caffè 2 Cucchiaini da dessert 3 Cucchiai 4 Forchette 5 Coltelli 7 Cucchiaio da salsa 8 Forchetta da portata Capacità 6 coperti standard Programma comparativo 1 Eco 50 Detersivo di riferimento 18 g 2 1 3 2 4 2 4 4 5 4 8 1 3 1 5 3 5 1 3 1 3 7 2 1 2 5 4 5 4 5 2 3 68 ...

Page 71: ......

Page 72: ...12300124191 ...

Reviews: