background image

If the motor, light are working together, or only motor is working, pushing A, 
automatic switch off timer is on, and it will delay 15 minutes to turn off the 
motor and light. To push B or D to adjust the time, and to push A again to 
stop the timer. 


FUNCTION KEYS: (Fig.24, Fig.26) 

A == Infrared Remote Control 
B == Timer (Automatic Shut Off) 
C == Digital Display

Timer/Speed) 

D == Speed F1/Cycle Control Adjustment/Off 
E == Light 
When key B is pressed, digital display screen will display 15 minutes. For 
cycle control adjustment and Speed F1 press key D. To stop the operation 
press key B again the digital display screen will show 00. If using remote 
control press “OFF” button. 
When key D is being pressed, the digital display screen will show F1 and 
speed 1 will ON. To stop F1 function press key D until the digital display 
screen shown 00. 
The F2, F3 Or F4 (Turbo) function can be adjusted thru key D. 
For ON/OFF light press key E. 
When the appliance and light are ON together or separately, press key B the 
Automatic Stop Timer will start the 15 minutes count down. Key D can also 
be used to extend the time of Automatic Stop Timer. To stop the Automatic 
Stop Timer Function before 15 minutes time frame, press key B again. 
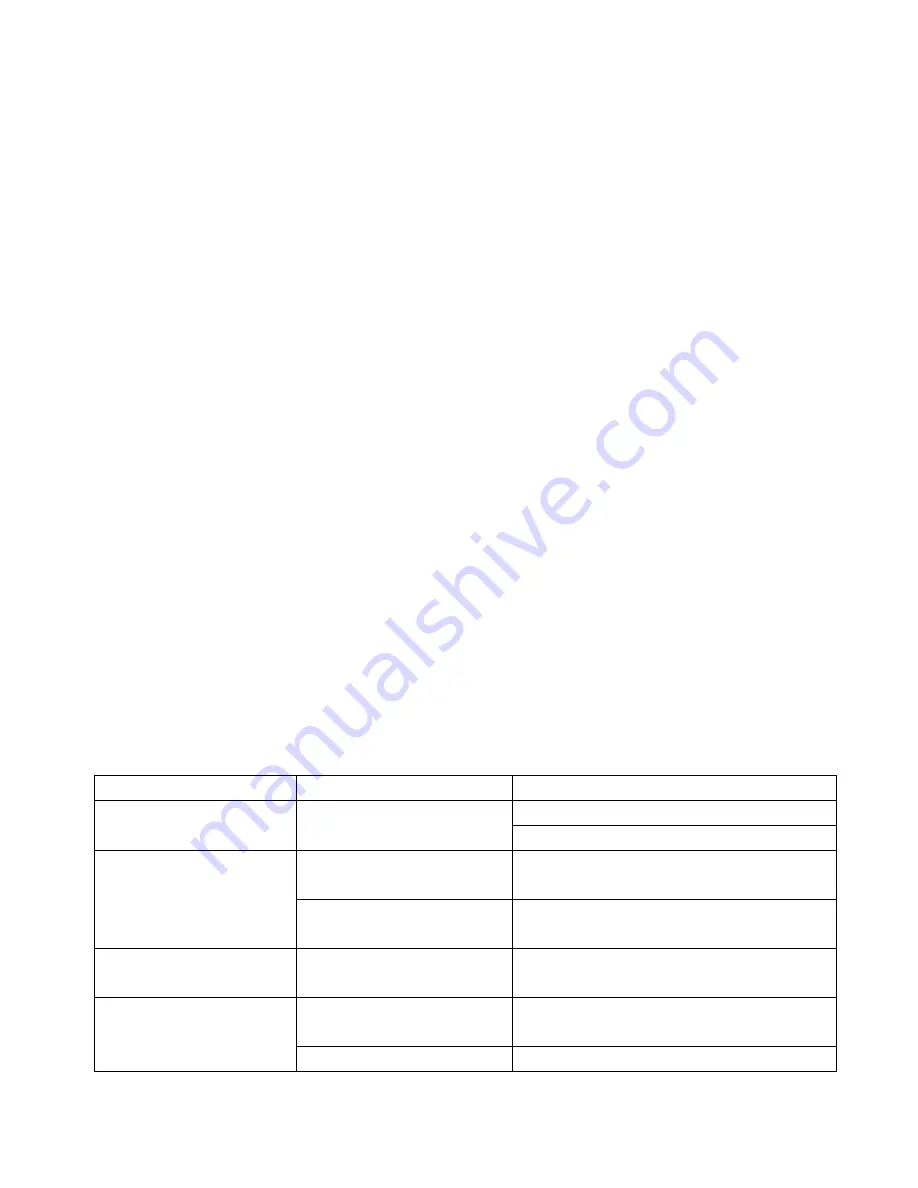
 

Troubleshooting 
 

Problem   

Possible reason   

Solution   

Hood doesn’t work 

No electric supply 

Check the plug is connected 
Check the main switch is turned on 

Poor airflow 

Aluminum grease 
filters clogged 

Clean the filters and replace when 
dry 

Charcoal filters 
clogged   

Replace the charcoal filters 

Motor running but no 
air flow 

Butterfly valve jammed  Contact technician 

Motor cuts after a 
few minutes 

High temperature 
safety device activated 

The kitchen is not sufficiently 
ventilated 

The hood is installed  The hood must be least 65cm from 

Summary of Contents for KI590TSL

Page 1: ...USE AND CARE GUIDE ISLAND HOOD ...

Page 2: ...Fig 1 Fig 2 Fig 3 Fig 4 Fig 5 ...

Page 3: ...Fig 6 Fig 7 Fig 8 Fig 9 ...

Page 4: ...Fig 10 Fig 11 Fig 12 Fig 13 A B Fig 14 Fig 15 ...

Page 5: ...Fig 16 Fig 17 Fig 18 Fig 19 Fig 20 Fig 21 Fig 22 Fig 23 Fig 24 ...

Page 6: ... hood is operating simultaneously with an open fireplace or burner that depend on the air in the environment and are supplied by other than electrical energy as the cooker hood removes the air from the environment which a burner or fireplace need for combustion The negative pressure in the environment must not exceed 4Pa 4x10 5 bar Provide adequate ventilation in the environment for a safe operati...

Page 7: ...ire hazard E Constantly check food frying to avoid that the overheated oil may become a fire hazard F Disconnect the electrical plug prior to any maintenance G This appliance is not intended for use by young children or infirm persons without supervision H Young children should be supervised to ensure they do not play with the appliance I There shall be adequate ventilation of the room when the ra...

Page 8: ...port surfaces of the cooking pots on the cooker top and the lowest part of the cooker hood must be at least 65 cm If a connection tube composed of two parts is used the upper part must be placed outside the lower part Do not connect the cooker hood exhaust to the same conductor used to circulate hot air or for evacuating fumes from other appliances generated by other than an electrical source Befo...

Page 9: ...itive blocking of the upper part of structure B Take the lower part of the telescopic structure C and insert it into the upper structure B Adjust the height Fig 5 by referring to the amounts indicated in and block it using the 8 unit screws G that are supplied Fig 4 Suction version fix the flexible pipe to the prepared air evacuation hole Fig 6 Take the upper chimney piece and fix it with 4 unit s...

Page 10: ...tions in particular the active carbon filter The anti grease filters capture the grease particles suspended in the air and are therefore subject to clogging according to the frequency of the use of the appliance In order to prevent fire hazard it is recommendable to clean the filter at a maximum of 2 months by carrying out the following instructions Remove the filters from the cooker hood and wash...

Page 11: ...the bulb Use a one edged screwdriver or any other appropriate tool to lift and remove the overhead light fixture Replace the damaged lamp Use only halogen lamps as the original specification avoiding contact with hands Return the light fixture to its position snap fastening Fig 15 COMMANDS Fig 16 A OFF B SPEED I OFF C SPEED II OFF D SPEED III OFF E LIGHT If your appliance does not have the INTENSI...

Page 12: ...same as above table At the same time indicated light will flash on the each function key buttons To stop the speed function press key A If Speed 3 is required press key C adjust At Speed 3 program both key B and key C indication light will flash on each function key button To on the light press key E To off the light press key E again When the appliance and light are ON together or separately pres...

Page 13: ...t will flash on each function key button If Speed 4 function is available when Speed 4 function is ON key C and D indication light will flash If using Remote Control press the key To on the light press key E To off the light press key E again When the appliance and light are ON together or separately press key A the Automatic Stop Timer will start the 15 minutes count down Indication light on the ...

Page 14: ...by pushing the key C or E To stop the alarm push the key F And to cancel the alarm set then push the key F for 3 seconds Push the key G the light is on and it shows on the digital display and push the G again to turn off the light COMMANDS Fig 23 A Timer automatic shut off B Speed 1 adjust switch off C digital display screen showing timer and speed D Speed 3 adjust switch off E Light When pushing ...

Page 15: ...ess key D until the digital display screen shown 00 The F2 F3 Or F4 Turbo function can be adjusted thru key D For ON OFF light press key E When the appliance and light are ON together or separately press key B the Automatic Stop Timer will start the 15 minutes count down Key D can also be used to extend the time of Automatic Stop Timer To stop the Automatic Stop Timer Function before 15 minutes ti...

Page 16: ...il dripping onto stove Oil cup missing or not installed Remove aluminum filter and replace oil cup Aluminum grease filter saturated Wash the aluminum grease filters Whirring sound Something in contact with fan blade Contact with technician THE MANUFACTURORY DECLINES ALL RESPONSIBILITY FOR EVENTUAL DAMAGES CAUSED BY BREACHING THE ABOVE WARNINGS ...

Reviews: