background image


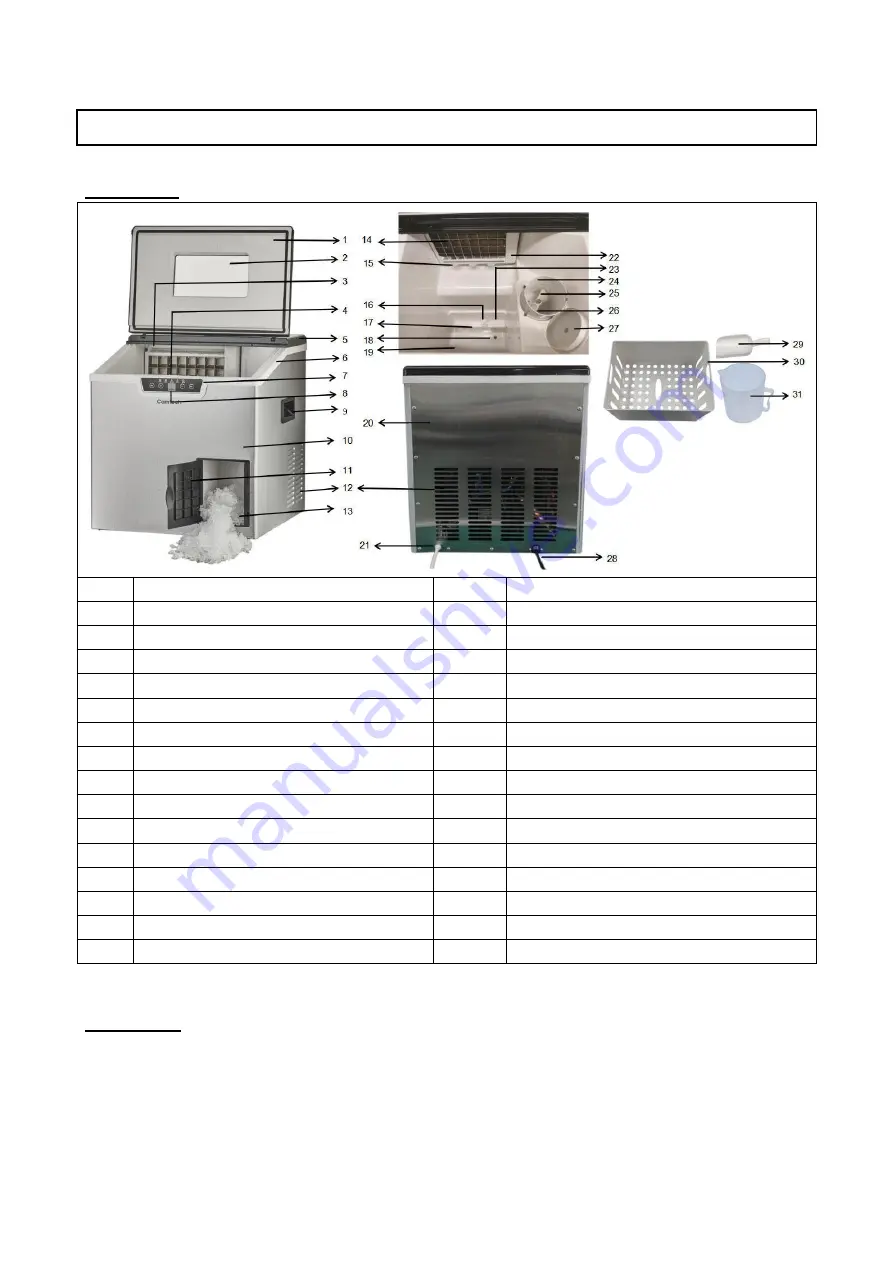
Beschrijving 


Voorpaneel 

17 

Isolatieplaat 

Kijkvenster 

18 

Aftapplug 

Spuitslang 

19 

Max. watervullijn 

IJsmand 

20 

Achterdeksel 

Achterpaneel 

21 

Waterinlaatopening 

Middenframe 

22 

Verdamperframe 

Bedieningspaneel 

23 

Waterafzuigopening 

LCD-scherm 

24 

Kom voor schaafijs 

Hendel 

25 

Schaafblad 

10 

Behuizing 

26 

Mes 

11 

Decoratieve deur 

27 

Deksel van de kom 

12 

Ventilatordeksel 

28 

Stroomkabel en stekker 

13 

Schaafijsuitlaat 

29 

Schep 

14 

Verdamper 

30 

Ijsmand 

15 

IJsvol sensor 

31 

IJsbeker van 500ml 

16 

Drijfbol 


Specificaties 


IJsmachine

                                                  ZBS-20B                                                    Nederlandes


180 watt ijsmaker 

30 watt ijsschaver 

220-240V~ 50-60Hz 

Kubusblokies 

Verstelbare ijsmaat 

R290 koelmiddel 

Watertank van 1.8 lite 

Capaciteit tot 15 kg ijs /24 H 

Voeg waterindicator toe 

Indicator volle ijsbak 

ijsschaver ice-functie 

Wateraansluiting 

Summary of Contents for ZBS-20B

Page 1: ...Machine gla ons ZBS 20B Mode d emploi Instruction manual Gebruiksaanwijzing...

Page 2: ...26 Couteau 11 Porte d corative 27 Couvercle du r servoir 12 Couvercle du ventilateur 28 Cordon d alimentation et prise 13 Sortie de glace pil e 29 Pelle glacon 14 vaporateur 30 Panier glace 15 Capteu...

Page 3: ...ant au moins deux heures 5 V rifiez que la tension indiqu e sur la machine glace correspond la tension de votre habitation 6 L utilisation d eau pure n est pas autoris e avec cette unit nous recommand...

Page 4: ...nd du panier glace Si vous pr f rez remplir l eau automatiquement ins rez le tuyau d eau dans la prise situ e l arri re de l unit comme indiqu ci dessous Sch ma tape 1 Sch ma tape 2 tape 3 Branchez la...

Page 5: ...r finir retirez le tuyau Entretien 1 Nettoyez la zone o l eau ou la glace sont r guli rement touch es Pendant le nettoyage d branchez l unit et retirez les gla ons Utilisez une solution dilu e base d...

Page 6: ...avec l appareil Le nettoyage et l entretien ne doivent pas tre effectu s par des enfants sans supervision 9 ATTENTION utilisez de l eau en bouteille ou du robinet de bonne qualit uniquement Ne rempli...

Page 7: ...s et appos sur le produit indique que ce dernier appartient la cat gorie des quipements lectriques et lectroniques et ne doit donc pas tre mis au rebut avec les autres d chets domestiques ou commercia...

Page 8: ...Housing 26 Knife 11 Decoration door 27 Bowl cap 12 Fan Cover 28 Power Cord and Plug 13 Shaved ice outlet 29 Scoop 14 Evaporator 30 Ice basket 15 Icefull sensor 31 Shaved Ice Collecting Cup 500ml 16 W...

Page 9: ...please wait 2 hours after positioning it and keep the front lid open for at least 2hours 5 Ensure that the voltage indicated on the ice maker corresponds with the voltage in your home 6 Pure water is...

Page 10: ...et If you prefer to fill the water automatically then insert the water pipe into the socket at back of the unit as sketch above Step 3 Connect to the power Step 4 Press button to turn unit on The ice...

Page 11: ...horoughly before starting 2 Keep ventilation openings in the appliance enclosure or in the built in structure clear of obstruction Do not use mechanical devices or other means to accelerate the defros...

Page 12: ...other means to accelerate the defrosting process other than those recommended by the manufacturer 12 WARNING Do not damage the refrigerant circuit 13 WARNING Do not use electrical appliances inside th...

Page 13: ...of its useful life The Waste of Electrical and Electronic Equipment WEEE Directive 2002 96 EC has been put in place to recycle products using best available recovery and recycling techniques to minim...

Page 14: ...0 Behuizing 26 Mes 11 Decoratieve deur 27 Deksel van de kom 12 Ventilatordeksel 28 Stroomkabel en stekker 13 Schaafijsuitlaat 29 Schep 14 Verdamper 30 Ijsmand 15 IJsvol sensor 31 IJsbeker van 500ml 16...

Page 15: ...t moet u 2 uur na het plaatsen van de ijsmachine wachten en het voorpaneel minstens 2 uur open laten 5 Zorg dat de aangegeven spanning op de ijsmachine overeenkomt met de spanning in uw huis 6 U mag g...

Page 16: ...de aansluiting aan de achterkant van het apparaat zoals hieronder aangegeven Diagram stap 1 Diagram stap 2 Stap 3 Sluit het apparaat aan op de stroomvoorziening Stap 4 Druk op knop om het apparaat aan...

Page 17: ...ebruik een verdunde oplossing van water en azijn om de binnenkant en de buitenkant van de ijsmachine te reinigen Spuit geen chemicali n of verdunde producten zoals zuren benzine of olie op de ijsmachi...

Page 18: ...RSCHUWING Gebruik geen mechanische apparaten of andere middelen om het ontdooiproces te versnellen behalve als die door de fabrikant worden aanbevolen 12 WAARSCHUWING Zorg dat het koelmiddelcircuit ni...

Page 19: ...niet meer bruikbaar is De Waste of Electrical and Electronic Equipment WEEE richtlijn 2002 96 EC is opgesteld om producten te recyclen met de beste beschikbare terugwinnings en recycling technieken o...

Reviews: