background image


14 

15.2. PILOT BURNER 

 
Turn the gas valve control knob counterclockwise to off position and allow the boiler to try for 
ignition. Observe the spark making sure that it is strong and continuous. 
 
If the spark is not acceptable the igniter will have to be removed. This can be readily 
accomplished by first removing the burners tray assembly from the boiler as detailed in 15.1.  
 
The spark gap should be 1/8” to 3/16”. Make sure that the electrode does not appear 
overheated or fouled with carbon. It may be necessary to clean the ignition electrode using 
sandpaper. Once the pilot appears to be properly set, reinstall it into the boiler making sure to 
properly tighten the pilot line connection. 
 
Once the spark is satisfactory, open the pilot gas and allow the pilot burner to light. Once air has 
been purged from the pilot line, the pilot flame should appear almost instantly at the initiation of 
spark. Cycle the pilot several times to confirm reliability. A properly set pilot will appear blue and 
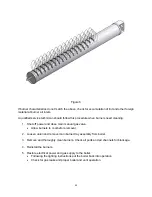
will engulf the ignition sensor and ground plate. (See figure 7) 


Figure 7 

 
Turn the gas control to “ON” and allow the main burner to light. The pilot must not extinguish. 
After running for 15 minutes, cycle the boiler to ensure that the pilot remains stable. 
 

Summary of Contents for BLUE-FLAME Series

Page 1: ...nce WHAT TO DO IF YOU SMELL GAS o Do not try to light any appliance o Do not touch any electrical switch do not use any phone in your building o Immediately call your gas supplier from a neighbour s p...

Page 2: ...9 WARNING REGARDING CHILLED WATER SYSTEMS 8 10 PIPING OF BOILER TO THE SYSTEM FIG 3 8 11 PLACING BOILER IN OPERATION 10 12 CHECK OUT OF IGNITION SYSTEM SAFETY SHUT OFF DEVICE 10 13 LOW WATER TEMPERAT...

Page 3: ...by the authority having jurisdiction the installation must conform to the Standard for Controls and Safety Devices for Automatically Fired Boilers ANSI ASME CSD 1 The qualified installer shall instru...

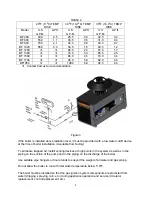
Page 4: ...to combustibles as follows TOP 12 SIDES 12 REAR 12 VENT 6 3 PROVIDE AIR FOR COMBUSTION AND VENTILATION Provisions for combustion and ventilation air must be in accordance with section 5 3 Air for comb...

Page 5: ...ff and remote controller use terminal strip provided inside control panel Refer to wiring diagram provided with boiler 5 GAS SUPPLY AND PIPING This boiler is intended to operate at inlet gas pressures...

Page 6: ...installations always consider the use of a shelter such as a garden shed in lieu of direct exposure of the appliance to the elements The additional protection afforded by the shelter will help to min...

Page 7: ...ove return doors windows exhaust fans fireplace dampers and any other gas burning appliance to their previous condition of use g Any improper operation of the common venting system must be corrected s...

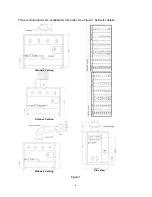
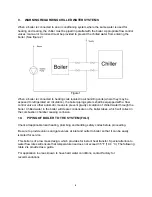
Page 8: ...6 Three venting options are available for this boiler See Figure 1 below for details Standard Venting Outdoor Venting Sidewall Venting Side View Figure 1...

Page 9: ...relief valve sized in accordance with ASME Boiler and Pressure Vessel Code Section IV Heating Boilers The relief valve is to be installed in the vertical position and mounted in the hot water outlet N...

Page 10: ...means to prevent gravity circulation of chilled water through the boiler Chilled water in the boiler will create condensate on the boiler tubes which will collect in the combustion chamber causing co...

Page 11: ...tion level it must be provided with a low water cutoff device at the time of boiler installation Available from factory To eliminate trapped air install venting devices at high points in the system as...

Page 12: ...ter level in expansion tank If level exceeds of tank volume air is still trapped in system Shut down boiler and continue to run pumps Within 3 days of start up recheck all air vents and expansion tank...

Page 13: ...e after 15 minutes c If the inlet temperature is less than 110 F slowly close outlet valve until the inlet temperature climbs to 110 F d If the inlet temperature is greater than 110 F but not greater...

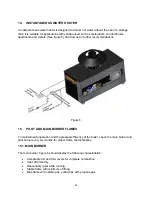
Page 14: ...ns Figure 5 15 PILOT AND MAIN BURNER FLAMES To maintain safe operation and the greatest efficiency of the boiler check the main burner and pilot burner every six months for proper flame characteristic...

Page 15: ...off power and close main manual gas valve Allow burners to cool before removal 2 Loosen union and remove main burner tray assembly from boiler 3 Remove and thoroughly clean burners Check all ports and...

Page 16: ...e ignition electrode using sandpaper Once the pilot appears to be properly set reinstall it into the boiler making sure to properly tighten the pilot line connection Once the spark is satisfactory ope...

Page 17: ...tion 15 of this manual After the first season of operation inspect the heat exchanger and venting Follow the detailed instructions in section 6 of this manual CAUTION Label all wires prior to disconne...

Page 18: ...ime to light the pilot if air is not present in the pilot line If pilot fails to light and you suspect air in the line close the main manual valve and repeat lighting steps 1 thru 5 7 Once the pilot l...

Page 19: ...lame Adjust if necessary Remove pilot and ensure that spark electrode is clean and properly located 5 Pilot lights but main burner does not fire Ensure that main firing valve is in OPEN position Check...

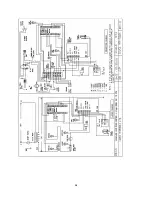
Page 20: ...CAL DIAGRAMS Each Blue Flame boiler will be provided with its own wiring diagram to guarantee that any options ordered with the unit are properly detailed The following diagrams 99 5020 and 99 5021 ar...

Page 21: ...19...

Page 22: ...20...

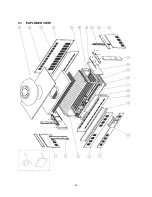
Page 23: ...21 21 EXPLODED VIEW...

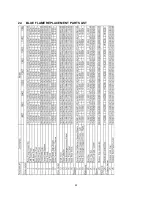
Page 24: ...22 22 BLUE FLAME REPLACEMENT PARTS LIST...

Page 25: ...standard warranty 2 Years six through ten replacement purchase price pro rated at the following schedule Year six 60 Year seven 65 Year eight 70 Year nine 75 Year ten 80 of the current list price of...

Page 26: ...uilt water heaters and heating boilers as well as a into every single unit For more information supplier of specialty HVAC products Our service line is open 24 hours 7 days a week on our innovative pr...

Reviews: