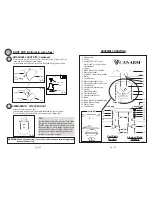
1. Wooden Joist
2. Ceiling
3. Approved (CSA for Canada
and UL for U.S.) ceiling fan box
(not provided)
4. J-Hook
5. Blade Bracket (Cast Metal)
6. Mounting Bracket
7. Outlet Box Screws (not provided)
8. Motor
9. Lock Washer
10. Mounting Bracket Screws
11. Mounting Bracket Side Screws
12. Lock Washer
13. Decorative Motor Housing
14. Hex Nut
15. Steel Flat Washer
16. Flat Fibre Washer
17. Fibre Bracket Gasket
18. Blade
19. Blade Bracket (Stamped Metal)
20. Blade Bracket Screws
21. Motor Screws
22. Lock Washer
Pg. #10
Pg. #3
ASSEMBLY DRAWING
1
7
6
4
3
2
10
9
8
11
16
15
22
14
13
12
18
18
5
19
20
17
21
22
16
15
20
Cast Blade
Brackets
Stamped Blade
Brackets
Style #1
Style #2
LIGHT KITS (Optional in some fans)
DETACHABLE LIGHT KITS (Continued)
- Place shades on light kit and secure with either screws, finger tight, or
push and turn for pop-off style shades.
- Install proper wattage and type of bulb identified on light kit or shade.
or
PERMANENTLY ATTACHED LIGHT
- Loosen thumb screws on light.
- Install proper wattage and type of bulb identified on light or shade.
- Place shade on light and secure with thumb screws, finger tight.
Shade
Thumb
Screw
Light Kit
Light Kit
Shade
Push and
Turn
7.
A
B
Fig. C
Fig. A
Fig. 9b
Glass
Fixture Socket
Spinner Nut
Tool
NOTE:
Electrical diagrams are for reference only. Light
kits that are not packed with the fan must be
CSA/UL Listed and marked suitable for use with
the model fan you are installing. Switches must
be CSA/UL General Use Switches. Refer to the
instructions packaged with the light kits and
switches for proper assembly.
WARNING: Check all connections, set screws and screws are securely tightened
before the next step.
Fig. 1
Fig. 9a
Fig. 9c
Fig. 9d


