background image

CANARM LTD.

2157 Parkedale Ave.

Brockville, Ontario

K6V 5V6

PH: 613-342-5424

FX: 613-342-8437

CANARM LTÉE.

2555 Rue Bernard Lefebvre

Laval, Quebec

H7C 0A5

PH: 450-665-2535

FX: 450-665-0910

CANARM 30 YEAR LIMITED WARRANTY

“THANK YOU” for purchasing a Canarm product.  It is our policy to furnish you 
with high quality products at a fair price.  With proper installation your fan should 
provide you with years of money saving comfort.

This fan is guaranteed to be free from defects in workmanship and material for a 

period of thirty (30) years from date of purchase.  Within the first (1) year from date 

of purchase any defective product should be returned to your RETAIL OUTLET 
along with proof of purchase.  For the balance of the warranty, twenty nine (29) 
years, the MOTOR WINDINGS ONLY, shall be free of defects.  We will correct such 
defects or replace the motor assembly at our option if the product is returned, 
FREIGHT PREPAID, to Canarm.  The returned fan must be accompanied by your 
proof of purchase and a cheque for $20.00 for handling and labour charges.  

All costs of removing and re-installing the product are YOUR RESPONSIBILTY.  
Damage to any part as such by accident, misuse, improper installation or by 

affixing any accessories IS NOT covered by this warranty.  As a result of varying 

climatic conditions in our area this warranty does not cover any changes in 

finishes, including rusting, pitting, corroding, tarnishing or peeling.

WARRANTY VOID:  In cases of alteration, abuse, installation not in accordance 
with instructions or REMOVAL of the cUL Sticker.

Summary of Contents for PACIFIC WIND

Page 1: ...N FOR 24 HOURS QUESTIONS OR CONCERNS CONTACT CANARM AT 1 800 265 1833 ENGLISH 1 800 567 2513 FRENCH Monday through Friday 8 00 a m to 5 00 p m EST IMPORTANT FOR YOUR RECORDS RECORD AND KEEP THE FOLLOW...

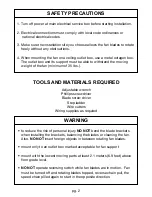
Page 2: ...IALS REQUIRED Adjustable wrench Phillips screwdriver Blade screw driver Step ladder Wire cutters Wiring supplies as required to reduce the risk of personal injury NO NOT bend the blade brackets when i...

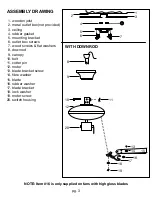
Page 3: ...7 wood screws flat washers 8 downrod 9 canopy 10 bolt 11 cotter pin 12 motor 13 blade bracket screw 14 fibre washer 15 blade 16 rubber washer 17 blade bracket 18 lock washer 19 motor screw 20 switch...

Page 4: ...downrod insert bolt through hole in shaft and downrod be careful not to damage or cut the fan wires secure bolt with cotter pin secure downrod in position by tightening jam screws and lock nut place...

Page 5: ...shers supplied through outer slots of mounting bracket and into the wood joist Leave one of the wood screws sufficiently loose to allow the safety cable to be looped around before final tightening 2 I...

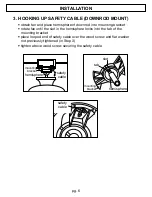
Page 6: ...tab of the mounting bracket place looped end of safety cable over the wood screw and flat washer not previously tightened in Step 3 tighten above wood screw securing the safety cable 3 HOOKING UP SAF...

Page 7: ...ll list of fan accessories 4 ELECTRICAL HOOKUP INSTALLATION NOTE Once ground wires are connected carefully tuck wires and marrette into the metal outlet box making sure that the wires are clear of the...

Page 8: ...ck wire from outlet box to black wire from fan plus red or blue wire using a marrette NOTE A red or blue wire would be power for a light kit if applicable NOTE Once ground wires are connected carefull...

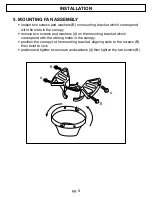
Page 9: ...th the slots in the canopy remove two screws and washers A on the mounting bracket which correspond with the oblong holes in the canopy position the canopy to the mounting bracket aligning slots to th...

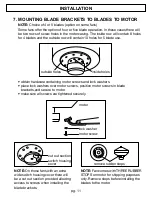
Page 10: ...ose fans with high gloss blades B MEDALLION STYLE BLADE BRACKETS obtain hardware package containing blade bracket screws and washers place fibre washer over screw place rubber washers in holes of blad...

Page 11: ...g motor screws and lock washers place lock washers over motor screws position motor screws in blade brackets and secure to motor make sure all screws are tightened securely NOTE On those fans with an...

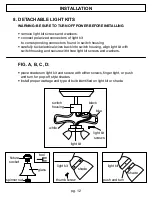
Page 12: ...k into switch housing align light kit with switch housing and secure with three light kit screws and washers FIG A B C D place shades on light kit and secure with either screws finger tight or push an...

Page 13: ...e into the fixture align slots in glass bowl with nipples on fixture Slide glass into loosened clip Assemble the other 2 clips to the fixture and then tighten all three nuts in place connect tassels t...

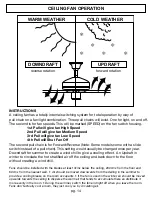
Page 14: ...to give a cooling effect An Updraft in winter to circulate the hot stratified air off the ceiling and back down to the floor without creating a wind chill Fans should be installed with the blades at...

Page 15: ...n period to eliminate noises Fan wobbles or shakes excessively check that all blades are screwed firmly into blade brackets check that all blade brackets are secured firmly to motor check distance fro...

Page 16: ...ith proof of purchase For the balance of the warranty twenty nine 29 years the MOTOR WINDINGS ONLY shall be free of defects We will correct such defects or replace the motor assembly at our option if...

Reviews: