ASSEMBLY INSTRUCTIONS FOR RDC STANDARD AND EP RACKS
1.
Material Verification:
Battery racks are shipped
unassembled with a complete set of related drawings and
documentation. Check received parts and quantities against
the rack’s bill of materials on provided drawings and/or
packing list. Do not assemble rack if parts are missing or
quantities are incomplete.
2.
Required Tools:
Torque wrench (0 to 65 ft.-lb.) with 9/16”
and 3/4” hex socket. Adjustable wrench or 9/16” and 3/4” box
wrenches, tape measure, square and leveling device. Note:
Consult manufacturer’s instructions for tools required to install
floor mounting hardware.
3.
Location of Rack Assembly:
When determining rack
location and floor anchoring pattern, use applicable drawings
provided with rack shipment. The optional arrangement
drawing, if ordered, should also be reviewed for rack and
battery cell placement. Consider boundaries and aisle
clearances when locating the general position of the rack.
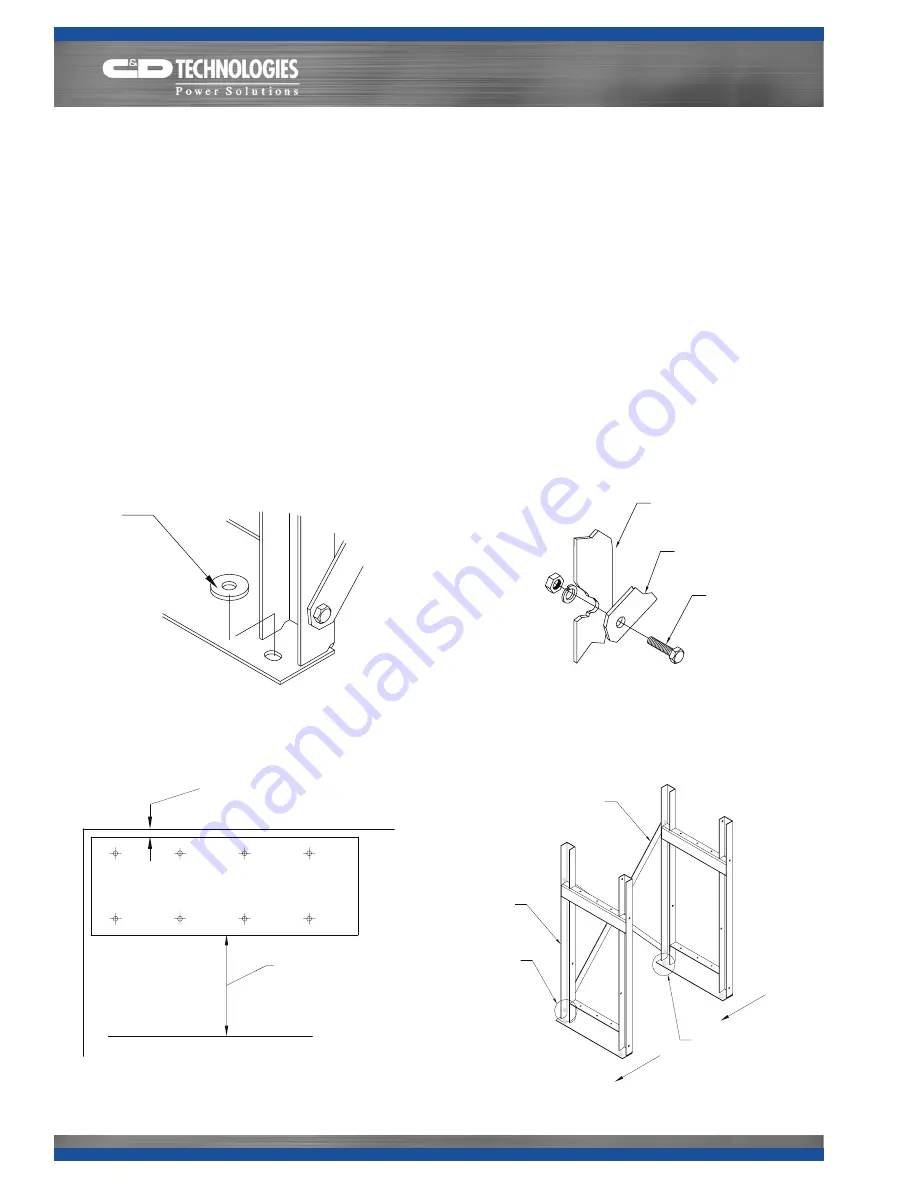
Locate floor mounting locations using provided drawings. See
Figure 3. Note: Floor mounting hardware must be determined
in accordance with applicable building codes. C&D does
not provide floor mounting hardware. SEE PAGE 7 & 8 FOR
LOCATION OF MULTI-RACK ARRANGEMENTS.
4.
Initial Assembly:
Anchor bolt washers (P/N RD05084 or
RD05100 for three tier racks) are supplied with the EP racks.
Each washer should be placed against the rack frame (see
Detail A). Place frames over the installed floor mounting
hardware, place the anchor bolt washers, and finger tighten
floor mounting hardware. All frames must face the same
direction. Install rear cross braces finger tight. See Figure 4
and Detail B. Do not install front cross braces at this time (if
required). Note: Cross bracing is used in all rear bays for EP1
racks (except for 2 step racks) and in all front and rear bays for
EP2 racks. Reference the rack assembly drawings included
in shipment for further details of the cross bracing pattern and
location for your specific rack model.
Anchor Bolt
Washer
Anchor Bolt Washer Installation
Initial Assembly
Rear Cross Brace(s)
Frame
Frame and Cross
Brace Connection
See Detail B
Floor Mounting
Hardware
See Detail A
Note Frame
Orientation
Frame Upright
Cross Brace
1/2-13 Bolt, Lock
Washer and Nut
Brace to Frame
connection (Reverse View)
DETAIL A
DETAIL B
FIGURE 3
FIGURE 4
RS02098/0114/CD
2
www.cdtechno.com
Rack Assembly Location
and Anchoring Hole Pattern
2.00" Typical Clearance Around
Existing Boundary
As Required Aisle
Clearance


