background image


The RED button is used for disarming from either home or away modes, so that there is no need for the owner to recall 
which mode the system has been armed in. 


The Panic feature is activated by pressing the GREEN & BLUE  buttons together.. This sets off the siren. 
To cancel “panic”, press the RED disarm button. 


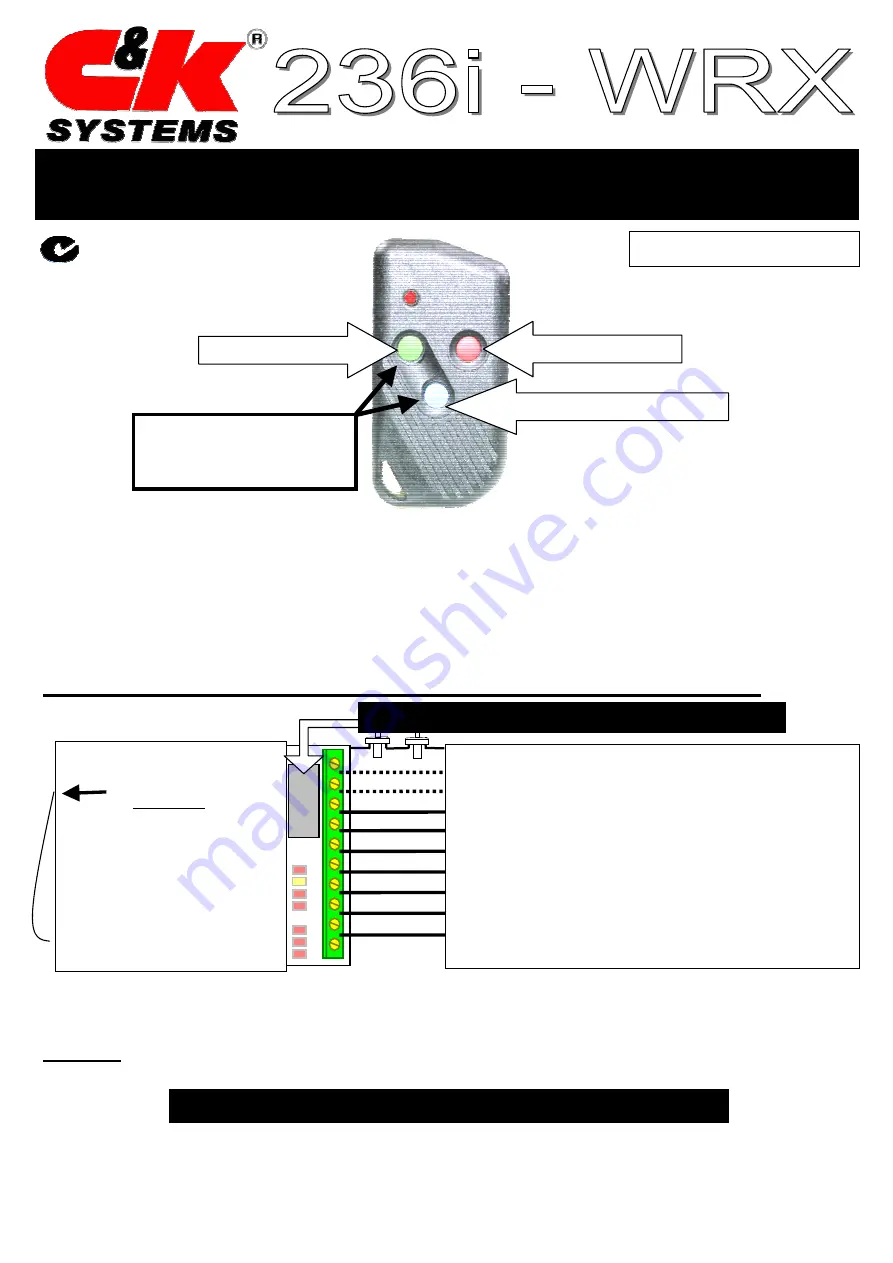
Wiring the 236i - WRX to your C & K 236i Panel 


Narrowband Wireless Receiver with 2 x Code Hopping Remote 

Controls  

Green: ARM 

Red: DISARM 

Blue: Activate HOME Mode 

To Activate Panic Mode, 

Press Green & Blue Buttons 

Together 

10: Fault Output (Supervision / Low Battery) - Zone 6
  9: Tamper Output (Open Case of PIR / Reed) 
  8: Available Wireless Zone Output - (Zone 5) 
  7: Wireless Smoke Sensor Output - (Zone 4)* 
  6: Wireless PIR Output  (Zone 3)* 
  5: Wireless PIR Output  (Zone 2)* 
  4: Wireless PIR Output  (Zone 1)* 
  3: Keypad Data Output - Connect to 

DATA


  2: Connect to 

C


  1: Connect to 

KEY+ 

Antenna Wir

e

Do Not Cut.  

Optimum operation 

range will be 

achieved when 

antenna is vertical & 

straight. Run the wire 

out of the top of your 

metal panel box. 

N517 

Build Date: 

Sticker showing User PIN Number (Refer to Page 2 for details).

• 

* When purchasing the 236i - WRX Kit, sensors supplied in the kit will be pre-programmed as detailed   

          above. 


NOTES:


1) Your 236i Panel should use the default Master PIN Number 1234. 


2) The 236i - WRX uses the fixed keypad address 11.  


1


3) The 236I - WRX already has inbuilt 2k2 end of line resistors, so no additional 

WARNING!  - Do Not Have Another Keypad On The Same Address


     resistors need to be configured on the zone panel inputs. 
4) You must enter the User PIN Number for your receiver, as detailed on Page 2. 

Summary of Contents for 236i-WRX

Page 1: ...4 6 Wireless PIR Output Zone 3 5 Wireless PIR Output Zone 2 4 Wireless PIR Output Zone 1 3 Keypad Data Output Connect to DATA 2 Connect to C 1 Connect to KEY Antenna Wire Do Not Cut Optimum operation...

Page 2: ...6 and push the key 1 3 Enter the 4 digit 236I WRX User Pin Number located on the white sticker near the connector on the receiver module and then push the key 4 Enter the new PIN again and push the ke...

Page 3: ...PROGRAMMING MODE 1 Press keep holding down the green left button until the LED lights begin to scroll again approx 5 seconds SELECTING THE CHANNEL YOU WISH TO PROGRAM IMPORTANT When programming make s...

Page 4: ...mote control on off 4 times in quick succession E Channel 1 light will stop flashing to confirm that the remote has been successfully learnt F To exit programming mode hold down the GREEN button until...

Page 5: ...amming mode again Learning a new detector into a channel which already had a detector learnt into that channel will erase the original detector code replace it with the new detector s code After learn...

Page 6: ...TURE MODE lights press the GREEN Button to select the desired Channel Zone that you wish to enable or disable supervision for as shown in diagram below FLASHING MODE LIGHTS indicate supervision is OFF...

Page 7: ...ill switch low for 2 seconds to indicate that the detector has a flat battery The tamper output will switch low for 2 seconds whenever the front case is removed and the tamper switch is released on a...

Reviews: