background image

02

SAFETY INSTRUCTIONS

Safety always comes first.  Please keep the following points in mind at all


times.

Read and follow this instruction guide completely before using your 

upper/lower body exerciser.

Keep this guide in a safe place and make sure everyone who uses the


machine also reads this guide.  Have a safe exercise.

CAUTION

Read, understand, and practice the precautionary and operating

instructions.  Know the limitations and hazards associated with using any

upper/lower body

 exercise device.  Observe the precautionary and

operational decals placed on the unit.

Exercise of a

 strenuous

 nature, as customarily done on this equipment,

should not be undertaken without first consulting a physician.  No specific

health claims are made or implied as they relate to the equipment.

Check unit before each use of determine all controls function normally.

Handle unit with care.  Inappropriate handling of the unit may adversely

affect its characteristics.

DO NOT permit any foreign materials or liquids to enter the unit.  Take care

to prevent any foreign materials including, but not limited to, inflammables,

water, and metallic objects from entering the unit.  These may cause unit

damage, malfunction, of personal injury.

DO NOT modify or remodel the unit.  This may cause unit damage,

malfunction, or personal injury.

If you have difficulty in operating the unit after carefully reviewing this

operator’s guide, contact your dealer for assistance.

Failure to use and maintain the 

upper/lower body exerciser

 in accordance with

the


instructions outlined in this manual will invalidate your warranty.

Know your heart rate and pulse, as well as your physician recommended

target heart rate training zone.  Monitor these during exercise.

Proper medical clearance is recommended for anyone beginning an

exercise program, especially if you are over 35 years of age or suffer from

heart or respiratory problems.

Summary of Contents for 10-0716

Page 1: ...Exer II The specification of this product may vary from this photo subject to change without notice PT21000 Owner s Manual...

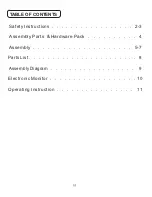
Page 2: ...01 Safety Instructions 2 3 Parts List 8 Assembly Diagram 9 Assembly Parts Hardware Pack 4 Assembly 5 7 Electronic Monitor 10 Operating Instruction 11 TABLE OF CONTENTS...

Page 3: ...mally Handle unit with care Inappropriate handling of the unit may adversely affect its characteristics DO NOT permit any foreign materials or liquids to enter the unit Take care to prevent any foreig...

Page 4: ...s unit only for its intended purpose as described in this manual This unit should only be used by one person at a time Do not put hands feet or any foreign objects on or near this unit when in use by...

Page 5: ...4 x 2 4pcs 18 Wall mount 4pcs 17 16 Open End Wrench Double Open End Wrench 1 5v AA Battery 1Pc Allen wrench Socket Head Screw M8x50L 4pcs Flat Washer 8 5x 16x1 5t 4pcs Nylon nut M8 4pcs 13 14 15 12 He...

Page 6: ...ASSEMBLY STEP 1 Attach Quick Release Knob 06 and Quick Release Pop Knob 07 and tighten Insert the Lower Upright Tube 09 into the Upper Upright Tube 08 and secure it with two Head screws 12 12 07 06 08...

Page 7: ...06 STEP 2 Attach the Main Unit to the Main Frame Mounting 11 Then secure it with four M8x50L Socket screws 13 four Flat washers 14 and four M8 Nylon nut 15 13 15 14 14 11 11...

Page 8: ...07 STEP 3 Secure the Main Unit to a level wall board with four Hex Head screw 16 four Flat washers 17 and four Wall mounts 18 Attach the Pedals 20 to the Crank 03 and tighten them 16 17 18 03 20 20...

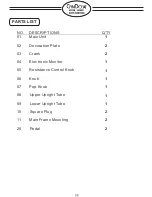
Page 9: ...Q TY 01 Main Unit 02 Decoration Plate 03 Crank 04 Electronic Monitor 05 Resistance Control Knob 06 Knob 07 Pop Knob 08 Upper Upright Tube 09 Lower Upright Tube 10 Square Plug 11 Main Frame Mounting 20...

Page 10: ...09 ASSEMBLY DIAGRAM 01 02 03 04 05 06 07 11 10 08 09 11 10 20 20...

Page 11: ...E A GOOD RESULT 4 BATTERY SPEC 1 5V AA 1PC ELECTRONIC MONITOR FUNCTION BUTTON MODE RESET PRESS TO SELECT FUNCTIONS RESET OR HOLD ON CAN BE TOTAL RESET FOR ALL FUNCTION VALUES FUNCTIONS STOP WHEN STOP...

Page 12: ...is to control the amount of resistance applied during exercise Turn the Resistance Control Knob clockwise for a more difficult workout and count clockwise for a less difficult workout It is recommend...

Reviews: