background image

6

IMPORTANT NOTES AND PRECAUTIONS FOR USE


CAUTION

: In order to avoid a hazard 

due  to  inadvertent  resetting  of  the 

thermal  cutout,  this  appliance  must 

not be supplied through an external 

switching device, such as a timer, or 

connected to a circuit that is  regularly 

switched on and off by the utility.

•  Ensure that the appliance is switched 

off before replacing the lamp to avoid 

the possibility of electric shock..

•  The cookers can be equipped with a 

small  compartment  under  the  oven 

that  can  be  used  for  storing  things


Remember that the surfaces become 

hot,  it  is  strictly  forbidden  to  place 

inflammable materials inside.

• 

Do not

 use a steam cleaner to clean 

a hob, oven or range.

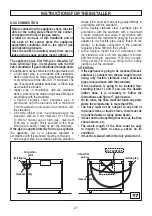
•  If  the  range  is  placed  on  a  base, 

measures must to be taken to prevent 

the appliance slipping off the base.

• 

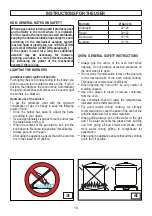
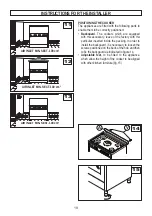
If the appliance is fitted with a glass 

lid,  this  can  shatter  when  heated. 

Turn off all the burners or disconnect 

all the plates, and allow them to cool 

before closing the lid  (fig.3)

•  Avoid using the oven as a larder or as a 

saucepan cupboard when you are not 

using it for cooking: if the oven is turned 

on accidentally it could cause damage 

and accidents.

•  If  you  are  using  an  electrical  socket 

near the appliance, make sure that the 

cables are not touching the cooker and 

are far enough away from all hot parts.

 • The  means  for  disconnection  must 

be  incorporated  in  the  fixed  wiring  in 

accordance with the wiring rules.

•  The instructions state the type of cord 

to  be  used,  taking  into  account  the 

temperature of the rear surface of the 

appliance.

•  This  appliance  must  be  installed  in 

accordance with the regulations in force 

and only used in a well ventilated space. 

Read the instructions before installing 

or using this appliance.• 

When 

you have finished using the appliance 

check that all the controls are in the off 

or  closed  position,  checking  that  the 

“0” of the knob corresponds to the “

” 

symbol serigraphed on the front panel.

•  Switch off the electrical supply before 

you  start  cleaning  or  servicing  the 

appliance.

•  In the case of a failure or malfunction, 

turn  the  appliance  off  and  switch  off 

the electrical supply and do not tamper 

with it. All repairs or adjustments must 

be carried out with maximum care and 

the  proper  attention  of  an  authorised 

person. 

•  For this reason we recommend you call 

our Service Centre.

•  The  use  of  a  gas  cooking  appliance 

results  in  the  production  of  heat  and 

moisture  in  the  room  in  which  it  is 

installed.  Ensure  that  the  kitchen  is 

well ventilated: keep natural ventilation 

holes  open  or  install  a  mechanical 

ventilation device (mechanical extractor 

hood).    Prolonged  intensive  use  of 

the  appliance  may  call  for  additional 

ventilation,  for  example  opening  of  a 

window,  or  more  effective  ventilation, 

for  example  increasing  the  level  of 

mechanical ventilation where present.

•  These  instructions  are  only  valid  if 

the  country  symbol  appears  on  the 

appliance.  If  the  symbol  does  not 

appear on the appliance, it is necessary 

to  refer  to  the  technical  instructions 

which  will  provide  the  necessary 

instructions concerning modification of 

the appliance to the conditions of use 

of the country».

Summary of Contents for CCG9M52PX

Page 1: ...gb INSTRUCTIONS AND ADVICE FOR INSTALLING USING AND SERVICING OF COOKERS 461308198_001 07 2013 ...

Page 2: ...ust therefore be delivered to a waste recycling centre specifically for electric and electronic equipment or returned to the retailer at the moment of purchase of a new equivalent appliance The user is responsible for delivering the appliance to the appropriate collection centre at the end of its useful life Failure to do so may result in a fine as provided for by laws governing waste disposal Dif...

Page 3: ...bel affixed on the appliance as well as on its original packaging A duplicate data label is contained in this booklet also Please attach this label on the handbook or to an accessible surface near by the appliance for easy reference This information enables the technical assistant to come and visit you with the correct spares and guarantee a prompt and suitable service You will only find original ...

Page 4: ...sibleforanydamagetopersons or property resulting from an incorrect installation maintenance or use of the appliance Oncethepackaginghasbeenremoved fromtheoutersurfacesandthevarious inner parts thoroughly check that the appliance is in perfect condition If you have any doubts do not use the appliance and call in an authorised person The packaging materials used cardboard plastic bags polystyrene fo...

Page 5: ...the wall with hooks Ensurethechainsaretaut Pleaserefer to instructions for installation Before cooking for the first time ensure the oven is empty and its door closed heattheovenatmaximumtemperature for two hours This will allow the protective coating on the interior of the oven to be burnt off and dissipate the associated smells Ensure adequate ventilation in the cooker whilst burning off and don...

Page 6: ...of cord to be used taking into account the temperature of the rear surface of the appliance This appliance must be installed in accordancewiththeregulationsinforce andonlyusedinawellventilatedspace Read the instructions before installing or using this appliance When you have finished using the appliance check that all the controls are in the off or closed position checking that the 0 of the knob c...

Page 7: ...afe use of the appliance the combined and alla electrical cookers have equipped with a safety temperature device which automatically turns on in case the main thermostat fails to work In such an event the electricity is interrupted temporarily do not attempt to repair it yourself but turn the appliance off and contact your nearest Assistance Centre The oven walls are fitted with various runners fi...

Page 8: ... on for all functions Fan on Top and bottom heating elements on Top and bottom heating elements and fan on Bottom heating element and fan on Rear heating element and fan on Grill spit heating element on Grill heating element and fan on RED WARNING LIGHT If present when lit it indicates that one or more of the hob electric plates is on if the hob is mixed or one of the oven electric components YELL...

Page 9: ...of cooking time with push button 6 the AUTO and symbols will turn on and stay on all the time At the end of the set time the symbol will turn off the AUTO symbol will flash and the buzzer will go off Automatic operation with the start of cooking time delayed First programme cooking time both the AUTO and symbol will turn on and then the end of cooking time the symbol will turn off as described pre...

Page 10: ...or each burner see the table below and fig 4 When the content of the pan start to boil turn the knob down to Reduced rate position small flame Always put a lid on the pan After using the appliance ensure that all the controls are in the closed or off position Burners Ø pan cm Ultrarapid 22 24 Rapid 20 22 Semi rapid 16 18 Auxiliary 12 14 INSTRUCTIONS FOR THE USER OVEN GENERAL SAFETY INSTRUCTIONS Al...

Page 11: ...heating unit and its heat is distributed by the fan This function is particularly recommended to defrost and warm up ready made meals FAN REAR HEATING COMBINED COOKING Turn the selector knob to the symbol and set the thermostat knob to the desired temperature then place your food the oven If oven needs pre heating wait till the thermostat yellow led turns off before placing foods inside it This fu...

Page 12: ...ith flour or bread crumbs If the biscuits will not come away from the baking tray put the tray back in the oven for a while and lift the biscuits up before they cool The next time use a sheet of baking parchment to prevent this happening again Meat If when cooking meat the time needed is more than 40 minutes turn the oven off 10 minutes before the end of cooking time to exploit the residual heat e...

Page 13: ...170 190 190 200 190 200 15 20 40 45 CAKES Angel cake Fruit cake Chocolate cake 0 8 0 8 0 8 3 3 3 190 200 200 52 65 45 170 190 190 200 190 200 45 65 45 The values given in the tables temperatures and cooking times are approximate and may vary according to each person s cooking habits This table gives cooking times on only one shelf If you are cooking with a fan oven and you are using more than one ...

Page 14: ...tes 15 W 230 V 50 Hz E 14 and must be resistant to high temperature 300 C Draw out the side guide rails as described above Then remove the glass protection cap V from the bulb socket lifting it with a screwdriver placed between the cap and the oven wall and replace the lamp L Fit the accessories back in reverse order CLEANING AND MAINTENANCE To keep the surface of the hob and the various component...

Page 15: ... close the door forcing it upwards at the same time to free stop tooth and hinge sector Once the hinge is free pull the door forwards tilting it slightly upwards to free sector To reassemble proceed in the reverse order paying attention to the correct position of sectors HOW TO CLEAN THE INNER OVEN DOOR GLASS only certain versions One of the features of our cookers is that the inner oven door glas...

Page 16: ...e knob round to a hotter temperature Turn the knob of another element Call our Assistance Centre The electric oven is not working Check that the programmer accessory if there is one is on the manual position and then repeat the operations described in the manual The thermostat is not working Call our Service Centre The electric thermostat warning light does not switch on during use Turn the thermo...

Page 17: ...00 25 29 W H05 RR F 3 x1 5 BURNERS Operating Pressure Gas Rate Diameter Injectors Sabaf Heat Input W By Pass N DESIGNATION mbar g h L h 1 100mm Min Max 1 100mm 2 Rapid G30 Butano G31 Propano G20 Naturale 218 214 286 88 88 117 Y 800 800 800 3000 3000 3000 44 3 Semi rapid G30 Butano G31 Propano G20 Naturale 131 129 171 68 68 98 Z 600 600 600 1800 1800 1800 34 4 Auxiliary G30 Butano G31 Propano G20 N...

Page 18: ...ave any doubts do not use the appliance and call in a qualified person Some parts mounted on the appliance are protected by a plastic film This protection must be removed before using the appliance We recommend slitting the plastic film along the edges with a sharp knife or pin Do not move the appliance by the handle The packaging materials used cardboard bags polystyrene foam nails etc must not b...

Page 19: ...kguard The cookers which are equipped with this accessory leave of the factory with this particular inserted inside the packing In order to install the backguard it is necessary to loosen the screws positioned on the back of the hob and then to fix the backgaurd as indicated in figure 14 Adjustable feet to be fitted to the appliance which allow the height of the cooker to be aligned with other kit...

Page 20: ...users put extreme weight on the door when in open position two chains MUST BE fixed to the back of the oven which should at all times be secured to the threaded pins The threaded pins should be secured to the wall at the back of the cooker Assembly instructions Secure threaded pins into wall immediately behind and to the left hand side about 770 mm from the floor Finished fixing the chains must be...

Page 21: ...appliance fed by a pressure regulator in accordance with the standard must be connected with a copper pipe in accordance with the standard INSTRUCTIONS FOR THE INSTALLER whose joints must be made using sealed fittings in accordance with the standard with a flexible stainless steel seamless pipe in accordance with the standard with a maximum 2 metre extension and seals in accordance with the standa...

Page 22: ...tter L phase brown wire letter N neutral blue wire symbol earth green yellow wire The power cable must be laid so that no parts of it ever reach a temperature of 75 C For connecting do not use adapters or shunts as they could cause false contacts resulting in hazardous overheating When connecting directly to the mains Install a multipolar switch that can withstand the appliance load with a minimum...

Page 23: ... tap which is attached by simply applying pressure to the rod Insert a small screwdriver C into screw V side of the stem fig 19 and turn to the right or left the throttling cone until the flame of the burner is conveniently regulated to the Low position Check that the flame does not go out when the knob is sharply switched from the Full on to Reduced rate positions ATTENTION This operation can be ...

Page 24: ...SPACE FOR DATA LABEL 461308198_001 07 2013 ...

Reviews: