12
12
220 V
PE
N
L
1
(L )
2
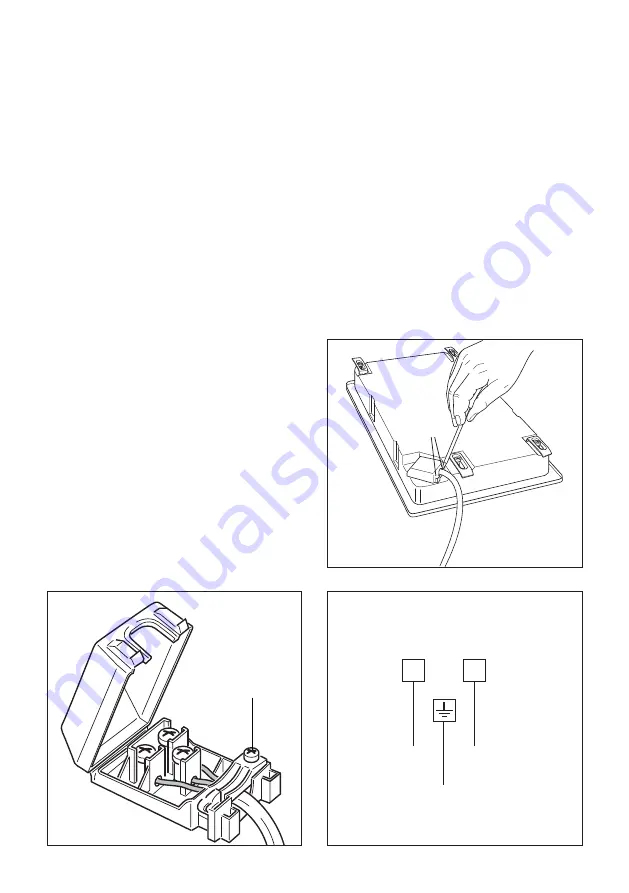
Fig. 2.1
F
A
Fig. 2.2
Fig. 2.3
SECTION OF THE SUPPLY CABLE
TYPE “H05RR-F” or “H05V2V2-F”
(resistance to temperatures of
90°C)”
220 - 240 V 50-60 Hz
3 x 1,5 mm
2
(*) (**)
(*) Connection possible with plug and outlet
(**) Connection with wall box connection.
220-240 V ac
REPLACING THE POWER SUPPLY CABLE
Important! This appliance must be connected to the electricity supply only by an
authorised person.
WARNING: If the power supply cable is damaged, it must be replaced only by an
authorised service agent in order to avoid a hazard.
•
The supply cable must be replaced with a cable of the same type.
•
Turn the cooktop over and unhook the terminal board cover by inserting a screwdriver
into the two hooks “
A
” (fig. 2.1).
•
Open the cable gland by unscrewing screw “
F
” (fig. 2.2), unscrew the terminal screws
and remove the cable.
•
The new supply cable, of suitable type and section, is connected to the terminal board
following the diagram in fig. 2.3.
•
Pull the feeder cable and block it with cable gland.
•
Close the terminal block cover (check the two hooks “
A
” are correctly hooked).
Note: The earth conductor must be left about 3 cm longer than the others.
Summary of Contents for CE32XK
Page 2: ...2 2...
Page 13: ...13 13...
Page 14: ...14 14 Advice for the users...
Page 19: ...19 19...
Page 20: ...20...
Page 31: ...31...
Page 32: ...32 Rady pro u ivatele...
Page 37: ...37...
Page 38: ...38...
Page 49: ...49...
Page 50: ...50 Conseils aux utilisateurs...
Page 55: ...55...
Page 56: ...56...
Page 67: ...67...
Page 68: ...68 Savjeti za korisnike...
Page 73: ...73...
Page 74: ...74...
Page 85: ...85...
Page 86: ...86 Conselhos para os utilizadores...
Page 91: ...91...
Page 92: ...92...
Page 103: ...103...
Page 104: ...104 Recomand ri pentru utilizatori...
Page 109: ...109...
Page 110: ...110...
Page 121: ...121...
Page 122: ...122 Rady pre pou vate ov...
Page 127: ...127...
Page 128: ...128...
Page 139: ...139...
Page 140: ...140 Consigli per gli utenti...


