background image


6

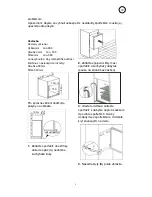
5.

Odd

Č

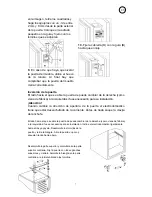
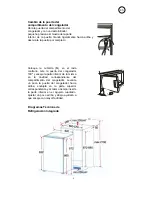
lte díly A,B,C,D podle 

obrázku.

6.

 Umíst

Č

te vodítko (A) na bo

þ

stranu dví

Ĝ

ek nábytku, nahoru a dol

Ĥ

podle obrázku a pozna

þ

te pozici 

externích otvor

Ĥ

. Po vyvrtaní otvor

Ĥ

p

Ĝ

ipevn

Č

te vodítka pomocí dodaných 

šroub

Ĥ

.

7.

 P

Ĝ

ipevn

Č

te kryt ( C ) na vodítko 

(A), dokud nezacvakne na míst

Č

.

8.

 Otev

Ĝ

ete dví

Ĝ

ka spot

Ĝ

ebi

þ

e a 

dví

Ĝ

ka nábytku do úhlu 90°. Vložte 

malý

þ

tverec (B) do vodítka (A). 

P

Ĝ

itla

þ

te spole

þ

n

Č

 dví

Ĝ

ka spot

Ĝ

ebi

þ

e

a dví

Ĝ

ka nábytku a pozna

þ

te otvory. 

Vyjm

Č

te

þ

tverec a vyvrtejte otvory 

ij

2 mm o délce 8 mm z vn

Č

jšího

okraje dví

Ĝ

ek. Nasa

ć

te

þ

tverec op

Č

t

na vodítko a upevn

Č

te pomocí 

dodaných šroub

Ĥ

.

9.

 P

Ĝ

i nastavení dví

Ĝ

ek nábytku 

použijte nastavovací otvory. Na 
konci postupu je nutné zkontrolovat 
správní zavírání dví

Ĝ

ek nábytku. 

C

Z

Summary of Contents for CRU 160 E

Page 1: ......

Page 2: ...angle and or with signal words Warning Caution Important Please observe the following carefully Supplementary information regarding operation and practical applications of the appliance appear after this symbol Tips and notes concerning economical and environmentally sound use of the appliance are marked with the cloverleaf The operating instructions contain instructions for the correction of poss...

Page 3: ... the freezer compartment door 8 Positioning 9 Description of the appliance 9 Starting up and temperature regulation 9 Interior accessories 10 Defrosting 10 Switching off the appliance 10 Cleaning and Care 11 Trouble shooting 11 Correcting Malfunctions 11 Changing the light bulb 13 Noises during Operation 13 Disposal of the appliance 14 ...

Page 4: ...pliance for transport damage Under no circumstances should a damaged appliance be plugged in In the event of damage please contact your supplier Refrigerant The refrigerant isobutene R600a is contained within the refrigerant circuit of the appliance a natural gas with a high level of environmental compatibility which is nevertheless flammable During transportation and installation of the appliance...

Page 5: ...ehold appliances It is therefore important that you ensure adequate supervision and never let children play with the appliance Daily Operation Containers with flammable gases or liquids can leak at low temperatures There is a risk of an explosion Do not store any containers with flammable materials such as spray cans fire extinguisher refill cartridges etc in the refrigerator and or freezer Do not...

Page 6: ... mm 550 Width 3 mm 560 It is necessary that the cabinet has a ventilation recess with the following dimensions Depth 50mm Width 540mm 1 540 50 3 2 For appropriate venting follow indications in the figure 1 Push the appliance into the housing until stop strip A touches the kitchen unit 2 Press in the joint covers between the appliance and the kitchen furniture only on the side without hinge 3 Open ...

Page 7: ...ix the guide with the screws supplied 7 Fix cover C on guide A until it clips into place 8 Open the appliance door and the furniture door at 90é Insert the small square B into guide A Push together the appliance door and the furniture door and mark the holes as indicated in the figure remove the squares and drill holes with 2 mm at 8 mm from the outer edge of the door Place the small square on the...

Page 8: ...hich the door opens the appliance must not be connected to the mains Remove plug from the mains beforehand The side at which the door opens can be changed from the right side as supplied to the left side if the installation site requires Tilt the appliance slightly towards the rear and prop it securely Unscrew the door hinge screws and remove the hinge pin bracket Open the door a little way and ta...

Page 9: ...ing cap M on the opposite side Turn the freezer compartment door through 180 and fit the lower door bearing into the lower bearing cavity of the freezer compartment door Lift the freezer compartment doora little way upwards fit it into the upper door bearing and at the same time insert the lower door bearing into the square hole Small upward and downward adjustments of the freezer compartment door...

Page 10: ......

Page 11: ......

Page 12: ...e condenser increases energy consumption For this reason carefully clean the condenser at the back of the appliance once a year with a soft brush or a vacuum cleaner Check the water drain hole on the rear wall of the fridge Clear a blocked drain hole with the aid of the green peg in the pack of accessories included with the appliance After everything is dry place appliance back into service Energy...

Page 13: ...ded period Open the door only as long as necessary A large quantity of warm food was placed in the appliance within the last 24 hours Turn the temperature regulation to a colder setting temporarily The food is too warm The appliance is near a heat source Please look in the installation location section Interior lighting does not work Light bulb is defective Please look in the changing the Light Bu...

Page 14: ...on The following noises are characteristic of refrigeration appliances Clicks Whenever the compressor switches on or off a click can be heard Humming As soon as the compressor is in operation you can hear it humming Bubbling When refrigerant flows into thin tubes you can hear bubbling or splashing noises Splashing Even after the compressor has been switched off this noise can be heard for a short ...

Page 15: ...nd find their way into the food chain Meaning of crossed out wheeled dustbin Do not dispose of electrical appliances as unsorted Municipal waste use separate collection facilities Contact your local government for the information regarding the collection systems available If electrical appliances are disposed of in landfills or dumps hazardous substances can leak into the groundwater and get into ...

Page 16: ......

Page 17: ...re appareil en toute sécurité Conservez ce document et n oubliez pas de le confier à l acquéreur en cas de revente Veuillez noter que pour une meilleure lecture de cette notice les principes de fonctionnement importants sont précédés par les termes Important Attention Ces termes sont destinés à vous alerter sur l importance d une information pour votre sécurité Assurez vous d avoir bien compris to...

Page 18: ...n du sens d ouverture de la porte du congélateur 6 Comment positionner votre appareil 7 Description de l appareil 8 Démarrer et régler la température 8 Aménagement intérieur 9 Dégivrage 9 Comment éteindre votre appareil 10 Comment nettoyer votre appareil 10 Conseils divers 10 Dysfonctionnements éventuels 11 Changer l ampoule 12 Bruits pendant le fonctionnement 12 Normes 12 Mise hors d usage de l a...

Page 19: ...est contenu dans le circuit de votre appareil Il s agit d un gaz naturel respectueux de l environnement qui est cependant inflammable Assurez vous qu aucun composant du circuit de réfrigération ne vienne à être endommagé lors du transport ou de l installation de l appareil Si le circuit réfrigérant venait à être endommagé tenez l appareil à l écart de toutes flammes et sources inflammables ventile...

Page 20: ...e les parents surveillent de près leurs enfants s ils viennent à jouer avec l appareil L utilisation quotidienne Les composants contenant des gaz inflammables ou des liquides peuvent fuir à basse température Un risque d explosion existe Ne jamais mettre aucun produit inflammable comme des produits en spray ni d appareil électrique ex mixers etc dans votre réfrigérateur Avant de nettoyer votre appa...

Page 21: ...astrement Dimensions d encastrement Hauteur mm min 880 Profondeur mm min 550 Largeur mm min 560 Il est nécessaire que le caisson soit équipé d une niche d aération aux dimensions suivantes Profondeur 50mm Largeur 540 mm 1 540 50 3 2 Pour une aération appropriée veuillez suivre les indications ci dessous sur le dessin 1 Placer l appareil dans le caisson jusqu à ce que la lamelle A touché le caisson...

Page 22: ...sa position 4 Positionnez les plaques de protection B comme indiqué ci dessous 5 Séparez les parties A B C D comme montré dans le dessin ci dessous 6 Placez la glissière A sur le côté intérieur de la porte de cuisine aux distances indiquées dans le dessin ci dessous et marquez les positions des trous Après avoir percé les trous fixez la glissière avec les vis fournies 7 Placez le cache C sur la ch...

Page 23: ...ns le dessin ci dessous Z des trous de ij 2mm de diamètre à 8mm de la tranche de la porte Placez une nouvelle fois la petite pièce carrée dans la charnière et fixez la avec les vis fournies 9 Afin d aligner la porte de la cuisine aidez vous de l ajustement des encoches A la fin de l opération il est nécessaire de vérifier que la porte de la cuisine ferme correctement 10 Fixez le cache D sur la char...

Page 24: ... changez le sens d ouverture de la porte Penchez légèrement l appareil vers l arrière et appuyez le contre un mur avec précaution Dévissez la charnière de la porte et retirez les attaches de la charnière Ouvrir légèrement la porte et retirez la de haut en bas Dévissez la charnière supérieure et vissez la du côté opposé Placez la porte sur la charnière supérieure et fermez la Vissez attentivement l...

Page 25: ...t vers le haut Retirez la porte Positionnez le cache charnière dans le sens opposé Inversez à 180 le sens d ouverture de la porte du compartiment congélateur et positionnez la partie basse de la porte Soulevez légèrement la porte du compartiment congélateur pour ainsi placer la partie haute de cette dernière dans la cavité Pour faciliter le positionnement procédez à de petits ajustements de haut e...

Page 26: ...tion électrique L appareil est seulement compatible avec une prise de 220 240V 50 1 Hz Cordon d alimentation Le fil ne doit pas être plié quand l appareil est en service ni rallongé Par ailleurs il est important de veiller à ce que le fil ne soit pas proche ou ne touche pas le compresseur à l arrière de l appareil car il peut chauffer lorsqu il fonctionne et l isolant peut ainsi s altérer et provo...

Page 27: ......

Page 28: ......

Page 29: ... de citron ou le jus d une orange Ne pas utiliser de nettoyants abrasifs Retirez la nourriture du réfrigérateur La placer dans un endroit frais bien enveloppée Eteindre l appareil et débrancher la prise ou couper l arrivée d électricité Nettoyer l appareil et les accessoires intérieurs avec un chiffon humide Un nettoyant spécifique réfrigérateur peut être aussi utilisé L accumulation de poussière ...

Page 30: ... prolongée N ouvrir la porte que pour le temps nécessaire Une large quantité de nourriture tiède a été placée dans l appareil depuis les dernières 24h Régler la température à un niveau plus bas La nourriture est tiède L appareil se situe près d une source de chaleur Veuillez regarder dans le chapitre Installation de votre appareil La lumière interne ne fonctionne pas L ampoule est défectueuse Veui...

Page 31: ...ge ou des bruits de dégagement de bulles Clapotis Même après que le compresseur soit éteint ce bruit de clapotis peut être audible pendant un court moment Normes Cet appareil est en accord avec les normes européennes suivantes 2006 95 EC faible voltage normes 2004 108 EC EMC Directive Mise hors d usage de l appareil Cet appareil ne doit pas être traité comme un déchet ménager Il doit être rapporté...

Page 32: ......

Page 33: ...uftretende Fragen auf und geben sie gegebenenfalls an den nächsten Besitzer des Gerätes weiter Anmerkungen die zu Ihrer Sicherheit oder für das korrekte Arbeiten des Gerätes wichtig sind werden mit Signalwörtern Warnung Achtung Wichtig hervorgehoben Die Bedienungsanleitung beinhaltet im Abschnitt Störungssuche Instruktionen bei möglichen Störungen Wenn diese Anweisungen nicht genügen um den Fehler...

Page 34: ...der ersten Benutzung des Gerätes sicher dass Sie diese komplett verstanden haben Gebrauch Das Gerät ist für den Haushaltsgebrauch konzipiert und dient der Aufbewahrung von Lebensmitteln Sollte das Gerät anders oder zweckentfremdet verwendet werden so kann durch den Hersteller für mögliche entstehende Schäden keine Haftung übernommen werden Änderungen am Gerät oder den mitgelieferten Komponenten si...

Page 35: ...UNG Halten Sie die Ventilationsöffnungen bei einem Einbau in Küchenmöbel unbedingt frei damit entstehende Abwärme entweichen kann WARNUNG Verwenden Sie beim Abtauen keine anderen Geräte Werkzeuge als in dieser Anleitung empfohlen WARNUNG Beschädigen Sie nicht den Kühlmittelkreislauf WARNUNG Verwenden Sie keine elektrischen Geräte im Innern des Lebensmittelfachs ausgenommen jene Geräte die dem Gerä...

Page 36: ... oder Gefrierraum Nutzen Sie keine elektrischen Geräte z B elektrische Eiscremehersteller Mixer usw im Kühlraum und oder im Gefrierraum Vor der Reinigung des Gerätes schalten Sie das Gerät bitte immer aus und ziehen den Netzstecker Wenn Sie die Stromversorgung trennen ziehen Sie bitte immer am Stecker selbst und nicht am Kabel Fehlfunktionen Liegt eine Fehlfunktion des Gerätes vor beachten Sie bit...

Page 37: ...lüftung des Gerätes bauen Sie es bitte entsprechend der Abbildung ein 1 Drücken Sie das Gerät in die Nische bis Endstreifen A das Gehäuse berührt 2 Drücken Sie die gemeinsamen Abdeckungen zwischen dem Gerät und den Küchemöbeln ein nur auf der Seite ohne Scharnier 3 Bitte öffnen Sie die Tür Drücken Sie das Gerät gegen die Seite der Küchenmöbel gegenüber dem der Gerätescharniere Befestigen Sie das G...

Page 38: ...elieferten Schrauben fixieren 7 Fixieren Sie die Verschlusskappe C auf der Führung A bis diese fest sitzt 8 Öffnen Sie die Gerätetür um 90 Setzen Sie das Plättchen B in die Führung A ein Drücken Sie die Gerätetür und die Möbeltür zusammen und markieren Sie die Löcher des Plättchens Entfernen Sie das Plättchen und bohren Sie die Löcher mit 2 mm in 8 mm Abstand vom äußeren Rand der Tür Platzieren Si...

Page 39: ...7 der Schlitze 8mm Am Ende der Installation ist es notwendig zu überprüfen ob die Möbeltür richtig schließt 10 Fixieren Sie die Abdeckung D auf dem Plättchen B bis diese fest sitzt DE ...

Page 40: ...t etwas nach hinten und stützen Sie es sicher ab Schrauben Sie die Türscharnierschrauben ab und entfernen Sie den Scharnierstifthaltewinkel Öffnen Sie die Tür und nehmen Sie diese abwärts heraus Schrauben Sie den oberen Stift ab und schrauben Sie ihn entsprechend auf der gegenüberliegenden Seite an Passen Sie die Tür in den oberen Stift ein Schrauben Sie den Scharnierstifthaltewinkel sicher auf de...

Page 41: ......

Page 42: ...hlt werden WICHTIG Hohe Umgebungstemperaturen z B an Sommertagen und eine Einstellung der Temperatur auf Stufe 6 oder 7 können den Kompressor veranlassen kontinuierlich zu laufen um eine kontinuierlich niedrige Temperatur im Innenraum des Gerätes zu halten INNENAUSSTATTUNG Ablageböden Je nach Ausstattung wird das Gerät mit verschiedenen Ablagefächern aus Glas Kunststoff oder Gitterroste ausgeliefe...

Page 43: ......

Page 44: ... Betrieb des Kompressors Stellen Sie eine ausreichende Luftzirkulation sicher und decken Sie niemals die Lüftungsöffnungen ab Lassen Sie warme Nahrungsmittel zuerst abkühlen bevor Sie diese im Kühlraum platzieren Lassen Sie die Tür nur solange geöffnet wie nötig Stellen Sie die Temperatur nicht kälter ein als unbedingt erforderlich Halten Sie den Kondensator auf der Rückwand des Gerätes immer saub...

Page 45: ...Gerät steht neben einer Wärmequelle Bitte lesen Sie den Abschnitt Installation Innenbeleuchtung funktioniert nicht Lampe ist defekt Bitte lesen Sie den Abschnitt Auswechseln der Glühlampe Starke Frostbildung Türdichtung ist nicht luftdicht möglich nach Türanschlagswechsel Erwärmen Sie bitte sorgfältig die undichten Abschnitte der Profildichtung mit einem Haartrockner auf einer kühlen Einstellung F...

Page 46: ...en Selbst nachdem der Kompressor ausgeschaltet worden ist können diese Geräusche für kurze Zeit gehört werden ENTSORGUNG Das Gerät enthält keine umweltschädlichen Kühlgase weder im Kühlsystem noch im Isolierungsmaterial ACHTUNG Das Gerät muss im Einklang mit der EU Richtlinie über die Entsorgung von Elektro und Elektronikgeräte WEEE entsorgt werden und gehört nicht in den normalen Hausmüll Für näh...

Page 47: ......

Page 48: ...la vostra sicurezza o sul corretto funzionamento dell apparecchio sono evidenziati con le parole Attenzione Importante Si prega di osservare attentamente quanto segue Le istruzioni per l uso contengono anche informazioni per la correzione di eventuali malfunzionamenti da parte dell utente nella sezione Risoluzione dei problemi Se queste istruzioni non dovrebbe essere sufficienti rivolgersi al loca...

Page 49: ......

Page 50: ...o può essere collegato ad una presa di corrente In caso di danni contattare il Centro Assistenza Refrigerante L isobutano R600a che è contenuto all interno del circuito refrigerante dell apparecchio è un gas naturale con un elevato livello di compatibilità ambientale ma che è comunque infiammabile Durante il trasporto e l installazione dell apparecchio assicurarsi che nessuno dei componenti del ci...

Page 51: ... del prodotto Prima della pulizia spegnere sempre l apparecchio e staccare la spina o spegnere l interruttore Per staccare la spina dalla presa della corrente non tirare il cavo In caso di malfunzionamento Se si verifica un malfunzionamento dell apparecchio consultare prima la sezione Risoluzione dei problemi di queste istruzioni Se le informazioni fornite non aiutano si prega di non effettuare in...

Page 52: ...zione seguire le istruzioni 1 Spingere il prodotto nell alloggio fino a che la linea di arresto A raggiunga il limite del mobile cucina 2 Inserire le guarnizioni di gomma tra l apparecchio e il mobile della cucina solo sul lato senza cerniera 3 Inserire l apparecchio nella colonna accostandolo sul lato opposto alle cerniere Fissare l apparecchio con 6 viti fornite nel kit incluso nel prodotto Spez...

Page 53: ...i fissare la slitta con le viti in dotazione 7 Fissare il coperchio C sulla slitta A 8 Aprire la porta del prodotto e del mobile a 90 Inserire la squadretta B nella guida A Accoppiare la porta del prodotto e del mobile e contrassegnare i buchi come indicato in figura Rimuovere le squadrette e forare con una punta da 2 mm a 8 mm dal bordo esterno della porta Fissare di nuovo la squadretta sulla gui...

Page 54: ...porta del mobile usando le guide sulla squadretta Alla fine dell operazione è necessario controllare che la porta del mobile si chiuda correttamente 10 Fissare il coperchio D sulla guida B DIMENSIONI DEL PRODOTTO E DEL VANO DA INCASSO IT ...

Page 55: ...ella cerniera e rimuovere il perno della traversa Rimuovere il perno inferiore con una chiave svitando il dado e riavvitare sul lato opposto Riavvitare poi il perno superiore Attenzione Durante l operazione di reversibilità della porta il prodotto non deve essere collegato alla presa di corrente IT ...

Page 56: ...remere la molla e sollevare leggermente la porta Posizionare il tappo M sul lato opposto Girare la porta della celletta freezer di 180 e posizionare la parte inferiore nella cavità apposita dello scomparto freezer Sollevare leggermente la porta e incastrarla nella parte superiore nella cavità apposita M IT ...

Page 57: ......

Page 58: ......

Page 59: ...o fresco ben coperto Pulire l apparecchio e gli accessori interni con un panno e acqua tiepida Dopo la pulizia pulire con acqua fresca e strofinare a secco L accumulo di polvere sul condensatore aumenta il consumo di energia Per questo motivo pulire accuratamente il condensatore sul retro dell apparecchio una volta l anno con una spazzola morbida o un aspirapolvere Pulire il foro di drenaggio con ...

Page 60: ...ar Installazione e posizionamento La luce interna non funziona La lampadina è guasta Par Sostituzione della lampadina L apparecchio non è stato installato bene Regolare i piedini L apparecchio è stato installato tra mobili o oggetti che vibrano ed emettono rumori Spostare leggermente l apparecchio L apparecchio emette molti rumori Un componente sul retro dell apparecchio tocca un altra parte o un ...

Page 61: ...i direttive Comunitarie 2006 95 EC sul basso voltaggio 2004 108 EC Direttiva EMC Smaltimento dell apparecchio E proibito smaltire questo apparecchio nel normale flusso dei rifiuti solidi urbani Gli apparecchi dismessi devono essere raccolti separatamente per ottimizzare il tasso di recupero e riciclaggio dei materiali che li compongono ed impedire potenziali danni per la salute e l ambiente Il sim...

Page 62: ...i direttive Comunitarie 2006 95 EC sul basso voltaggio 2004 108 EC Direttiva EMC Smaltimento dell apparecchio E proibito smaltire questo apparecchio nel normale flusso dei rifiuti solidi urbani Gli apparecchi dismessi devono essere raccolti separatamente per ottimizzare il tasso di recupero e riciclaggio dei materiali che li compongono ed impedire potenziali danni per la salute e l ambiente Il sim...

Page 63: ......

Page 64: ...abras Atención Precaución Importante Preste especial atención a esas indicaciones Después de este símbolo se indicará información complementaria y aplicaciones prácticas del electrodoméstico Los trucos y notas relacionadas con aspectos de ahorro y medioambientales se señalan con un trébol Las instrucciones de funcionamiento contienen instrucciones para la corrección de posibles fallos que puede so...

Page 65: ...to del congelador 8 Colocación 9 Descripción del electrodoméstico 9 Puesta en marcha y regulación de la temperatura 9 Accesorios internos 10 Desconexión del electrodoméstico 10 Limpieza y Cuidado 11 Guía de incidencias 11 Corrección de fallos 11 Cambio de bombilla 13 Ruidos durante el funcionamiento 13 Normativas Estándares y Directrices 13 Tirar el electrodoméstico 14 ES ...

Page 66: ...cha inicial Compruebe que el electrodoméstico no se ha dañado durante su traslado Bajo ninguna circunstancia deberá conectar un electrodoméstico dañado En caso de que detecte algún daño póngase en contacto con su proveedor Refrigerante El circuito refrigerante del electrodoméstico contiene refrigerante isobutano R600a un gas natural con un alto nivel de compatibilidad medioambiental que sin embarg...

Page 67: ...cable de suministro eléctrico rompa o quite los muelles o los tornillos de los cierres si los tuviere Con esto lo que se consigue es asegurar que los niños no se puedan quedar encerrados dentro del electrodoméstico si juegan con él existe riesgo de asfixia o que se expongan a situaciones peligrosas Normalmente los niños no pueden ver los peligros que representan los electrodomésticos del hogar Por...

Page 68: ...stalación Instalación Colocación Antes de instalarlo lea detenidamente las instrucciones hasta el final para evitar algunos problemas Atención para evitar los peligros propios de la inestabilidad del electrodoméstico es obligatorio fijarlo siguiendo las instrucciones Empotrado Dimensiones del hueco Altura del hueco 880 mm Fondo del hueco 550 mm Ancho del hueco 560 mm Es necesario que el hueco disp...

Page 69: ... la imagen 6 Coloque la guía A en la parte lateral de la puerta del mueble arriba y abajo como se muestra en la imagen y marque la posición de los agujeros externos Una vez hechos los agujeros fije la guía con los tornillos que se adjuntan 7 Fije la cobertura C en la guía A hasta que encaje 8 Abra la puerta del electrodoméstico y la puerta del mueble 90é Inserte el cuadrado pequeño B en la guía A ...

Page 70: ... si fuese necesario para su instalación Atención Cuando cambie la dirección de apertura de la puerta el electrodoméstico tiene que estar desenchufado de la corriente Antes de nada saque la clavija del enchufe El lado hacia el que se abre la puerta de puede cambiar de la derecha como viene de fábrica a la izquierda si fuese necesario para su instalación Incline el electrodoméstico ligeramente hacia...

Page 71: ...e la cubierta M en el lado contrario Gire la puerta del congelador 180º y encaje la parte inferior de la misma en la cavidad correspondiente del compartimento del congelador Levante un poco la puerta del congelador hacia arriba encájela en la parte superior correspondiente y al mismo tiempo inserte la parte inferior en el agujero cuadrado Ajustar un poco arriba y abajo ayudará a que encaje con may...

Page 72: ......

Page 73: ......

Page 74: ...a de vajillas La acumulación de polvo en el condensador aumenta el consumo energético Por ello ha de limpiarse el condensador de la parte posterior del electrodoméstico una vez al año con un cepillo suave o con una aspiradora Una vez que todo esté seco vuelva a poner en marcha el electrodoméstico Trucos para el ahorro energético No coloque el electrodoméstico cerca de cocinas radiadores u otras fu...

Page 75: ... colocó gran cantidad de alimentos templados en el electrodoméstico en las últimas 24 horas Gire la regulación de la temperatura hasta una configuración más fría de forma temporal Los alimentos están demasiado calientes El electrodoméstico está cerca de una fuente de calor Véase la sección instalación colocación La luz interior no funciona La bombilla es defectuosa Véase la sección Cambio de la Bo...

Page 76: ...ambie la bombilla estropeada Vuelva a colocar la cubierta y atornille Vuelva a poner en funcionamiento el frigorífico Ruidos durante el funcionamiento Los ruidos siguientes son característicos de los electrodomésticos de enfriado Click Cuando el compresor se conecta y se desconecta puede que se escuche un click Susurro Cuando el compresor está funcionado se escucha un leve susurro Burbujas Cuando ...

Page 77: ...icia Significado de un cubo de basura tachado No deposite electrodomésticos eléctricos utilice depósitos independientes Póngase en contacto con la autoridad local competente para informarse sobre los sistemas de recogida posibles Si los dispositivos eléctricos se dejan en campo abierto o en vertederos puede que las sustancias peligrosas se filtren y lleguen a las aguas subterráneas pudiendo accede...

Page 78: ......

Page 79: ...nkþnost spotĜebiþe jsou zvýraznČné trojúhelníkem nebo slovy UpozornČní Pozor DĤležité Dodržujte je dĤkladnČ Dodateþné informace týkající se provozu a praktických aplikací spotĜebiþe jsou zobrazené po tomto symbolu Tipy a poznámky týkající se ekonomického a správného použití spotĜebiþe jsou oznaþené lístkem Pokyny k použití obsahují pokyny o možných závadách odstranitelných uživatelem v þásti Odstr...

Page 80: ...írání dvíĜek mrazicího prostoru 8 Postavení 10 Popis spotĜebiþe 10 Zapnutí spotĜebiþe a nastavení teploty 10 VnitĜní vybavení 11 Odmrazování 11 Vynutí spotĜebiþe 11 ýištČní a údržba 12 OdstranČní možných problémĤ 12 OdstranČní závad 12 VýmČna žárovky 13 BČžné provozní zvuky 14 PĜedpisy standardy smČrnice 14 Likvidace starého spotĜebiþe 14 CZ ...

Page 81: ...R600a je obsažený v chladicím okruhu spotĜebiþe je to zemní plyn pĜíznivý k životnímu prostĜedí ale pĜesto hoĜlavý BČhem pĜepravy a instalace spotĜebiþe nepoškoćte žádný z komponentĤ chladícího okruhu Pokud je poškozený chladící okruh vyhnČte se zdrojĤm s otevĜeným plamenem dĤkladnČ vyvČtrejte místnost ve které se nachází spotĜebiþ UpozornČní UPOZORNċNÍ Udržujte vČtrací otvory spotĜebiþe nebo vest...

Page 82: ...Hrozí riziko exploze Neskladujte žádné nádoby s hoĜlavými látkami jako jsou spreje hasicí pĜístroje apod uvnitĜ chladniþky nebo mrazáku UvnitĜ spotĜebiþe nepoužívejte elektrická zaĜízení napĜ elektrické výrobníky zmrzliny mixéry apod PĜed þištČním spotĜebiþe jej vždy vypnČte a odpojte od elektrické sítČ nebo vypnČte jistiþ PĜi odpojování tahejte za zástrþku nikoli za pĜívodní kabel V pĜípadČ závad...

Page 83: ... rozmČry Hloubka 50mm ŠíĜka 540mm 1 540 50 3 2 Pro správné vČtrání dodržujte pokyny na obrázku 1 Zatlaþte spotĜebiþ do skĜíĖky dokud se pás A nedotkne kuchyĖské linky 2 Zatlaþte spojovací lišty mezi spotĜebiþ a kuchyĖský nábytek pouze na stranČ bez závČsĤ 3 OtevĜete dvíĜka a zatlaþte spotĜebiþ k nábytku naproti závČsĤm UpevnČte spotĜebiþ 6 šrouby dodanými se spotĜebiþem UmístČte kryt závČsĤ D na m...

Page 84: ...acvakne na místČ 8 OtevĜete dvíĜka spotĜebiþe a dvíĜka nábytku do úhlu 90 Vložte malý þtverec B do vodítka A PĜitlaþte spoleþnČ dvíĜka spotĜebiþe a dvíĜka nábytku a poznaþte otvory VyjmČte þtverec a vyvrtejte otvory ij2 mm o délce 8 mm z vnČjšího okraje dvíĜek Nasaćte þtverec opČt na vodítko a upevnČte pomocí dodaných šroubĤ 9 PĜi nastavení dvíĜek nábytku použijte nastavovací otvory Na konci postup...

Page 85: ...i PĜed postupem odpojte zástrþku od síĢové zásuvky SmČr otvírání dvíĜek lze zmČnit z pravé strany pĜi dodání na levou stranu pokud to vyžaduje místo instalace NakloĖte spotĜebiþ mírné dozadu a zajistČte jej Odšroubujte šrouby závČsu dvíĜek a vyjmČte kolík závČsu OtevĜete dvíĜka a vysuĖte je dolĤ Odšroubujte horní závČs a našroubujte je na opaþnou stranu Nasaćte dvíĜka na horní závČs a zavĜete je N...

Page 86: ... a vysaćte dvíĜka UmístČte kryt M na opaþnou stranu Otoþte dvíĜka mrazicího prostoru o 180 a nasaćte spodní závČs do dvíĜek ZvednČte dvíĜka mírné nahoru nasaćte na horní závČs a souþasnČ vložte spodní závČs do þtvercového otvoru Malý pohyb nahoru a dolĤ dvíĜek mrazicího prostoru usnadĖuje nasazení Nákres integrovaného spotĜebiþe CZ ...

Page 87: ...CZ ...

Page 88: ...CZ ...

Page 89: ...e kondenzátor na zadní stranČ spotĜebiþe jednou za rok pomocí mČkkého kartáþe nebo vysavaþe Zkontrolujte odtokový otvor na zadní stČnČ chladniþky Zablokovaný otvor vyþistČte pomocí zeleného párátka z dodaného pĜíslušenství Po vysušení spotĜebiþe jej mĤžete opČt uvést do provozu Tipy pro úsporu energie Neinstalujte spotĜebiþ do blízkosti sporákĤ radiátorĤ nebo jiných zdrojĤ tepla Vysoká okolní tepl...

Page 90: ...zy na tČsnČní DvíĜka netČsní dostateþnČ po výmČnČ smČru otvírání dvíĜek OhĜejte tČsnČní fénem na vlasy PĜitom vytvarujte tČsnČní do správného tvaru SpotĜebiþ nestojí rovnČ Vyrovnejte spotĜebiþ SpotĜebiþ se dotýká stČn nebo jiných pĜedmČtĤ SpotĜebiþ mírnČ odsuĖte Neobyþejné zvuky Komponent napĜ trubka na zadní stranČ spotĜebiþe se dotýká jiné þásti spotĜebiþe nebo stČny Pokud je to nutné opatrnČ oh...

Page 91: ...e starý spotĜebiþ k likvidaci bez výdavkĤ spotĜebitele 3 Staré spotĜebiþe obsahují hodnotné zdroje které lze opČtovnČ využít Nesprávná likvidace starých spotĜebiþĤ má nepĜíznivý vliv na životní prostĜedí a lidské zdraví spodní vodu a potraviny Význam symbolu pĜeškrtnuté nádoby Nevyhazujte elektrické zaĜízení jako netĜídČný domovní odpad použijte k tomu urþené sbČrné stĜedisko Kontaktujte místní sp...

Page 92: ......

Page 93: ...ȘȖȓİȢ İʌȚȝİȜȫȢ ȉȠ țİȓȝİȞȠ ʌȠȣ ĮțȠȜȠȣșİȓ ĮȣIJȐ IJĮ ıȪȝȕȠȜĮ ĮijȠȡȐ ȠįȘȖȓİȢ ȜİȚIJȠȣȡȖȓĮȢ țĮȚ ʌȡĮțIJȚțȑȢ ȠįȘȖȓİȢ ȖȚĮ IJȘ ȤȡȒıȘ IJȘȢ ıȣıțİȣȒȢ ȅįȘȖȓİȢ țĮȚ ıȘȝİȚȫıİȚȢ ʌȠȣ ĮijȠȡȠȪȞ ıIJȘȞ ȠȚțȠȞȠȝȚțȒ țĮȚ ijȚȜȚțȒ ʌȡȠȢ IJȠ ʌİȡȚȕȐȜȜȠȞ ȤȡȒıȘ IJȘȢ ıȣıțİȣȒȢ İʌȚıȘȝĮȓȞȠȞIJĮȚ ȝİ ȑȞĮ IJȡȚijȣȜȜȐțȚ ȈIJȚȢ ȠįȘȖȓİȢ ȜİȚIJȠȣȡȖȓĮȢ ıȣȝʌİȡȚȜĮȝȕȐȞȠȞIJĮȚ țĮȚ IJȡȩʌȠȚ ĮʌȠțĮIJȐıIJĮıȘȢ įȣıȜİȚIJȠȣȡȖȚȫȞ ʌȠȣ ȝʌȠȡİȓ ȞĮ ʌȡȠțȪȥȠȣȞ țĮȚ ȠȚ ȠʌȠȓİȢ ȝʌȠȡȠȪȞ ȞĮ ĮʌȠț...

Page 94: ......

Page 95: ... ıȣȞIJȒȡȘıȘ IJȡȠijȓȝȦȞ Ȓ Įʌȩ IJȘ ȤȡȒıȘ IJȘȢ ȖȚĮ İʌĮȖȖİȜȝĮIJȚțȠȪȢ ıțȠʌȠȪȢ ȆȡȚȞ ȕȐȜİIJİ ıİ ȜİȚIJȠȣȡȖȓĮ IJȘ ıȣıțİȣȒ ǺİȕĮȚȦșİȓIJİ ȩIJȚ Ș ıȣıțİȣȒ įİȞ İȝijĮȞȓȗİȚ ȗȘȝȚȑȢ Įʌȩ IJȘȞ ȝİIJĮijȠȡȐ ȈȣıțİȣȒ Ș ȠʌȠȓĮ İȝijĮȞȓȗİȚ ȗȘȝȚȑȢ įİȞ ʌȡȑʌİȚ ȞĮ IJİșİȓ ıİ ȜİȚIJȠȣȡȖȓĮ ȖȚĮ țĮȞȑȞĮ ȜȩȖȠ ǼȐȞ Ș ıȣıțİȣȒ İȝijĮȞȓȗİȚ ȗȘȝȚȑȢ ʌȠȣ ȠijİȓȜȠȞIJĮȚ ıIJȘ ȝİIJĮijȠȡȐ İʌȚțȠȚȞȦȞȒıIJİ ȝİ IJȠ țĮIJȐıIJȘȝĮ Įʌȩ IJȠ ȠʌȠȓȠ ĮȖȠȡȐıĮIJİ IJȘ ıȣıțİȣȒ ȌȣțIJȚțȩ ĮȑȡȚȠ ȉȠ ȚıȠȕȠȣIJȐȞ...

Page 96: ... ȞĮ İʌȑȝȕİIJİ ıİ țȐʌȠȚȠ İȟȐȡIJȘȝĮ IJȘȢ ıȣıțİȣȒȢ ʌȡȑʌİȚ ʌȡȫIJĮ ȞĮ IJȘȞ ĮʌȠıȣȞįȑıİIJİ Įʌȩ IJȠ įȓțIJȣȠ ȘȜİțIJȡȚțȒȢ ʌĮȡȠȤȒȢ ȆȇȅȈȅȋǾ ǹijĮȚȡȑıIJİ IJȚȢ ʌȩȡIJİȢ ʌȡȚȞ ĮʌȠıȪȡİIJİ IJȘ ıȣıțİȣȒ ȆȡȠijȣȜȐȟİȚȢ ĮıijȐȜİȚĮȢ ȖȚĮ IJĮ ʌĮȚįȚȐ ȉĮ ȣȜȚțȐ ıȣıțİȣĮıȓĮȢ ʌȤ ȆȜĮıIJȚțȒ ȝİȝȕȡȐȞȘ ıȣıțİȣĮıȓĮȢ ʌȠȜȣİıIJȑȡİȢ İȖțȣȝȠȞȠȪȞ țȓȞįȣȞȠ ȖȚĮ IJĮ ʌĮȚįȚȐ ȊʌȐȡȤİȚ țȓȞįȣȞȠȢ ʌȡȩțȜȘıȘȢ ĮıijȣȟȓĮȢ ȀȡĮIJİȓıIJİ IJĮ ȣȜȚțȐ ıȣıțİȣĮıȓĮȢ ıİ ıȘȝİȓȠ ȝȘ ʌȡȠıȕȐıȚȝȠ ıIJĮ ʌĮȚį...

Page 97: ...ıȓĮ ȖȚĮ IJȘȞ ĮıijĮȜȒ ȝİIJĮijȠȡȐ ǹijĮȚȡȑıIJİ IJȘȞ ĮȣIJȠțȩȜȜȘIJȘ IJĮȚȞȓĮ Įʌȩ IJȘȞ įİȟȚȐ țĮȚ ĮȡȚıIJİȡȒ ʌȜİȣȡȐ IJȘȢ ıȣıțİȣȒȢ ȉĮ ȣʌȩȜȠȚʌĮ IJȘȢ ĮȣIJȠțȩȜȜȘIJȘȢ IJĮȚȞȓĮȢ ȝʌȠȡİȓIJİ ȞĮ IJĮ ĮijĮȚȡȑıİIJİ ȝİ Ȝİȣțȩ ȠȚȞȩʌȞİȣȝĮ ǹʌȠȝĮțȡȪȞİIJİ Įʌȩ IJȠ İıȦIJİȡȚțȩ IJȘȢ ıȣıțİȣȒȢ ȩȜĮ IJĮ ȣȜȚțȐ ıȣıțİȣĮıȓĮȢ ǼȖțĮIJȐıIJĮıȘ ǼȖțĮIJȐıIJĮıȘ țĮȚ IJȠʌȠșȑIJȘıȘ ȆȡȚȞ İȖțĮIJĮıIJȒıİIJİ IJȘ ıȣıțİȣȒ įȚĮȕȐıIJİ ʌȡȠıİțIJȚțȐ IJȚȢ ȠįȘȖȓİȢ ȝȑȤȡȚ IJȑȜȠȢ ʌȡȠțİȚȝȑȞȠȣ ȞĮ ĮʌȠijȪȖİIJİ țȐʌ...

Page 98: ...ȚıȝȠȪ ʌȠȣ İȓȞĮȚ IJȠʌȠșİIJȘȝȑȞȠȚ ıIJȘȞ ĮʌȑȞĮȞIJȚ ʌȜİȣȡȐ Įʌȩ İțİȓȞȘ ȝİ IJȠȣȢ ȝİȞIJİıȑįİȢ ıIJȒȡȚȟȘȢ IJȘȢ ʌȩȡIJĮȢ 3 ǹȞȠȓȟIJİ IJȘȞ ʌȩȡIJĮ țĮȚ ıʌȡȫȟIJİ IJȘ ıȣıțİȣȒ ʌȡȠȢ IJȘȞ ʌȜİȣȡȐ IJȠȣ İʌȓʌȜȠȣ IJȘȢ țȠȣȗȓȞĮȢ ĮʌȑȞĮȞIJȚ Įʌȩ IJȘȞ ʌȜİȣȡȐ ʌȠȣ ȕȡȓıțȠȞIJĮȚ ȠȚ ȝİȞIJİıȑįİȢ IJȘȢ ʌȩȡIJĮȢ ȈIJİȡİȫıIJİ IJȘ ıȣıțİȣȒ ȝİ IJȚȢ 6 ȕȓįİȢ ʌȠȣ șĮ ȕȡİȓIJİ ıIJĮ ȣȜȚțȐ ʌȠȣ ıȣȞȠįİȪȠȣȞ IJȘ ıȣıțİȣȒ ȉȠʌȠșİIJİȓıIJİ IJĮ țĮȜȪȝȝĮIJĮ IJȠȣ ȝİȞIJİıȑ D ıIJȘ șȑıȘ IJȠȣȢ GR ...

Page 99: ...ȒȝĮIJĮ A B C D ıȪȝijȦȞĮ ȝİ IJȘȞ İȚțȩȞĮ 6 ȉȠʌȠșİIJİȓıIJİ IJȠȞ ȠįȘȖȩ A ıIJȘȞ ȝİȡȚȐ ʌȠȣ ȕȡȓıțİIJĮȚ Ș ʌȩȡIJĮ IJȠȣ İʌȓʌȜȠȣ ıIJȠ İʌȐȞȦ țĮȚ țȐIJȦ ȝȑȡȠȢ ȩʌȦȢ įİȓȤȞİȚ Ș İȚțȩȞĮ țĮȚ ıȘȝİȚȫıIJİ IJȘȞ șȑıȘ IJȦȞ ȠʌȫȞ ıIJȘȞ İȟȦIJİȡȚțȒ ʌȜİȣȡȐ ǹijȠȪ ĮȞȠȓȟİIJİ IJȚȢ ȠʌȑȢ ıIJİȡİȫıIJİ IJȠȞ ȝİ IJȚȢ ȕȓįİȢ ʌȠȣ ıȣȞȠįİȪȠȣȞ IJȘ ıȣıțİȣȒ GR ...

Page 100: ... ıȣıțİȣȒȢ țĮȚ IJȠȣ İʌȓʌȜȠȣ țĮȚ ıȘȝİȚȫıIJİ IJȚȢ IJȡȪʌİȢ ȩʌȦȢ ıIJȘȞ İȚțȩȞĮ ĮijĮȚȡȑıIJİ IJȚȢ ȖȦȞȚȑȢ țĮȚ ĮȞȠȓȟIJİ IJȚȢ IJȡȪʌİȢ ȝİ ȑȞĮ IJȡȣʌȐȞȚ 2 mm ıIJĮ 8 mm Įʌȩ IJȘȞ İȟȦIJİȡȚțȒ ʌȜİȣȡȐ IJȘȢ ʌȩȡIJĮȢ ȉȠʌȠșİIJİȓıIJİ IJȘ ȖȦȞȓĮ ıIJȘ șȑıȘ IJȘȢ țĮȚ ıIJİȡİȫıIJİ IJȘ ȝİ IJȚȢ ȕȓįİȢ ʌȠȣ ıȣȞȠįİȪȠȣȞ IJȘ ıȣıțİȣȒ 9 ǼȐȞ ȤȡİȚĮıIJİȓ ȞĮ ĮȞĮıȘțȫıİIJİ IJȘ ʌȩȡIJĮ IJȠȣ İʌȓʌȜȠȣ İȞIJȠȚȤȚıȝȠȪ țȐȞIJİ IJȠ ȝİ IJȘȞ ȡȪșȝȚıȘ IJȠȣ IJȗȩȖȠȣ ıIJȠ ȝİȞIJİıȑ ȈIJȠ IJȑȜȠȢ İȜȑȖȟIJİ İȐȞ...

Page 101: ...ȩ IJȘȞ ʌĮȡȠȤȒ ʌȡȚȞ ĮȡȤȓıİIJİ ȠʌȠȚĮįȒʌȠIJİ İȡȖĮıȓĮ Ǿ ʌȜİȣȡȐ ıIJȘȞ ȠʌȠȓĮ ĮȞȠȓȖİȚ Ș ʌȩȡIJĮ ȝʌȠȡİȓ ȞĮ ĮȜȜȐȟİȚ Įʌȩ IJĮ įİȟȚȐ ȩʌȦȢ ʌĮȡĮįȓįİIJĮȚ ıIJȘȞ ĮȡȚıIJİȡȒ ʌȜİȣȡȐ İijȩıȠȞ ĮȣIJȩ İȟȣʌȘȡİIJİȓ IJȠȞ İȞIJȠȚȤȚıȝȩ īİȓȡİIJİ IJȘ ıȣıțİȣȒ İȜĮijȡȐ ʌȡȠȢ IJĮ ʌȓıȦ țȡĮIJȫȞIJĮȢ IJȘ ıIJİȡİȐ ȄİȕȚįȫıIJİ IJȠ ȝİȞIJİıȑ IJȘȢ ʌȩȡIJĮȢ țĮȚ ĮijĮȚȡȑıIJİ IJȠ ǹȞȠȓȟIJİ ȜȓȖȠ IJȘȞ ʌȩȡIJĮ țĮȚ ĮijĮȚȡȑıIJİ IJȠȞ IJȡĮȕȫȞIJĮȢ IJȠ ʌȡȠȢ IJĮ țȐIJȦ ȄİȕȚįȫıIJİ IJȠȞ İʌȐȞȦ ʌȓȡȠ țĮȚ IJȠʌȠșİ...

Page 102: ...ȘȢ ʌȩȡIJĮȢ ȝĮȗȓ ȝİ IJȘȞ ʌȩȡIJĮ ȉȠʌȠșİIJİȓıIJİ IJȠ țĮʌȐțȚ M ıIJȘȞ ĮȞIJȓșİIJȘ ʌȜİȣȡȐ ǹȞȠȓȟIJİ IJȘ ʌȩȡIJĮ IJȠȣ ȥȣȖİȓȠȣ ıIJȚȢ 180Ƞ țĮȚ ȕȐȜIJİ IJȠȞ țȐIJȦ ʌȓȡȠ ıIJȒȡȚȟȘȢ ıIJȘȞ ʌȚȠ ȤĮȝȘȜȒ ȣʌȠįȠȤȒ ʌȠȣ ȕȡȓıțİIJĮȚ ıIJȘ ʌȩȡIJĮ IJȘȢ țĮIJȐȥȣȟȘȢ ǹȞĮıȘțȫıIJİ İȜĮijȡȐ IJȘȞ ʌȩȡIJĮ IJȠȣ țĮIJĮȥȪțIJȘ țĮȚ șȘȜȣțȫıIJİ IJȠȞ İʌȐȞȦ ʌȪȡȠ ıIJȘ IJİIJȡȐȖȦȞȘ ȠʌȒ ȆĮȓȟIJİ ʌȐȞȦ țȐIJȦ ȖȚĮ ȞĮ ijȑȡİIJİ IJȘ ʌȩȡIJĮ ıIJȘ ıȦıIJȒ șȑıȘ İȣțȠȜȩIJİȡĮ ǻȚȐȖȡĮȝȝĮ İȞIJȠȚȤȚıȝȠȪ M GR ...

Page 103: ......

Page 104: ......

Page 105: ...IJȣȠ ʌĮȡȠȤȒȢ țȜİȓıIJİ IJȠ įȚĮțȩʌIJȘ ıIJȠ ʌȓȞĮțĮ Ȓ ĮijĮȚȡȑıIJİ IJȘȞ ĮıijȐȜİȚĮ Įʌȩ IJȠ ʌȓȞĮțĮ ʌĮȡȠȤȒȢ ȀĮșĮȡȓıIJİ IJȘ ıȣıțİȣȒ țĮȚ IJĮ İȟĮȡIJȒȝĮIJĮ IJȘȢ ȝİ ȑȞĮ ȪijĮıȝĮ țĮȚ ȗİıIJȩ Ȟİȡȩ īȚĮ IJȠ țĮșĮȡȚıȝȩ IJȘȢ ıȣıțİȣȒȢ ȝʌȠȡİȓIJİ ȞĮ ȤȡȘıȚȝȠʌȠȚȒıİIJİ IJĮ ĮʌȠȡȡȣʌĮȞIJȚțȐ ʌȠȣ įȚĮIJȓșİȞIJĮȚ ıIJȘȞ ĮȖȠȡȐ ȖȚĮ IJȠ țĮșĮȡȚıȝȩ IJȦȞ ʌȚȐIJȦȞ ȂİIJȐ IJȠ ʌȜȪıȚȝȠ țĮșĮȡȓıIJİ ȝİ țȡȪȠ Ȟİȡȩ țĮȚ ıIJİȖȞȫıIJİ ȝİ ȑȞĮ ȝĮȜĮțȩ ȪijĮıȝĮ Ǿ ıȣȖțȑȞIJȡȦıȘ ıțȩȞȘȢ İʌȐȞȦ ıIJȠ ıȣȝ...

Page 106: ...ȡȠ IJİȤȞȚțȒȢ ȣʌȠıIJȒȡȚȟȘȢ Gias Service IJȘȜȞȠ 80111505050 ǺȜȐȕȘ ȆȚșĮȞȒ ĮȚIJȓĮ ǹʌȠțĮIJȐıIJĮıȘ Ǿ ıȣıțİȣȒ įİȞ ȑȤİȚ IJİșİȓ ıİ ȜİȚIJȠȣȡȖȓĮ ǼȞİȡȖȠʌȠȚİȓıIJİ IJȘ ıȣıțİȣȒ ȅ țİȞIJȡȚțȒ ʌȡȓȗĮ įİȞ ȑȤİȚ ȝʌİȚ ıȦıIJȐ ıIJȘ șȑıȘ IJȠȣ Ȓ İȓȞĮȚ ȤĮȜĮıȝȑȞȘ ǺȐȜIJİ IJȘ ʌȡȓȗĮ ıȦıIJȐ Ǿ ĮıijȐȜİȚĮ țȐȘțİ Ȓ İȓȞĮȚ İȜĮIJIJȦȝĮIJȚțȒ ǼȜȑȖȟIJİ IJȘȞ ĮıijȐȜİȚĮ țĮȚ ĮȞIJȚțĮIJĮıIJȒıIJİ IJȘȞ İȐȞ ȤȡİȚȐȗİIJĮȚ Ǿ ıȣıțİȣȒ įİȞ ȜİȚIJȠȣȡȖİȓ ǼȜĮIJIJȦȝĮIJȚțȩȢ ȡİȣȝĮIJȠįȩIJȘȢ ǽȘIJİȓıIJİ IJ...

Page 107: ...ȓĮ IJȘȢ ıȣıțİȣȒȢ țĮȚ ĮʌȠıȣȞįȑıIJİ IJȘ Įʌȩ IJȠ įȓțIJȣȠ ʌĮȡȠȤȒȢ ȘȜİțIJȡȚțȒȢ İȞȑȡȖİȚĮȢ Ȓ șȑıIJİ İțIJȩȢ IJȘȞ ĮıijȐȜİȚĮ Ȓ IJȠ ȡİȜȑ ĮıijĮȜİȓĮȢ ıIJȠ ʌȓȞĮțĮ įȚțIJȪȠȣ ȉȪʌȠȢ ȜĮȝʌIJȒȡĮ 220 240 V ȝȑȖȚıIJȘ ȚıȤȪȢ 15 W īȚĮ ȞĮ įȚĮțȩȥİIJİ IJȘ ȜİȚIJȠȣȡȖȓĮ IJȘȢ ıȣıțİȣȒȢ ȡȣșȝȓıIJİ IJȠ șİȡȝȠıIJȐIJȘ ıIJȘ șȑıȘ Ā0ā ǹʌȠıȣȞįȑıIJİ Įʌȩ IJȠ įȓțIJȣȠ IJȘ ʌȡȓȗĮ īȚĮ ȞĮ ĮȜȜȐȟİIJİ IJȠ ȜĮȝʌIJȒȡĮ ȕȖȐȜIJİ IJȘ ȕȓįĮ ȆȚȑıIJİ IJȠ țĮʌȐțȚ IJȠȣ ȜĮȝʌIJȒȡĮ ȖȚĮ ȞĮ ȕȖİȚ Įʌȩ IJȘ șȑıȘ ...

Page 108: ...ʌȚıIJȠʌȠȚȘIJȚțȩ ʌȠȣ ıȣȞȠįİȪİȚ IJȘȞ ıȣıțİȣȒ ȈȪȝijȦȞĮ ȝİ IJȘȞ ȚıȤȪȠȣıĮ ȞȠȝȠșİıȓĮ IJȠ ʌȚıIJȠʌȠȚȘIJȚțȩ İȖȖȪȘıȘȢ ʌȡȑʌİȚ ȞĮ İʌȚįİȚȤșİȓ ıIJȚȢ ȣʌȘȡİıȓİȢ ȉİȤȞȚțȒȢ ȊʌȠıIJȒȡȚȟȘȢ ȩʌȠIJİ ȤȡİȚĮıIJİȓ ıȣȞȠįİȣȩȝİȞȠ Įʌȩ ȑȖțȣȡȠ ʌĮȡĮıIJĮIJȚțȩ ĮȖȠȡȐȢ İʌȐȞȦ ıIJȠ ȠʌȠȓȠ ʌȡȑʌİȚ ȞĮ ĮȞĮȖȡȐijȠȞIJĮȚ IJĮ ıIJȠȚȤİȓĮ IJȠȣ ȝİIJĮʌȦȜȘIJȒ Ș ȘȝİȡȠȝȘȞȓĮ ĮȖȠȡȐȢ IJĮ ıIJȠȚȤİȓĮ IJȠȣ ʌȡȠȧȩȞIJȠȢ țĮȚ Ș IJȚȝȒ ĮȖȠȡȐȢ īȓȞİIJĮȚ ĮʌȠįİțIJȩ ȩIJȚ țĮIJĮıțİȣĮıIJȚțȐ İȜĮIJIJȫȝĮIJĮ IJȘȢ ıȣı...

Page 109: ......

Page 110: ...jeþima Upozorenje Napomena Znaþajno Molimo da sve navedeno pažljivo proþitate Dodatne informacije vezane uz uporabu i praktiþnu primjenu ureÿaja slijede nakon znaka ili rijeþi upozorenja Savjeti i napomene koje se odnose na ekonomiþno i ekološki prihvatljivo korištenje ureÿaja oznaþeni su znakom lista djeteline Upute i savjeti koji vam mogu pomoüi pri uklanjanju eventualnih nepravilnosti u radu ur...

Page 111: ......

Page 112: ... izobutan R600a nalazi u sustavu za hlaÿenje Izobutan je plin s visokom razinom ekološke usklaÿenosti ali je zapaljiv Pazite i provjerite da nijedan dio sustava za hlaÿenje nije ošteüen prilikom transporta ili instalacije Ako se sustav za hlaÿenje ošteti postupite kako je navedeno uklonite iz blizine hladnjaka sve izvore otvorenog plamena ili iskrenja i dobro prozraþite prostoriju u kojoj se nalaz...

Page 113: ...vojih spremnika Moguüa opasnost od eksplozije Ne stavljajte u hladnjak ili ledenicu zapaljive predmete ili materijale kao npr sprejeve upaljaþe protupožarne aparate i sl Ne koristite u unutrašnjosti hladnjaka ili ledenice elektriþne ureÿaje kao npr miksere ureÿaje za izradu sladoleda sušila za kosu itd Prije þišüenja iskljuþite i odpojite hladnjak iz elektriþne mreže ili uklonite osiguraþ Kada hla...

Page 114: ...njskom elementu osigurate otvore za ventilaciju sljedeüih mjera Dubina 50mm Širina 540mm 1 540 50 3 2 Za izvedbu odgovarajuüe ventilacije pogledajte nižu sliku 1 Gurnite hladnjak u kuüište kuhinjskog elementa sve dok zaustavne oznake A ne dodirnu rub kuhinjskog elementa 2 Utisnite spojne poklopce izmeÿu ureÿaja i kuhinjskog elementa samo na strani bez šarki 3 Otvorite vrata i gurnite hladnjak prem...

Page 115: ...ce pomoüu isporuþenih vijaka 7 Uþvrstite poklopac C na vodilicu A sve dok ne sjedne na mjesto 8 Otvorite vrata hladnjaka i vrata kuhinjskog elementa za 90 Umetnite mali þetverokutni dio B u vodilicu A Gurnite zajedno vrata hladnjaka i vrata kuhinjskog elementa i oznaþite rupicu kako je prikazano na slici uklonite þetverokutni dio i izbušite rupicu Ø 2 mm na 8 mm od vanjskog ruba vrata Ponovno post...

Page 116: ...te smjer otvaranja vrata hladnjak mora biti odpojen sa elektriþnog napajanja Odpojite utikaþ iz zidne utiþnice Smjer otvaranja vrata hladnjaka može se promijeniti sa desne strane kako je hladnjak isporuþen na lijevu stranu ako to mjesto postave hladnjaka zahtijeva Nagnite hladnjak malo prema stražnjem dijelu i poduprite zbog sigurnosti Odvrnite vijke šarki vrata i uklonite zatik na spojnom zglobu ...

Page 117: ...tima Namjestite poklopac M na suprotnu stranu Okrenite vrata ledenice za 180 i namjestite donji nosaþ vrata u donju udubinu nosaþa vrata ledenice Podignite vrata ledenice malo prema gore i namjestite gornji nosaþ vrata istovremeno umetnite donji nosaþ vrata u þetverokutni otvor Manje podešavanje prema gore ili dole pojednostavnit üe ugradnju vrata ledenice Tehniþka shema M HR ...

Page 118: ......

Page 119: ......
Page 120: ...ureÿaja može poveüati potrošnju elektriþne energije Iz tog razloga bar jedanput godišnje pažljivo oþistite nakupljenu prašinu pomoüu mekane þetke Provjerite otvor za ispust vode nastale odleÿivanjem koja se nalazi na stražnjoj unutarnjoj stijenki hladnjaka Ako je otvor za ispust vode zaþepljen oþistite ga pomoüu malog zelenog štapiüa koji je kao pribor isporuþen uz hladnjak Nakon što ste oþistili ...

Page 121: ...unutar 24 sata stavljena veüa koliþina tople hrane Okrenite gumb za podešavanje temperature na položaj za nisku temperaturu Hrana nije hladna Hladnjak je blizu izvora topline Pogledajte upute o postavljanju hladnjaka Svjetlo u unutrašnjosti hladnjaka ne radi Neispravna žarulja Pogledajte odlomak zamjena žarulje Naslage inja na brtvi vrata Brtva vrata nije dovoljno þvrsta moguüe nakon promjene smje...

Page 122: ...nite neispravnu žarulju Ponovno namjestite poklopac žarulje i zavrnite vijke Ponovno ukljuþite hladnjak Šumovi tijekom rada hladnjaka Sljedeüi šumovi uobiþajeni su pri radu hladnjaka Klik Uvijek kada se kompresor ukljuþi ili iskljuþi þuje se klik Brujanje Kada kompresor radi þuje se brujanje Klokotanje Kada sredstvo za hlaÿenje struji kroz sustav mogu se üuti zvukovi poput klokotanja Pljuskanje Uv...

Page 123: ...jom i podvodnim vodama Znaþenje simbola prekrižene kante za odpatke Ne odlažite stare elektriþne ureÿaje kao nesortirani kuüni odpad veü koristite posebno namijenjena mjesta za tu svrhu Obratite se nadležnoj gradskoj službi za potrebne informacije Ako se elektriþni kuüanski ureÿaj odloži u prirodni okoliš opasne tvari i materijali koje ureÿaj sadrži mogu doüi u dodir sa zemljom i podvodnim vodama ...

Reviews: