8
l
Level the appliance using the feet as
illustrated in
figure 8
:
a
. turn the nut clockwise to release the
screw;
b
. rotate the foot to raise or lower it until it
touches to the floor;
c
. lock the foot, screwing in the nut, until it
tightens against to the bottom of the
washing machine.
l
Plug in the appliance.
A
B
C
8
The detergent draw is split into 3
compartments as illustrated in
figure 9
:
l
compartment "1"
: for prewash detergent;
l
compartment “
”
: for special additives,
softeners, starch fragrances, etc.;
l
compartment "2":
for washing detergent.
A liquid detergent cup
is also included
IN
SOME MODELS
(fig. 10)
. To use it, place it
in
compartment "2"
. This way, liquid
detergent will only enter the drum at the
right time. The cup can also be used for
bleach when the “Rinse” program is
selected.
2
1
9
10
WARNING:
contact the Customer Service Centre
should the power cord need
replacement.
Detergent drawer
WARNING:
only use liquid products; the washing
machine is set to automatically dose
additives at each cycle during the last
rinse.
WARNING:
some detergents are hard to remove.
In this case we recommend using the
specific container to be placed in the
drum (example in figure 11).
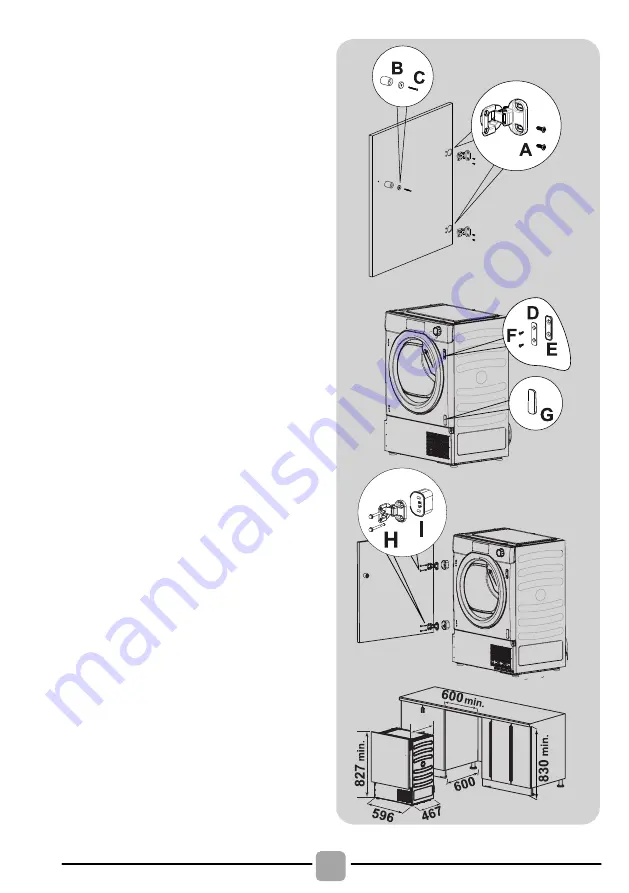
8
l
Fix the hinges in place (on the
door) with the 4 screws
provided (A)
(figure 4)
.
l
Fix the m agnet (B) in place
using screw (C)
(figure 4)
.
l
Mount the plate (D) on the right
or left-hand side, depending on
your installation requirements
(figure 5)
.
l
Place the plastic support (E)
under the plate and fix it in
position with screw (F)
(figure 5)
.
l
Snap moun t cap (G) in the
lower position
(figure 5)
.
l
Mount the furniture door to the
front of the dryer using the
hinges. Place the spacers
under the hinges (I)
(figure 6)
and then fix in
position wit h
screw (H).
l
Slide the dryer into an opening
of the size indicated in the
diagram
(figure 7)
.
Figure 4:
Figure 5:
Figure 6:
Figure 7:
'RQRWLQVWDOOWKHSURGXFWLQD
ORZ WHPSHUDWXUH URRP RU LQ D
URRPZKHUHWKHUHLVDULVNRIIURVW
RFFXUULQJ$WWHPSHUDWXUHDURXQG
IUHH]LQJ SRLQW WKH SURGXFW PD\
QRWEHDEOHWRRSHUDWHSURSHUO\
WKHUH LV D ULVN RI GDPDJH LI WKH
ZDWHULVDOORZHGWRIUHH]HLQWKH
K\GUDXOLF FLUFXLW YDOYHV KRVHV
SXPSV )RU D EHWWHU SURGXFW
SHUIRUPDQFH WKH DPELHQW URRP
WHPSHUDWXUH PXVW EH EHWZHHQ
& 3OHDVH QRWH WKDW
RSHUDWLQJ LQ FROG FRQGLWLRQ
EHWZHHQ DQG & PLJKW
VLPSO\VRPHZDWHUFRQGHQVDWLRQ
DQGZDWHUGURSVRQIORRU
3UHYHQW LWHPV IURP IDOOLQJ RU
FROOHFWLQJ EHKLQG WKH GU\HU DV
WKHVHPD\REVWUXFWWKHDLULQOHW
DQG RXWOHW 1(9(5 LQVWDOO WKH
GU\HUXSDJDLQVWFXUWDLQV
Ɣ
$LU2XWOHWVLQWKH%DVH
:$51,1* 7KH DSSOLDQFH
PXVWQRWEHVXSSOLHGWKURXJK
DQ H[WHUQDO VZLWFLQJ GHYLFH
VXFKDVDWLPHURUFRQQHFWHG
WR D FLUFXLW WKDW LV UHJXODU\
VZLWFKHGRQDQGRIIE\DXWLOLW\
,IWKHVXSSO\FRUGLVGDPDJHG
LW PXVW EH UHSODFHG E\ WKH
PDQXIDFWXUHULWVVHUYLFHDJHQWRU
VLPLODUO\ TXDOLILHG SHUVRQV LQ
RUGHUWRDYRLGDKD]DUG
7KHSOXJVKRXOGEHDFFHVVLEOHIRU
GLVFRQQHFWLRQ DIWHU WKH DSSOLDQFH
KDVEHHQLQVWDOOHG
Ɣ
8
487


