


1
11
11
93783991
FR
FR
FR
FR
FR
NOTICE D'EMPLOI ET D'INSTALLATION DES FOURS ENCASTRABLES
NOTICE D'EMPLOI ET D'INSTALLATION DES FOURS ENCASTRABLES
NOTICE D'EMPLOI ET D'INSTALLATION DES FOURS ENCASTRABLES
NOTICE D'EMPLOI ET D'INSTALLATION DES FOURS ENCASTRABLES
NOTICE D'EMPLOI ET D'INSTALLATION DES FOURS ENCASTRABLES
GB
GB
GB
GB
INSTRUCTIONS FOR THE USE AND INSTALLATION OF BUILT-IN OVENS
INSTRUCTIONS FOR THE USE AND INSTALLATION OF BUILT-IN OVENS
INSTRUCTIONS FOR THE USE AND INSTALLATION OF BUILT-IN OVENS
INSTRUCTIONS FOR THE USE AND INSTALLATION OF BUILT-IN OVENS
INSTRUCTIONS FOR THE USE AND INSTALLATION OF BUILT-IN OVENS
ES
ES
ES
ES
ES
INSTRUCCIONES DE FUNCIONAMIENTO E INSTALACIÓN HORNO
INSTRUCCIONES DE FUNCIONAMIENTO E INSTALACIÓN HORNO
INSTRUCCIONES DE FUNCIONAMIENTO E INSTALACIÓN HORNO
INSTRUCCIONES DE FUNCIONAMIENTO E INSTALACIÓN HORNO
INSTRUCCIONES DE FUNCIONAMIENTO E INSTALACIÓN HORNO
EMPOTRABLE
EMPOTRABLE
EMPOTRABLE
EMPOTRABLE
EMPOTRABLE
BE
BE
BE
BE
BE
GEBRUIKS- EN INSTALLATIEHANDELEIDING VOOR INBOUWOVENS
GEBRUIKS- EN INSTALLATIEHANDELEIDING VOOR INBOUWOVENS
GEBRUIKS- EN INSTALLATIEHANDELEIDING VOOR INBOUWOVENS
GEBRUIKS- EN INSTALLATIEHANDELEIDING VOOR INBOUWOVENS
GEBRUIKS- EN INSTALLATIEHANDELEIDING VOOR INBOUWOVENS
NL
NL
NL
NL
NL
GEBRUIKSAANWIJZING EN INSTALLATIE VAN INBOUWOVENS
GEBRUIKSAANWIJZING EN INSTALLATIE VAN INBOUWOVENS
GEBRUIKSAANWIJZING EN INSTALLATIE VAN INBOUWOVENS
GEBRUIKSAANWIJZING EN INSTALLATIE VAN INBOUWOVENS
GEBRUIKSAANWIJZING EN INSTALLATIE VAN INBOUWOVENS
~~~
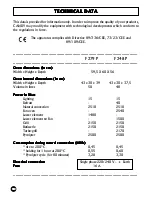
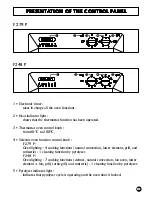
F 248 P
F 248 P
F 248 P
F 248 P
F 248 P
F 279 P
F 279 P
F 279 P
F 279 P
F 279 P


