


43
43
43
43
43
CLEANING : "THE PYROLYSER"
CLEANING : "THE PYROLYSER"
CLEANING : "THE PYROLYSER"
CLEANING : "THE PYROLYSER"
CLEANING : "THE PYROLYSER"
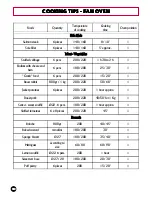
The pyrolyser is a system for the high temperature destruction of stains. The work is done
automatically by means of the timer. The resulting fumes are rendered "clean" by passing
through a pyrolyser whose action begins while the food is cooking. Because the pyrolyse
requires such high temperatures, the oven door is fitted with a safety lock. As long as the
temperature inside the oven is above 320°C, the door cannot be opened.
IMPORTAN
IMPORTAN
IMPORTAN
IMPORTAN
IMPORTANT :
T :
T :
T :
T :
. If a hob has been fitted above the oven, never use the gas burners or electric hot plates while
the pyrolyser is operating, this will prevent the hob from overheating.
.
. .
. . Remove heavy spillages or residues as it would take too long to destroy them. Also, any
heavy stain or grease residue is at risk of catching fire in the intense heat of the pyrolyser.
. Never use commercially available products for cleaning a pyrolyser oven.
During pyrolyser cycle, the oven door becomes hot. Keep children away from it.
During pyrolyser cycle, the oven door becomes hot. Keep children away from it.
During pyrolyser cycle, the oven door becomes hot. Keep children away from it.
During pyrolyser cycle, the oven door becomes hot. Keep children away from it.
During pyrolyser cycle, the oven door becomes hot. Keep children away from it.
Before carrying out the pyrolyser cycle
Before carrying out the pyrolyser cycle
Before carrying out the pyrolyser cycle
Before carrying out the pyrolyser cycle
Before carrying out the pyrolyser cycle
-
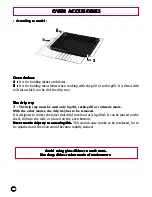
Remove all accessories from the oven
Remove all accessories from the oven
Remove all accessories from the oven
Remove all accessories from the oven
Remove all accessories from the oven
: they cannot withstand the pyrolyser
temperatures without being damaged.
- Remove heavy spillages or residues as it would take too long to destroy them.
- Close the oven door.
- Leave the thermostat control knob in the off position.
- Turn the selector control knob to the left, to the "P" mark.
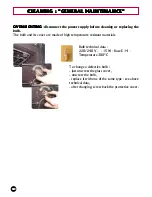
- The electronic programmer fixes a pre-set pyrolyser time (1 h 30 min.) which
corresponds to the minimum time required to complete a pyrolyser cycle and usually
allows perfect cleaning. The pre-set time can be changed :
1 h 30 minutes
:
for normal staining
for normal staining
for normal staining
for normal staining
for normal staining
1 h 45 minutes
:
heavy staining
heavy staining
heavy staining
heavy staining
heavy staining
2 h
:
very heavy staining
very heavy staining
very heavy staining
very heavy staining
very heavy staining
(maxi time : 2 hours, do not exceed this cleaning time).
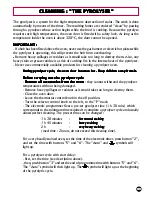
For a very heavily stained oven, set the time of the electronic timer, press button "2",
and set the time with buttons "5" and "6". The "Auto" and symbols will
light up.
For a pyrolyser cycle with start delay :
. first, set the time (see description above).
. then, push button "3" and set the end of programme time with buttons "5" and "6".
The "Auto" symbol will then light up. The symbol will light up at the beginning
of the pyrolytic cycle.


