background image

GB

FR

02

17

IT

32

USER INSTRUCTIONS

OVENS

NOTICE D'EMPLOI ET D'INSTALLATION

DES FOURS ENCASTRABLES

MANUALE D’ISTRUZIONI

FORNO

CANDY HOOVER GROUP S.R.L. • Via Comolli 16 • 20861 Brugherio (MB) - Italy

PEČICE

NAVODILA ZA UPORABO

SL

47

Summary of Contents for FCXNE828X WIFI

Page 1: ... IT 32 USER INSTRUCTIONS OVENS NOTICE D EMPLOI ET D INSTALLATION DES FOURS ENCASTRABLES MANUALE D ISTRUZIONI FORNO CANDY HOOVER GROUP S R L Via Comolli 16 20861 Brugherio MB Italy PEČICE NAVODILA ZA UPORABO SL 47 ...

Page 2: ...danger caused by the accidental resetting of the thermal interruption device the appliance should not be powered by an external switching device such as a timer or be connectedtoacircuitthatisregularlyswitchedonandoff Children under 8 should be kept at a safe distance from the appliance ifnotcontinuouslysupervised Childrenshouldnotplaywiththeappliance The appliance can be used by those aged 8 or o...

Page 3: ... should not be interrupted by the breaker The socket or omnipolar breaker used for the connection should be easilyaccessiblewhentheapplianceisinstalled The disconnection may be achieved by having the plug accessible or by incorporating a switch in the fixed wiring in accordance with the wiringrulesandwithcontact separationcompliant to the requirements forovervoltagecategoryIII lf the power cable i...

Page 4: ...othecavity WARNING Donotlinetheovenwallswithaluminiumfoilorsingle use protection available from stores Aluminium foil or any other protection in direct contact with the hot enamel risk melting and deterioratingtheenameloftheinsides WARNING Neverremovetheovendoorseal CAUTION Do not refill the cavity bottom with water during cooking or whentheovenishot No additional operation setting is required in ...

Page 5: ...Overview 2 2 Accessories 2 3 First use Product Description 8 3 1 Display description 3 2 Cooking modes Use of the Oven 9 4 1 General notes on cleaning 4 2 Maintenance Removing and cleaning wire racks Removal of the oven window Removal and cleaning of the glass door Changıng the bulb Oven Cleaning and Maintenance 14 5 1 F A Q Troubleshooting 16 Summary GB 05 ...

Page 6: ...iplesocketsandextensioncablesisnotrecommended Incaseofmalfunctionand orpooroperation switchofftheapplianceanddonottamperwithit 1 2 Electrical Safety ENSURE THAT AN ELECTRICIAN OR QUALIFIED TECHNICIAN MAKES THE ELECTRICAL CONNECTIONS The power supply to which the oven is connected must conform with the laws in force in the country of installation Themanufactureracceptsnoresponsibilityforanydamageca...

Page 7: ...ive effect on the environment and base elements that can be reused It is important that the WEEE undergo specific treatments to correctly remove and dispose of the pollutants and recover all the materials Individuals can play an important role in ensuring that the WEEE do not becomeanenvironmentalproblem itisessentialtofollowafewbasicrules TheWEEEshouldnotbetreatedasdomesticwaste The WEEE should b...

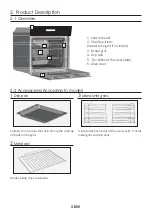
Page 8: ...ire grid if included 3 Metal grill 4 Drip pan 5 Fan behind the steel plate 6 Oven door Drip pan 1 Collects the residues that drip during the cooking offoodsonthegrills Metal grill 2 Holds baking trays and plates Lateral wire grids 3 2 3 5 4 6 1 It located at both sides of the oven cavity It holds metalgrillsanddrippans ...

Page 9: ...remove any lingering smellsofnewness 3 Use of the Oven 3 1 Display description Cooking duration Cooking end Timer Clock set Child lock WiFi ON OFF EXTRA The oven is switched on and off with this button If the oven is switched off the display shows the clock When the oven is inactive all the functions are available except the cookingdurationandendofcooking If the clock is not set the oven does not ...

Page 10: ...said temperature To modify the end of cooking before the set time press EXTRA enough times to illuminate the icon regulate the end of cooking time as required using the and keys and confirm by pressing SELECT To cancel the end of cooking time reset the display to 00 00 TIMER To modify the timer press EXTRA enough times to illuminate the icon regulate the cooking time as required using the and keys...

Page 11: ...y the Wi Fi menu is available by pressing Extra You can switch the oven off using the On Off button but you cannot switch it back on again via the display it can only be switched on via the app To exit the enrolment reset procedure via the display press Extra and then use buttons to select Off After five minutes the appliance will exit the enrolment reset procedureautomatically Read the oven sends...

Page 12: ...are connected andallwirelessnetworkportsareactivated Howtodeactivatewirelessnetworkport 2 0 W Ifthewifiiconisonorblinksthewifimoduleison If the oven is already enrolled press Extra on the timer display and select the Wi Fi menu then press the buttons select On and press the select button If the oven is not enrolled follow procedure for enrolling Ifthewifiiconisoffthewifimoduleisoff To switch off t...

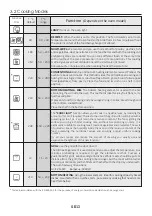
Page 13: ...for juicy fruit flans tarts quichesandpâté It prevents food from drying and encourages rising in cakes bread dough and otherbottom cookedfood Placetheshelfinthebottomposition L3 L1 L5 GRILL Usethegrillwiththedoorclosed Thetopheatingelementisusedaloneandyoucanadjustthetemperature Five minutes preheating is required to get the elements red hot Success is guaranteed for grills kebabs and gratin dishe...

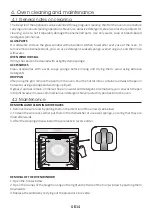
Page 14: ...h a wet soapy sponge before rinsing and drying them avoid using abrasive detergents DRIPPAN Afterusingthegrill removethepanfromtheoven Pourthehotfatintoacontainerandwashthepanin hotwater usingaspongeandwashing upliquid If greasy residues remain immerse the pan in water and detergent Alternatively you can wash the pan inthedishwasheroruseacommercialovendetergent Neverputadirtypanbackintotheoven 4 2...

Page 15: ...xtractingitfromtheovendoor NB inpyrolyticovens alsoremovethe secondandthirdglass ifpresent 7 Attheendofcleaningorsubstitution reassemblethepartsinreverseorder Onallglass theindication Pyro mustbelegibleandpositionedontheleftsideofthedoor closetothe left handlateralhinge Inthisway theprintedlabelofthefirstglasswillbeinsidethedoor GB 15 LOW E 1 2 3 1 2 3 4 5 6 7 ...

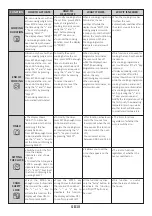
Page 16: ...ary settings are correct The oven does not heat up The oven does not heat up GB 16 Steam and condensation on the user interface panel Clean with a microfiber cloth the user interface panel to remove the condensation layer No reaction of the touch user interface CHANGINGTHEBULB 1 Disconnecttheovenfromthemainssupply 2 Undotheglasscover unscrewthebulbandreplaceitwithanewbulbofthesametype 3 Oncethedef...

Page 17: ...s à une distance desécurité AVERTISSEMENT Vérifiez que l appareil est éteint avant de remplacer l ampoule pouréviterlerisquedechocsélectriques AVERTISSEMENT Afin d éviter tout risque lié à la réinitialisation accidentelle de l interrupteur thermique l appareil ne doit pas être alimenté par un dispositif de commutation externe tel qu une minuterie oureliéàuncircuitrégulièrementalluméetéteint Les en...

Page 18: ...n électricien professionnel de remplacer la prise d alimentationparundispositifcompatible La fiche du câble d alimentation et la prise d alimentation doivent être conformesauxnormesenvigueurdanslepaysd installation Il est possible de brancher l appareil à la prise d alimentation en installant entre l appareil et la prise d alimentation un disjoncteur multipolaire qui supporte la charge électrique ...

Page 19: ...s vente L appareil ne doit pas être installé derrière une porte décorative pour éviterlasurchauffe Pourintroduirelagrilledanslefour vérifiezquelebutoirestdirigéversle haut et au fond de la cavité La grille doit être complètement insérée dans lacavité AVERTISSEMENT Ne recouvrez pas les parois du four avec du papier aluminium ou une protection jetable disponible dans les magasins Le papier d alumini...

Page 20: ...e conformité 2 1 Vue d ensemble 2 2 Accessoires 2 3 Première utilisation Description du produit 23 3 1 Description de l affichage 3 2 Mode de cuisson Utilisation du Four 24 4 1 Remarques générales concernant le nettoyage 4 2 Entretien Retrait et nettoyage des grilles Retrait de la porte du four Retrait et nettoyage des vitres REmplacement de l ampoule Nettoyage du four et maintenance 29 5 1 F A Q ...

Page 21: ...responsabledetoutdommage liéàunemauvaiseutilisation ouadesmodificationstechniquesduproduit L utilisationdetoutappareilélectriqueimpliquelerespectdecertainesrèglesfondamentales Nepastirersurlefilélectriquepourdébrancherlaprise Nepastoucherl appareilaveclesmainsoulespiedsmouillésouhumides Engénérall utilisationd adaptateurs deprisesmultiplesetderallongesestdéconseillé En cas de dysfonctionnement et ...

Page 22: ...elonletyped encastrement dernièrepage ATTENTION Faire vérifier la continuité de la terre de l installation avant de procéder au raccordement Le fabricant décline toute responsabilité en cas d accidents ou d autres problèmes qui pourraient survenir à l usage d unappareilnonreliéàlaterre oureliéàuneterredontlacontinuitéseraitdéfectueuse REMARQUE Le four peut nécessiter une opération de S A V Aussi p...

Page 23: ......

Page 24: ...ON OFF EXTRA Le four s allume et s éteint avec ce bouton Si le four s éteint l écran affiche l heure Quand le four est inactif toutes les fonctions s affichent sur l écran à l exception de la fonction de durée de cuisson et de fin de cuisson Si l heure n est pas réglée le four ne fonctionne pas et l heure 12 00 se met à clignoter sur l écran A cet instant la seule fonction qui marche est la foncti...

Page 25: ...i peuvent être programmées en avance Siunprogrammedecuissonest sélectionné n appuyez pas sur le bouton F sinon vos donnéesserontperdues Si le départ différé est programmé le four s éteint et l écran affiche l heure pendant que les fonctions de cuisson temps de cuisson et fin de cuissonsontallumés Siunprogrammedecuissonest sélectionné en cliquant sur les touches et vous pourrez voir la température ...

Page 26: ...XTRA et utiliser les boutons pour sélectionner la fonction Off Après 5 minutes le dispositif quitte la procédure d inscription la procédure de réinitalisatonautomatiquement Read Lecture Le four envoi ses statuts à l application mais il ne peut etre contrôlé à distance La procédured inscriptiondoitêtrefaiteenamont Si le réseau WIFI n est pas configuré seules les fonctions Off et Réinitialisation pe...

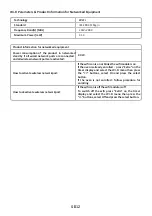
Page 27: ...yro FR 27 Paramètres de la fonction Wi Fi Informations sur les équipements en réseau Informations sur les équipements en réseau 2 0W Consommation électrique du produit en mode veille en réseau quand tous les ports de réseau câblés sont connectés et que tous les ports de réseausansfilsontactivés Si le symbole Wi Fi est allumé ou clignote le module sans filestactivéàlaconditionquele fourait déjàété ...

Page 28: ...tédecetteNouvellefonction CHALEURPULSÉE fonctionrecommandéepourlesvolailles lespâtisseries les poissons les légumes La chaleur pénètre mieux à l intérieur du mets à cuire et réduit le temps de cuisson ainsi que le temps de préchauffage Vous pouvez réaliser des cuissons combinées avec préparations identiques ou non sur un ou deuxgradins Cemodedecuissonassureeneffetunerépartitionhomogènede lachaleur...

Page 29: ...e puis rincer Eviter d utiliser des détergentsabrasifs LECHEFRITE Après l utilisation de la grille retirez le du four Prendre soin de reverser les graisses tièdes lêchefrite dans l évier Laver et rincer le plat récolte sauce dans de l eau chaude avec une éponge imbibée de produit lessiviel Si les résidus restent collés le faire tremper dans de l eau et un produit détergent Il peutaussiêtrenettoyéd...

Page 30: ...a porte du four NB dans les fours de pyrolyse retirez l extraire égalementlesdeuxièmeettroisièmeverre lecaséchéant 7 AlafindunettoyageRemonterlespiècesdansl ordreinverse Sur toutes les vitres l indication Pyro doit être lisible et positionné sur le côté gauche de la porte à proximitédelacharnièrelatéralegauche Decettemanière l étiquetteimpriméedupremierverresera àl intérieurdelaporte LOW E 1 2 3 1...

Page 31: ...s paramètres nécessaires sont corrects Le four ne chauffe pas Le four ne chauffe pas Vapeur et de la condensation sur l écran tactile Nettoyez avec un chiffon en microfibres l écran tactile pour enlever la couche de condensation Aucune réaction de l écran tactile REMPLACEMENTDEL AMPOULE 1 Débranchezlefourdelaprise 2 Défairelecouvercleenverre dévisserl ampouleetlaremplacerparuneampouledumêmemodèle ...

Page 32: ...ERTENZA assicurarsi che l elettrodomestico sia spento prima di sostituirelalampadinaperevitareognipossibilitàdifolgorazione AVVERTENZA per evitare rischi causati da un involontario ripristino dell interruttore automatico l elettrodomestico non deve essere alimentato da un dispositivo di commutazione esterno quale ad esempioun contaminuti oppure essere collegato ad un circuito che viene regolarment...

Page 33: ...o specializzato di sostituire la presa con un altra di tipo compatibile La spina e la presa devono essere conformi alle normative attuali del paese di installazione Il collegamento alla rete di alimentazione può essere effettuato anche collocando un interruttore automatico onnipolare tra l elettrodomestico e la rete di alimentazione in grado di supportare il caricomassimocollegato inlineaconlalegi...

Page 34: ...el monitor In tal caso contattare il servizioclienti L elettrodomestico non deve essere installato dietro a una porta a scopoornamentaleperevitarneilsurriscaldamento Quando si posiziona uno scaffale all interno accertarsi che il blocco sia rivolto verso l alto e nella parte posteriore della guida Lo scaffale deveessereinseritocompletamentenellaguida AVVERTENZA Non rivestire le pareti del forno con...

Page 35: ...o utilizzo Descrizione del Prodotto 38 3 1 Descrizione del display 3 2 Modalità di cottura Utilizzo del Forno 39 4 1 Note generiche di pulizia 4 2 Manutenzione Rimozione e pulizia delle scaffalature a filo Rimozione dello sportello del forno Rimozione e pulizia della porta in vetro Sostituzione della lampadina Pulizia e Manutenzione del Forno 44 5 1 F A Q Risoluzione dei problemi 46 IT 35 Sommario...

Page 36: ...iasiapparecchioelettricocomportal osservanzadialcuneregolefondamentali Nontirareilcavodialimentazioneperstaccarelaspinadellapresadicorrente Nontoccarel apparecchioconmaniopiedibagnatioumidi Ingeneraleèsconsigliabilel usodiadattatori presemultipleeprolunghe Incasodiguastoe ocattivofunzionamentodell apparecchio spegnerloenonmanometterlo 1 2 Sicurezza Elettrica FAREEFFETTUAREICOLLEGAMENTIELETTRICIADU...

Page 37: ...a circolazione del flusso di aria fresco necessario a garantire il raffreddamento del forno e la sicurezza dei componenti interni Realizzareleapertureindicatenell ultimapaginadelmanuale asecondadel tipodiinstallazione 1 5 Gestione dei rifiuti e rispetto dell ambiente Questo apparecchio è contrassegnato in conformità alla Direttiva europea 2012 19 EU sulle apparecchiature elettriche ed elettroniche W...

Page 38: ... group com 2 Descrizione del Prodotto 2 1 Panoramica 1 Pannello di controllo 2 Posizioni ripiani castelletto se previsto 3 Griglia metallica 4 Leccarda 5 Ventola dietro alla piastra di acciaio 6 Porta forno 2 2 Accessori Leccarda 2 Raccoglie i residui di cibo che gocciolano durante lacottura Griglia metallica 1 Sostiene teglie e piatti 2 3 5 4 6 1 Griglie laterali a rete 3 NOTA Per un corretto uti...

Page 39: ...peggia indicando 12 00 e l unico tasto che funziona è quello di EXTRA Tramite il tasto EXTRA si possono impostare leseguentifunzioni 2 3 Primo utilizzo PULIZIAPRELIMINARE Pulire sempre il forno prima di utilizzarlo per la prima volta Pulire le superfici esterne con un panno morbido leggermenteinumidito Lavare tutti gli accessori e pulire l interno del forno con del detergente per piatti ed acqua ca...

Page 40: ...SELECT Per cancellare il tempo di fine cottura azzerare il display a 00 00 Quando un programma di cottura termina il forno si spegne e il display visualizza END l icona del programma di cottura rimane accesa fino a quando non viene premuto il pulsante Acceso Spento l unico ancora funzionante Quando un programma di cottura termina si attiva un allarme L allarme funziona indipendentemente dal fatto ...

Page 41: ...gatoalWi Fi laduratapredefinitatempodicotturaèdi5ore mapuòesseremodificato dall utente ArruolamentoWi Fi Per arruolare l apparecchio al Wi Fi premere Extra sul display fino a quando l icona Wi Fi lampeggia quindi selezionare Reset premendo La procedura in applicazione dovrebbe quindi essere seguita Una volta selezionato l apparecchiosidà5minutipercompletareilprocessodiregistrazione IconaWi Fi Icon...

Page 42: ...e le porte di rete wireless sono attive Come disattivare la porta di rete wireless 2 0 W Se l icona Wi Fi è accesa o lampeggia il modulo Wi Fi è acceso Se il forno è già registrato premere Extra sul display del timer e selezionare il menù Wi Fi quindi premere i tasti selezionare On e premere iltastodiselezione Se il forno non è registrato seguire la procedura di registrazione Se l icona Wi Fi è sp...

Page 43: ...e senza miscelare sapori e odori Cottura delicata indicata per pan di spagna torte Margherita pastasfoglia ecc SCONGELAMENTO questa posizione permette di far circolare l aria a temperatura ambiente intorno al cibo surgelato facendolo così scongelare in pochiminutisenzamodificareodalterareilcontenutoproteico Testato secondo la norma EN 60350 1 ai fini della dichiarazione di consumo energetico e dell...

Page 44: ...ne sciacquarli e asciugarli evitare di usaredetergenti abrasivi VASCHETTADIGOCCIOLAMENTO Dopo l uso del grill rimuovere la vaschetta dal forno Versare il grasso caldo in un contenitore e lavare la vaschettainacquacalda utilizzandounaspugnaedeldetergenteperpiatti Se rimangono dei residui di grasso immergere la vaschetta in acqua e detergente In alternativa è possibile anche lavare la vaschetta nell...

Page 45: ...orta del forno NB nei forni pirolitici rimuovereancheilsecondoeterzovetro sepresente 7 Alterminedellapuliziaosostituzioneriassemblarelepartinell ordineoppostoalla rimozione Su tutti i vetri l indicazione Low E deve essere correttamente leggibile e posizionata sul lato sinistro della porta vicino alla cerniera laterale sinistra In questo modo l etichetta stampata del primo vetro rimarràinternaallap...

Page 46: ...Il prodotto è garantito oltre che ai sensi di legge alle condizioni e nei termini riportati sul certificato di garanzia convenzionale inserito nel prodotto Il certificato dovrà essere conservato e mostrato al nostro Centro di Assistenza Tecnica Autorizzato in caso di necessità insieme allo scontrino comprovante l acquisto dell elettrodomestico Puoi consultare le condizioni di garanzia anche sul no...

Page 47: ...ve termičnega prekinjala te naprave ne smete napajati preko zunanje stikalne naprave kot je časovnik ali je priključiti na tokokrog ki serednovklapljaaliizklaplja Otroci mlajši od 8 let morajo biti na varno oddaljeni od naprave če nisopodstalnimnadzorom Otroci se z napravo ne smejo igrati Napravo lahko uporabljajo osebe stare 8 let ali več in osebe z zmanjšanimi telesnimi čutnimi ali razumskimi sp...

Page 48: ... omrežja ne presega predpisane zakonodaje Rumeno zelenega kabla ni dovoljeno prekinjati z varovalko Vtičnica ali varovalka ki sta vgrajeni med vtičnico in napravo morata po namestitvi napraveostatienostavnodostopni Prekinitev napajanja mora biti možna bodisi z odklopom vtikača iz vtičnice oziromaprekdodatnovgrajenegastikala nameščenegaskladno spravilielektro stroke Če je napajalni kabel poškodovan...

Page 49: ...a oblagajte z aluminijasto folijo ali zaščito za enkratnouporabo kijenavoljovtrgovinah Aluminijasta folija ali katera koli druga zaščita ki je v neposrednem stiku z vročim emajlom predstavlja tveganje topljenja in slabšanja kakovosti emajlavnotranjosti OPOZORILO Nikolineodstranitetesnilnavratihpečice POZOR Dna odprtine pečice ne polnite z vodo med kuhanjem ali ko je pečicavroča Za upravljanje te n...

Page 50: ...Dodatna oprema 2 3 rvo potreba P u Opis izdelka 53 3 1 Opis zaslona 3 2 pečenja Uporaba pečice 54 4 1 Splošni napotki za čiščenje 4 Vzdrževanje 2 Odstranitev okna pečice Odstranjevanje in čiščenje žičnatih rešetk Odstranitev in čiščenje steklenih vrat Zamenjava žarnice Čiščenje in vzdrževanje pečice 59 5 1 Po gosta vprašanja Odpravljanje težav 61 Povzetek SL 50 ...

Page 51: ...ihpravil Nevlecitezanapajalnikabel daodstranitevtičizvtičnice Aparatasenedotikajtezvlažnimirokamialinogami Nasplošnouporabaadapterjev večvtičnicinpodaljškovnipriporočljiva Vprimeruokvarein alislabegadelovanja aparatizklopiteinganespreminjajte 1 2 Električna varnost ZAGOTOVITE DAELEKTRIČNEPOVEZAVEVZPOSTAVIELEKTRIČARALIUSPOSOBLJENTEHNIK Napajanje skaterimjepovezanapečica morabitivskladuzzakoni kivel...

Page 52: ...go stensko vtičnico da lahko pečico povežete z le to če jo odstranite iz prostora v katerega je nameščena Napajalni kabel lahko zamenja samo osebje tehničnega servisa s kablom z enakovrednimi kvalifikacijami 1 5 Ravnanje z odpadki in varstvo okolja Ta naprava je označena v skladu z določili Evropske direktive 2012 17 EU o odpadni električni in elektronski opremi OEEO OEEO so tako snovi ki onesnažu...

Page 53: ...ce Za nameščanjekovinskihrešetkinpladnjazakapljanje Ponev 2 Zbira ostanke ki z rešetke kapljajo med kuhanjem živilnarešetki 2 3 5 4 6 1 SL 53 1 6 Izjava o skladnosti Z oznako na tem proizvodu izjavljamo da je proizvod skladen z vsemi evropskimi zahtevami o varnosti zdravjuinvarstvuokolja kisevzakonodajinanašajonataizdelek S tem skupina Candy Hoover Group izjavlja da je ta aparat skladen z veljavni...

Page 54: ...skrbitezazračenjeprostora 3 Uporaba pečice 3 1 Opis zaslona Čas kuhanja Konec kuhanja Časovnik Nastavit ev ure Varnostni zaklep WiFi VKLOP IZKLOP EXTRA Pečica se s tem gumbom vklopi in izklopi Čejepečicaizklopljena senazaslonuprikažeura Kojepečica neaktivna so na voljo vse funkcije razen trajanja kuhanja in koncakuhanja Če ura ni nastavljena pečica ne deluje na zaslonu utripa 12 00 in edina delujo...

Page 55: ...e spremeniti časovnik tolikokrat pritisnite EXTRA DODATNO da ikona zasveti po potrebi nastavite čas kuhanja s tipkama in in potrdite s pritiskom SELECT IZBERI Tafunkcijaaktiviraalarm ki se za nekaj sekund vključi pred potekom nastavljenega časa ta funkcijapečiceneizklopi Izberete lahko as med č 00 00in23 59 ČASOVNIK Na zaslonu se prikaže 00 00 če časa ne vstavite aličeježedoločen Tolikokrat pritis...

Page 56: ...ostopkom funkcije kuhanja receptov in nastavitev temperature niso dostopne z zaslona S pritiskom tipke Extra Dodatno je na voljo le meni za Wi Fi Pečico lahko izklopite s tipko vklop izklop vendar je ne morete znova vklopiti na zaslonu znova jo lahko vklopite le prek aplikacije Za izhod iz postopka prijave ponastavitev prek zaslona pritisnite Extra Dodatno in nato tipki da izberete Off Izklop Po p...

Page 57: ...Kako deaktivirati vrata brezžičnega omrežja 2 0 W Če ikona Wi Fi sveti ali utripa potem je modul Wi Fi vklopljen Če je pečica že vpisana pritisnite možnost Extra Dodatno na zaslonu časovnika in izberite meni Wi Fi potem pa pritisnite gumba izberite možnost On Vklop in pritisnite gumb za izbiro Čepečicanivpisana upoštevajtepostopekzavpis Če je ikona Wi Fi izklopljena potem je modul Wi Fi izklopljen...

Page 58: ...in energijskega razreda 3 2 Načini pečenja SPODNJI GRELNIK VENTILATOR Pečico segreva spodnji grelec vroč zrak pa zahvaljujoč ventilatorju kroži v notranjosti pečice Funkcija je namenjena peki občutljivih jedi pite narastki Jed se ne izsuši in bolje naraste predvsem to velja za kolače kruh in druge jedi ki se morajo segrevati od spodaj Pekač potisnitevspodnjovišinovodila L3 L1 L5 ŽAR P ri zaprtih v...

Page 59: ...hkotesniloočistitezvlažnogobo DODATNAOPREMA Pred spiranjem in sušenjem očistite dodatke z vlažno gobico z milom izogibajte se uporabi abrazivnih detergentov PONEV Pouporabižaraodstraniteponevizpečice Prelijtevročomaščobovposodoinzgobicotersredstvomza pomivanjeposodooperitevvročivodi Če mastni ostanki niso odstranjeni potopite posodo v vodo in detergent Alternativno lahko posodo pomijete v pomivaln...

Page 60: ...azljivo ga povlecite iz vrat pečice opomba v pirolitičnih pečicah odstranite tudi drugointretjesteklo čejenameščeno 7 Obkoncučiščenjaalizamenjavesestavitedelevobratnemvrstnemredu Na vseh steklih mora biti oznaka Pyro čitljiva in nameščena na levi strani vrat v bližini levega stranskegatečaja Natanačinbonatisnjenaetiketaprvegasteklabilananotranjistranivrat LOW E 1 2 3 1 2 3 4 5 6 7 SL 60 ...

Page 61: ...reje Para in kondenzacija na plošči uporabniškega vmesnika Ploščouporabniškega vmesnikaočistiteskrpoiz mikrovlaken daodstranite kondenzacijsko plast Ni odziva uporabniškega vmesnika na dotik ODSTRANJEVANJEIN Š ČI ČENJESTRANSKIHNOSILCEV 1 Odvijtevijakvnasprotnismerivrtenjaurinegakazalca 2 Odstranitestranskenosilcetako dajihpovlečeteksebi 3 Očistitestranskastojalavpomivalnemstrojualizmokrogoboinjihn...

Page 62: ......

Page 63: ...5 000mm2 GB A Si le montage du socle ne permet pas la circulation d air pour obtenir la performance maximale du four il est nécessaire de créer une ouverture de 500x10mm ou la même surface dans 5 000mm2 FR A 595 mm 595 mm 546 mm 22 mm 580 mm 560 mm A 600 mm 560 mm 560 mm 560 mm 560 mm x 45 mm A 560 mm 590 mm If the furniture is coverage with a bottom at the back part provide an opening for the pow...

Page 64: ...r se réserve le droit de modifier les produits en cas de nécessité même dans l intérêtdel utilisation sanscauserdepréjudicesauxcaractéristiquesdefonctionnementdesécuritédesappareils FR IT Il produttore declina ogni responsabilità per inesattezze contenute nel documento stampato per errori di trascrizione contenuti in o questa brochure Inoltre si riserva il diritto di apportare modifiche al prodott...

Reviews: