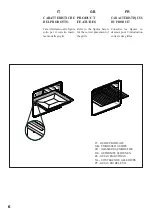
background image

9

IT

GB

FR

PRIMO UTILIZZO

Il  forno  va  pulito  a  fondo

con  acqua  e  sapone  e  ri-

sciacquato  accuratamente.

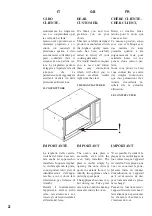
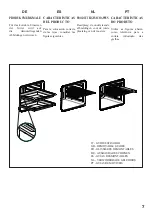
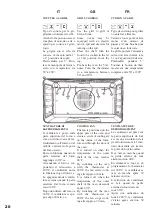
Per  togliere  i  telai  laterali

nei  forni  con  pareti  lisce

procedere come illustrato in

figura.

Riscaldare il forno per circa

30  minuti  alla  massima

temperatura;  verranno  così

eliminati  tutti  i  residui

grassi  di  lavorazione  che

potrebbero  causare  sgrade-

voli odori in fase di cottura.

PREMIERE

UTILISATION

Le  four  doit  être  nettoyé  à

fond  à  l’eau  et  au  savon,

puis rincé méticuleusement.

Pour  enlever  les  cadres

latéraux  dans  les  fours  à

parois  lisses,  procéder

comme  indiqué  sur  la

figure.

Il  convient  de  n’insérer  la

nourriture  que  lorsque  le

four a atteint la température

préétablie, 

c’est-à-dire

quand  s’éteint  le  voyant

lumineux.

THE FIRST TIME

YOU USE THE OVEN

Clean  the  oven  thoroughly

with  soapy  water  and  rinse

well. To remove the lateral

frames from smooth-walled

ovens, proceed as shown in

the figure.

Operate  the  oven  for  about

30  minutes  at  maximum

temperature  to  burn  off  all

traces  of  grease  which

might  otherwise  create

unpleasant  smells  when

cooking.

Important:

A  titre  de  précaution,  avant

d’effectuer  toute  opération

de  nettoyage  du  four  quelle

qu’elle  soit,  débrancher

toujours la fiche de la prise

de  courant  ou  couper  la

ligne  d’alimentation  de

l’appareil.  Veiller  à  ne  pas

utiliser de substances acides

ou  alcalines  (jus  de  citron,

vinaigre,  sel,  tomate,  etc.).

Ne pas utiliser de produits à

base  de  chlore,  acides  ou

abrasifs,  surtout  pour  le

nettoyage des parois peintes.

NE  PAS  UTILISER  DE

NETTOYEURS  VAPEUR

POUR NETTOYER LE FOUR.

Important:

As  a  safety  precaution,

before  cleaning  the  oven,

always  disconnect  the  plug

from  the  power  socket  or

the  power  cable  from  the

oven.  Do  not  use  acid  or

alkaline substances to clean

the  oven  (lemon  juice,

vinegar, salt, tomatoes etc.).

Do  not  use  chlorine  based

products,  acids  or  abrasive

products  to  clean  the

painted  surfaces  of  the

oven.

DO  NOT  USE  STEAM

CLEANERS TO CLEAN

THE OVEN.

Importante:

come  precauzione  di  sicu-

rezza  prima  di  procedere  a

qualsiasi operazione di puli-

zia  del  forno  staccare  sem-

pre  la  spina  della  presa  di

corrente  o  togliere  la  linea

di  alimentazione  dell’appa-

recchio. Inoltre evitare di u-

sare sostanze acide o alcali-

ne (succhi di limone, aceto,

sale, pomodori ecc.). Evita-

re di usare prodotti a base di

cloro,  acidi  o  abrasivi  spe-

cialmente per la pulizia del-

le pareti verniciate.

NON 

UTILIZZARE

PULITORI A VAPORE PER
LA PULIZIA DEL FORNO.

ES

NL

PT

DE

PRIMERA

UTILIZACIÓN

El  horno  se  limpia  a  fondo

con  agua  y  jabón  y  se

enjuaga  cuidadosamente.

Para  sacar  los  armazones

laterales  en  los  hornos  con

paredes lisas proceder como

se ilustra en la figura.

Recalentar  el  horno  alre-

dedor  de  30  minutos  a  la

máxima  temperatura;  serán

así  eliminados  todos  los

residuos  grasos  ya  que  po-

drían causar olores desagra-

dables  durante  la  fase  de

cocción.

ERSTMALIGE

BENUTZUNG

Der  Backofen  muss  gründ-

lich  mit  Seifenwasser  ge-

säubert  werden.  Wie  auf

der  Abbildung  dargestellt

vorgehen, um bei den Öfen

mit  glatten  Wänden  die

seitlichen  Backbleche  her-

auszunehmen.

Den  Backofen  für  etwa  30

Minuten  auf  Höchsttempe-

ratur  aufheizen;  auf  diese

Weise  werden  alle  fett-

haltigen  Bearbeitungsrück-

stände  eliminiert,  die  beim

Backen  unangenehme  Ge-

rüche verursachen könnten.

EERSTE GEBRUIK

De oven moet grondig wor-

den  schoongemaakt  met

water en zeep, en zorgvuldig

worden  afgespoeld.  Voor

het  verwijderen  van  de  zij-

frames in ovens met gladde

wanden  dient  u  te  werk  te

gaan zoals op de afbeelding

wordt geïllustreerd.

Verwarm  de  oven  ge-

durende  ongeveer  30  minu-

ten  op  de  hoogste  tempe-

ratuur;  zodoende  worden

alle  achtergebleven  vetten

geëlimineerd  die  onaange-

name geuren zouden kunnen

veroorzaken  tijdens  het

bereiden van voedsel.

Importante:

como  precaução  de  segu-

rança  antes  de  proceder  a

qualquer  operação  de  lim-

peza do forno tirar sempre a

ficha da tomada de corrente

ou  tirar  a  linha  de  alimen-

tação  do  aparelho.  Além

disso evite  usar substâncias

ácidas  ou  alcalinas  (sumos

de  limão,  vinagre,  etc.).

Evitar  a  utilização  de

produtos  à  base  de  cloro,

ácidos  ou  abrasivos    espe-

cialmente  para  a  limpeza

das paredes envernizadas.

NÃO UTILIZE M

Á

QUINAS

DE  LIMPEZA A  VAPOR

PARA LIMPAR O FORNO.

Belangrijk:

als 

veiligheidmaatregel

moet  altijd  de  stekker  uit

het  stopcontact  worden  ge-

haald  of  moet  de  voeding

van  het  apparaat  worden

afgekoppeld  alvorens  de

oven te gaan schoonmaken.

Gebruik  bovendien  geen

zure of alkaline stoffen (ci-

troensap,  azijn,  zout,  enz.).

Gebruik  geen  producten  op

chloorbasis,  of  zure  of

schurende  producten,  voor-

al  voor  het  reinigen  van

gelakte oppervlakken.

GEBRUIK GEEN STOOMREINIGERS

VOOR HET SCHOONMAKEN VAN

DE OVEN.

Importante:

Como  precaución  de  segu-

ridad,  antes  de  proceder  con

cualquier  operación  de  lim-

pieza  del  horno  quitar

siempre el enchufe de la toma

de  corriente  o  quitar  la  línea

de  alimentación  del  aparato.

Además  evitar  el  uso  de

sustancias  ácidas  o  alcalinas

(jugos de limón, vinagre, sal,

tomates,  etc.).  Evitar  el  uso

de productos a base de cloro,

ácidos  o  abrasivos    especial-

mente para la limpieza de las

paredes barnizadas.

NO UTILICE GENERADORES

DE VAPOR PARA LIMPIAR EL

HORNO.

Wichtig:

Als  Sicherheitsvorkehrung

muss  vor  jeder  Reinigung

des  Backofens  immer  das

Stromnetz 

abgeschaltet

werden.  Zum  Reinigen

dürfen  keine  sauren  oder

alkalischen Substanzen ver-

wendet  werden  (Zitronen-

saft, Essig, Salz, usw.).

Chlorhaltige  Produkte,  so-

wie  Säuren  oder  Scheuer-

mittel  sind  ebenfalls  zu

vermeiden,  dies  gilt  vor

allem für die Reinigung der

lackierten Wände.

ZUR REINIGUNG DES OFENS

KEINE  DAMPFREINIGER

BENUTZEN.

PRIMEIRA

UTILIZAÇÃO

O  forno  deve  ser  limpo  a

fundo  com  água  e  sabão  e

depois  cuidadosamente  se-

cado com um pno. Para tirar

as  estruturas  laterais  nos

fornos  com  paredes  lisas

proceder  como  ilustrado  na

figura.

Aquecer  o  forno  à  máxima

temperatura por cerca de 30

minutos; assim serão elimi-

nados  todos  os  resíduos  de

gorduras de fabrico que po-

deriam causar cheiros desa-

gradáveis ao cozinhar.

Summary of Contents for FNP319/1X/E

Page 1: ...Use Maintenance FOURS SÉRIE BIG90 Installation Emploi Entretien HORNOS SERIE BIG90 Instalación Uso Mantenimiento OVENS SERIE BIG90 Installatie Gebruik Onderhoud FORNOS SÉRIE BIG90 Instalação Uso Manutenção BACKÖFEN BAUREIHE BIG90 Installation Gebrauch Wartung IT GB FR ES NL PT DE ...

Page 2: ...ples instructions que vous permettront d at teindre d excellents ré sultats dès la prémière utilisation LE CONSTRUCTEUR IMPORTANT Il est possible d accéder à la plaque des caractéristiques du four même lorsque l appareil est installé Cette plaque que l on voit en ouvrant la porte présente toutes les données d identification de l appareil qu il est nécessaire de citer pour toute demande de pièces d...

Page 3: ...maneira a dar lhe total satisfação para um co zinhado perfeito Por conseguinte pedimos que leia e siga as instruções que lhe permitirão alcançar excelentes resultados desde o início da sua utilização O FABRICANTE IMPORTANTE La placa de características del horno se encuentra disponible junto con el apa rato En esta placa visible abriendo la puerta se muestran todos los datos de identificación del a...

Page 4: ...RIVANTIDAUNANONCORRETTA INSTALLAZIONE O DA USO IMPROPRIO ERRONEO OD ASSURDO L APPARECCHIO NON DEVE ESSERE USATO DA PERSONE COMPRESI BAMBINI CON RIDOTTE CAPACITÀ FISICHE SENSORIALI O MENTALI O DA PERSONE CHE MANCANO DELL ESPERIENZA E DELLE CONOSCENZE NECESSARIE SE NON SOTTO LA SUPERVISIONE O DIETRO ISTRUZIONI SULL USO DELL APPARECCHIO DA PARTE DI UNA PERSONA RESPONSABILE PER LA LORO SICUREZZA I BAM...

Page 5: ...A RESPONSABLE DE SU SEGURIDAD O HAYAN RECIBIDO LAS INSTRUCCIONES NECESARIAS SOBRE LA UTILIZACIÓNDELAPARATO LOSNIÑOSTIENEN QUE ESTAR CONTROLADOS PARAASEGURARSE DE QUE NO JUEGAN CON ELAPARATO ESTE PRODUTO FOI CONCEBIDO PARA UMA UTILIZAÇÃO DE TIPO DOMÉSTICA O FABRICANTE DECLINA TODAS AS RESPONSABILIDADESNOCASODEEVENTUAIS DANOS ACOISAS OU PESSOAS DERIVADOS DE UMA INSTALAÇÃO INCORRECTA OU DE USO IMPRÓP...

Page 6: ...oceed as shown in the figure Operate the oven for about 30 minutes at maximum temperature to burn off all traces of grease which might otherwise create unpleasant smells when cooking Important A titre de précaution avant d effectuer toute opération de nettoyage du four quelle qu elle soit débrancher toujours la fiche de la prise de courant ou couper la ligne d alimentation de l appareil Veiller à ...

Page 7: ...uer operação de lim peza do forno tirar sempre a ficha da tomada de corrente ou tirar a linha de alimen tação do aparelho Além disso evite usar substâncias ácidas ou alcalinas sumos de limão vinagre etc Evitar a utilização de produtos à base de cloro ácidos ou abrasivos espe cialmente para a limpeza das paredes envernizadas NÃO UTILIZE MÁQUINAS DE LIMPEZA A VAPOR PARA LIMPAR O FORNO Belangrijk als...

Page 8: ... d effectuer toute opération de nettoyage du four quelle qu elle soit débrancher toujours la fiche de la prise de courant ou couper la ligne d alimentation de l appareil Veiller à ne pas utiliser de substances acides ou alcalines jus de citron vinaigre sel tomate etc Ne pas utiliser de produits à base de chlore acides ou abrasifs surtout pour le nettoyage des parois peintes NE PAS UTILISER DE NETT...

Page 9: ...ra a limpeza das paredes envernizadas NÃO UTILIZE MÁQUINAS DE LIMPEZA A VAPOR PARA LIMPAR O FORNO Belangrijk als veiligheidmaatregel moet altijd de stekker uit het stopcontact worden ge haald of moet de voeding van het apparaat worden afgekoppeld alvorens de oven te gaan schoonmaken Gebruik bovendien geen zure of alkaline stoffen ci troensap azijn zout enz Gebruik geen producten op chloorbasis of ...

Page 10: ...ply hooked on to the walls before the side frames are fitted They are coated in a special micro porous catalytic enamel which oxidises and gradually va porises splashes of grease and oil at cooking tempe ratures above 200 C If the oven is not clean after cooking fatty foods operate the empty oven for 60 mi nutes max at maximum temperature Never wash or clean self cleaning panels with abra sive aci...

Page 11: ...of schoongemaakt worden met schurende producten of met zuur of alkalihoudende producten PANELES CATALÍTICOS AUTOLIMPIANTES Nuestros hornos provistos de paredes lisas tienen la posibilidad de llevar mon tados en su interior paneles autolimpiantes que recubran dichas paredes Estos paneles especiales que se enganchan a las pa redes antes de los bastidores laterales están recubiertos de un especial es...

Page 12: ...ine free bleached paper or re cycled paper to show respect for the environ ment The packaging has also been designed to avoid en vironmental impact Pack aging material is ecological and can be re used or recycled By recycling the packaging you will help save raw ma terials as well as reducing the bulk of domestic and industrial waste RISPETTO DELL AMBIENTE La documentazione del pre sente apparecch...

Page 13: ...en wordt een bijdrage geleverd aan de besparing van grondstoffen en aan de beperking van het volume industrieel en huisvuil RESPETO POR EL MEDIO AMBIENTE La documentación de este aparato utiliza papel blanqueado sin cloro o papel reciclado con el fin de contribuir a la protección del medio ambiente Los embalajes están conce bidos para no dañar el medio ambiente pueden ser recuperados o reciclados ...

Page 14: ...bottom heating elements with fan Thermo stat setting from 50 C to MAX Circular heating element with fan Thermostat setting from 50 C to MAX Fan for defrosting Thermo stat setting at 0 C Bottom heating element with fan Thermostat setting from 50 C to MAX Double top heating element with fan large area grill Thermostat setting from 50 C to 200 C Double top heating element large area grill Thermo stat...

Page 15: ...ng van de thermo staat van 50 C tot 200 C Dubbel bovenste ver warmingselement grill met groot oppervlak Instelling van de thermostaat van 50 C tot 200 C FUNCIONES PANEL DE MANDOS SÍMBOLOS DEL PANEL DE CONTROL Bombilla horno queda siempre encendida durante el funcionamiento Resistencia inferior Regu lación del termostato entre 50 C y MAX Resistencia superior e infe rior Regulación del termo stato e...

Page 16: ... forno durante la cottura Resistenza superiore grill superficie e potenza ridotta Regolazione del termostato da 50 a 200 C Resistenza inferiore Resistenza circolare con ventilatore Regolazione del termostato da 50 C a MAX Top heating element small low power grill Thermo stat setting from 50 C to 200 C Bottom heating element Circular heating element with fan Thermostat setting from 50 C to MAX Rési...

Page 17: ...e die Ofentür möglichst wenig geöffnet werden Oberhitze Grill mit redu zierter Fläche und Leistung Einstellung des Thermostats von 50 auf 200 C Unterhitze Heißluft mit Ventilator Einstellung des Thermostats von 50 C auf MAX Resistencia superior grill superficie y potencia reduci da Regulación del termo stato entre 50 C y 200 C Resistencia inferior Resistencia circular con ventilador Regulación del...

Page 18: ... type of cooking a fan positioned at the back allows the circulation of hot air inside the oven creating uniform heat In this way cooking is more rapid than conventional cooking It is a suitable method for cooking dishes on more than one shelf especially when the food is of different types fish meat etc COTTURA VENTILATO Con questo tipo di cottura un ventilatore posto nella parte posteriore fa cir...

Page 19: ...el horno distribuyéndolo de manera uniforme La cocción se produce más rápidamente con respecto a la cocción convencional El sistema es idóneo para la cocción de alimentos de distintas clases pescado carne etc también unos encima de otros UMLUFT BACKEN Bei dieser Garart bringt der Ventilator der sich im hinteren Ofenteil befindet heiße Umluft in den Ofen und verteilt diese gleichmäßig wobei die Gar...

Page 20: ...o la parte esteriore del forno raggiunge i 60 C ca Accendendo il forno e im postando il termostato a 200 C il ventilatore entra in funzione dopo 10 min ca Lo spegnimento del ventila tore avviene quando la parte esteriore del forno scende sotto i 60 C Dopo un utilizzo del forno a 200 C il ventilatore si spe gne dopo 30 min ca COOLING FAN The fan is positioned on the upper part of the oven and creat...

Page 21: ...kofen z B auf 200 C eingestellt schaltet sich die Kühlung nach etwa 10 Min ein Der Ventilator schaltet sich selbstättig aus wenn das äußere Gehäuse des Backofens eine Temperatur von 60 C wieder überschreitet z B schaltet sich die Kühl ung nach Betrieb auf 200 C nach etwa 30 Min aus VENTILADOR DE ENFRIAMIENTO El ventilador está situado en la parte superior del horno y crea una circulación de aire d...

Page 22: ...to the desired alarm time COOKING TIMER First turn the cooking se lector to the required cook ing function and the ther mostat to the desired cook ing temperature Then to set end of cooking time turn the cooking timer to the right and to the desired time First turn the knob fully clockwise then turn it back to the desired alarm time A buzzer sounds at the end of the timed cooking period and the ov...

Page 23: ...gen zonder vaste bereidingstijd moet de knop naar links worden gedraaid op het symbool TERMOSTATO Dispositivo que permite regular la temperatura de cocción más idónea para los alimentos a cocinar y puede ser regulado desde 50 a 250 C MINUTERO Indicador acústico desde 0 60 minutos Se debe girar el mando en el sentido de las agujas del reloj hasta su posición máxima para des pués colocarlo en el tie...

Page 24: ...he duration key and press the keys to set the duration of cooking A buzzer sounds when the cooking period finishes and the oven switches itself off Turn the thermostat and selector knobs back to 0 position and press the ma nual key SETTING ONLY THE END OF COOKING TIME IN SEMI AUTOMATIC MODE To set the end of cooking time press the end of cooking key and press the keys to set the time at which you ...

Page 25: ...schakelaar terug in de stand 0 en druk vervolgens op de handbedieningstoets TEMPORIZADOR ELECTRÓNICO DE 6 TECLAS Regulación del reloj Apretar simultáneamente las teclas de duración y fin de cocción y pulsar las teclas hasta la pro gramación de la hora deseada FUNCIÓNAMIENTO MANUAL Para cocciones con tiempo indefinido apretar la tecla manual FUNCIONAMIENTO SEMIAUTOMÁTICO DE DURACIÓN COCCIÓN Para co...

Page 26: ... sounds Press any key to silence it ALARM TIMER Press the alarm timer key and press the keys to set the required duration of cooking The buzzer sounds when the cooking time ends Press any key to silence it PROGRAMMING ERRORS You cannot program in a cooking period which starts earlier than the time displayed on the clock If you try to do so the buzzer sounds and the AUTO symbol flasher Simply chang...

Page 27: ...corrigeerd door de duur of de bereidingstijd te veranderen ANNULEREN PROGRAMMA Het is mogelijk een programma te annuleren door op de knop van de handbediening te drukken FUNCIONAMIENTO AUTOMÁTICO Para cocciones con tiempo definido apretar la tecla de duración de cocción y programar con las teclas el tiempo necesario para la cocción Apretar la tecla de fin cocción y pro gramar la hora en la cual se...

Page 28: ...plate c power 25W d E 14 connection Before proceeding dis connect the appliance from the main electricity supply to prevent damage place a tea cloth in the oven unscrew the glass cover of the light unscrew the old light bulb and replace it with the new one put back the glass cover and remove the tea cloth connect the appliance to the main electricity supply REMPLACEMENT DE LA LAMPE DU FOUR IMPORTA...

Page 29: ...a montar de nuevo la pro tección en vidrio y quitar el trapo para vajillas enchufar de nuevo el aparato a la línea de alimentación HET VERVANGEN VAN HET LAMPJE VAN DE OVEN BELANGRIJK Het lampje van de oven dient de volgende ken merken te bezitten a een structuur die ge schikt is voor hoge tem peraturen tot 300 C b voeding zie de waarde V Hz die wordt ver meld op de typeplaat c vermogen 25 W d aanh...

Page 30: ...y To do so proceed as follows Open the door fully Lift the two levers shown in fig Close the door as far as the first stop caused by the raised levers Lift the door upwards and outwards to remove it from its mountings To replace fit the door fit the hinges in their mountings and lower the two levers SMONTAGGIO DELLA PORTA FORNO Lo smontaggio della porta forno può essere facilmente effettuato opera...

Page 31: ...oeten de scharnieren in hun behuizingen worden geplaatst en moeten de twee hendeltjes weer worden teruggezet in de sluitende positie DESMONTAJE DE LA PUERTA DEL HORNO El desmontaje de la puerta del horno puuede ser fácil mente efectuado obrando como sigue abrir totalmente la puerta alzar las dos palanquitas indicas en fig volver a cerrar la puerta después de la primera pa rada consecuencia de la s...

Page 32: ...gatoire aux termes de la loi Le câble ne doit en aucun cas atteindre une température supérieure de plus de 50 C par rapport à la température ambiante Si un appareil fixe n a pas de cordon d alimentation et de fiche ou d autre dispositif assurant la déconnexion du secteur avec une distance d ouverture des contacts permettant une déconnexion E L E C T R I C A L CONNECTIONS Before connecting the oven...

Page 33: ...rede com uma distância de abertura dos contactos que permita a desactivação com pleta nas condições da cate goria de sobretensão III esses dispositivos de ELEKTRISCHE AANSLUITING Controleer voordat u de elektrische aansluiting tot stand brengt of de eigenschappen van de elektrische installatie over eenstemmen met de ge gevens op het typeplaatje op de voorzijde van de oven de installatie goed geaar...

Page 34: ...o l interruttore onnipolare devono essere facilmente raggiungibili con l apparecchiatura installata overvoltage protection then such a device must be fitted to the power supply in compliance with the regulations governing electrical installations The socket or switch must be easily reachable with the oven fully installed complète dans les conditions de la catégorie de surtension III ces dispositif...

Page 35: ...problemlos zugänglich sein que asegure la desconexión completa en las condiciones estipuladas para la categoría de sobretensión III La toma o el interruptor omnipolar deben ser de fácil acceso una vez insta lado el aparato mogelijk maakt dan moeten deze stroomverbrekers in het elektriciteitsnet worden opgenomen in overeenstemming met de installatievoorschriften Het stopcontact of de meerpolige sch...

Page 36: ...uola Bottom element Élément sole Unteres Heizelement Elemento suelo Element bodem Elemento inferior CARATTERISTICHE TECNICHE TECHNICAL FEATURES CARACTÉRISTIQUES TECHNIQUES TECHNISCHE DATEN CARACTERÍSTICAS TÉCNICAS TECHNISCHE KENMERKEN CARACTERÍSTICAS TÉCNICAS DIMENSIONI MUFFOLA MUFFLE SIZE DIMENSIONS MOUFLE ABMESSUNGEN MUFFEL DIMENSIONES CÁMARA AFMETINGEN MOFFEL DIMENSÕES DA MUFLA Larghezza mm 607...

Page 37: ...nne Einbau Hochschrank Integrado en columna Inbouw in kolomkast Encaixe em coluna Incasso Built under Built under type Encastrable Built under Einbau Built under Integrado bajo encimera Built under inbouw Encaixe Built under 517 477 893 849 472 538 50 860 510 min 480 ...

Page 38: ...38 ...

Page 39: ...39 ...

Page 40: ...n deze brochure welke geweten kunnen worden aan copie of drukfouten Hij behoudt zich het recht voor aan zijn eigen produkten wijzigingen aan te brengen die hij noodzakelijk of nuttig acht zonder dat de wezenlijke kenmerken erdoor varanderd worden El fabricante declina toda responsabilidad por las posibles inexactitudes contenidas en el presente documento imputables a errores de impresión o relacio...

Reviews: