background image

IMPORTANT


Always  switch


off  and 

remove


the  plug  from


the  electricity


supply 

before


cleaning this


appliance.

For electrical data


refer to the


rating label 

on


the front of the


dryer cabinet


(with the door


open).


Technical 

S

pecifications

 Information for Test Laboratory

Cleaning the Dryer

    Drum capacity                115 litres
    Maximum load                7 kg
    Height                             85 cm
    Width                              60 cm
    Depth                              60 cm
    Energy Label Band         A  ++

OPERATION


Clean  the  filter  and  empty  the  water


container after every drying cycle.


Regularly clean the 

filters

.


After each period of use, wipe the inside of


the drum and leave the door open for a while to 
allow circulation of air to dry it.


Wipe the outside of the machine and the


door with a soft cloth.


DO  NOT  use  abrasive  pads  or  cleaning


agents.


To prevent the door sticking or the build up


of fluff clean the inner door and gasket with a 
damp cloth after every drying cycle.

WARNING! 

The drum, door and load may 

be  very hot.

CLEANING AND ROUTINE MAINTENANCE

Delay Start Function

The Delay Start Function 


allows the user to delay the start of


the drying cycle by 

1 to 24 

 hours.

When the function is first selected the display will show a delay of 

1

 hour,


subsequent presses of 

the button will increase the delay 

with 1 hour steps

.

To


commence


the


programme


press


and


the


appliance


will


complete


the


drying


cycle


at


the 

end


of


this


time

The


indicator


light


will


flash


to


indicate


that


the


start


delay


is


in


progress

.

Cancelling and Resetting the Programme

To cancel a programme press the        button  for 3 seconds. 

In


the


TIME


CONTROL


display


0

:

00 

Light will flash to indicate that it has been reset.

EN 12

Note

:Install and use the drain hose to discharge

the condensing water. 

 EN 61121 Programme  Programme To Use 

-DRY COTTON

-HANG DRY


-IRON DRY


-HANG DRY + SYNTHETIC


-IRON DRY COTTON


-EASY-CARE TEXTILE

Summary of Contents for GCH 970NA2T

Page 1: ...INSTRUCTION BOOK GCH 970NA2T Heat Pump Tumble Dryer English 2 Suomi Italiano 50 62 Français 14 26 Dutch ...

Page 2: ... and Indicators Selecting the Programme Door and Filter Opening the Door Filter Filter Care Indicator To Clean the Condenser Filter Water Container To Remove the Container Operation Delay Start Function Cancelling and Resetting the Programme Cleaning and Routine Maintenance Cleaning the Dryer Technical Specifications Troubleshooting Customer Service Spares Gias Service Drain Hose Kit Fitting Instr...

Page 3: ...l capabilities or lack of experience and knowledge unless they have been given supervision or instruction concerning use of the appliance by a person responsible for their safety Children should be supervised to ensure that they do not play with the appliance WARNING Misuse of a tumble dryer may create a fire hazard This machine is solely for domestic use i e to dry household textiles and garments...

Page 4: ...gether with the plug To prevent children shutting themselves in the machine break the door hinges or the door lock Environmental Issues Check that the product has no visible signs of damage before use If damaged do not use and please call GIAS Service Do not use adapters multiple connectors and or extensions Never install the dryer against curtains and be sure to prevent items from falling or coll...

Page 5: ...er fuels including open fires being drawn into the room during operation of the tumble dryer Exhaust air must not be discharged into a flue which is used for exhausting fumes from appliances burning gas or other fuels Check regularly that the air flowing through the dryer is not restricted Check the fluff filter after use and clean if necessary The inlet and outlets should be kept free from obstru...

Page 6: ...cabinet next to the Cover 8 Feed the drain hose through the hole in the cabinet 9 Locate the grey pipe in the cutout of the tray and secure the pipe assembly to the bridge with the plastic tie 10 Carefully slide the worktop back into position ensuring that the hose is not trapped a n d r e p l a c e t h e worktop rear trim with the 3 screws 11 Connect the new drain hose to the waste water pipe Mak...

Page 7: ...ed and table linen Synthetics Blouses shirts overalls etc made of polyester or polyamid as well as for cotton synthetic mixes By drying level Sort into iron dry cupboard dry etc For delicate articles press the button to select low drying temperature Woollens silk delicate fabrics nylon stockings delicate embroidery fabrics with metallic decorations garments with PVC or leather trimmings training s...

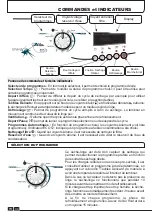
Page 8: ...programme list ECO indicator turns on when you select a low consumption programme Filter care When on please clean the filters Full water tank When on please empty the water tank This machine has a special Sensor Dry to help you choose your preferred programme simply by selecting the level of dryness wanted For small loads and pre dried clothes please use a Timing programme and select Delicate fab...

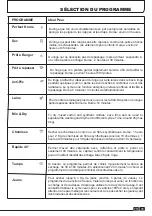
Page 9: ... cotton and synthetic fabrics Time 1h for 2kg of synthetic shirts around 10 shirts 1h and 20 min for 3 kg of cotton shirts around 10 shirts If you want to choose drying times from 30 to 180 minutes By selecting 20 min you choose a cool programme ideal to refresh clothes and to remove eventual smells To dry up to 4 kg of Jeans around 5 pairs The programme works for around 2h but timing can change a...

Page 10: ...ycle Do not operate the dryer without the filters Clogged filters can increase the drying time and cause damage which may result in expensive repair costs 1 P u l l t h e f i l t e r upwards 2 Open filter as shown 3 Gently remove lint using a soft brush or your fingertips 4 Snap the filter together and push back into place To Clean the Condenser Filter 1 R e m o v e t h e kickplate 2 Turn the two ...

Page 11: ...mittently to minimize creasing This will continue until the machine is switched OFF or the door is opened Do not open the door during the automatic programs in order to obtain a proper drying The water removed from the laundry during the drying cycle is collected in a container inside the door of the dryer When the container is full the indicator on the control panel will light and the container M...

Page 12: ...f clean the inner door and gasket with a damp cloth after every drying cycle WARNING The drum door and load may be very hot CLEANING AND ROUTINE MAINTENANCE Delay Start Function The Delay Start Function allows the user to delay the start of the drying cycle by 1 to 24 hours When the function is first selected the display will show a delay of 1 hour subsequent presses of the button will increase th...

Page 13: ...e mains supply Is there a power failure Has the fuse blown Is the door fully closed Is the dryer switched on both at the mains supply and at the machine Has the drying time or the programme been selected Has the machine been switched on again after opening the door CUSTOMER SERVICE Spares GIAS Service Should there still be a problem with your dryer after completing all the recommended checks pleas...

Page 14: ... D énergie Guide De Séchage Commandes Et Indicateurs Sélection Du Programme Porte Et Filtre Ouverture De La Porte Filtre Indicateur Entretien Filtre Réservoir D eau Pour Retirer Le Réservoir Condenseur Pour Retirer Le Condenseur Fonctionnement Départ Différé Annulation Et Réinitialisation Du Programme Nettoyage Et Entretien De Routine Nettoyage Du Sèche linge Spécifications Techniques Dépistage De...

Page 15: ... ou physiques réduites ou d un manque d expérience ou de connaissances sauf si elles sont surveillées ou ont reçu des instructions concernant l utilisation de cet appareil par une personne responsable de leur sécurité Les enfants doivent être surveillés afin de s assurer qu ils ne s amusent pas avec l appareil ATTENTION La mauvaise utilisation d un sèche linge risque de causer un d incendie Cette ...

Page 16: ... environnement Vérifiez que la machine ne présente aucun signe visible de détérioration avant de l utiliser En cas de détérioration assurez vous de ne pas l utiliser et de contacter le service GIAS N utilisez pas d adaptateurs de multi prises et ou de rallonges Veillez à ne pas installer le sèche linge contre des rideaux et assurez vous que rien ne pourra tomber ou s accumuler derrière le sèche li...

Page 17: ...rche L air d échappement ne doit pas être évacué par un conduit qui est également utilisé pour évacuer les fumées d échappement d appareils qui brûlent du gaz ou d autres combustibles Vérifiez régulièrement que l air peut circuler librement autour du sèche linge Vérifiez le filtre à peluches après usage et nettoyez le le cas échéant Les entrées et sorties doivent être libres d obstructions Pour ve...

Page 18: ... fixation du tuyau du raccord 4 Retirez le tuyau du raccord 5 Fixez le tuyau du kit e n u t i l i s a n t l e connecteur et les étriers de tuyau fournis au tuyau démonté du raccord 6 Retirez le couvercle du réservoir de l arrière de la machine en dévissant les deux vis et e n d é c l i p s a n t l e couvercle 7 Brisez l onglet placé sur le côté du couvercle et replacez le couvercle sur la machine ...

Page 19: ...ques Chemisiers chemises blouses etc en polyester ou polyamide ainsi que pour les mélanges de coton synthétique Par degré de séchage Triez selon sec pour repassage sec pour rangement etc Pour les articles délicats appuyez Sur le bouton pour sélectionner une température de séchage basse Les lainages la soie les tissus délicats les bas de nylon les broderies délicates les tissus ayant des décoration...

Page 20: ...cet voyant s allume il est nécessaire de nettoyer le filtre Réservoir d eau Quand cet voyant s allume il est nécessaire de vider le réservoir de l eau de condensation FR 44 COMMANDES et INDICATEURS Panneau de commande et témoins indicateurs SÉLECTION DU PROGRAMME Ce sèche linge est doté d un capteur de séchage qui permet de sélectionner le programme préféré en fonction du résultat de séchage désir...

Page 21: ...our 2 Kg de chemises en fibres synthétiques environ 10 chemises 1 heure et 20 minutes pour 3 Kg de chemises en coton environ 10 chemises Si besoin ce programme permet de choisir manuellement la durée de séchage de 30 à 180 minutes En sélectionnant 20 minutes on choisi un programme à froid idéal pour éliminer d éventuelles odeurs Pour sécher jusqu à 4 Kg de jeans environ 5 paires de Jeans Le progra...

Page 22: ...e filtre Un filtre encrassé peut augmenter la durée de séchage et causer des dégâts qui peuvent entraîner des coûts de réparation importants 1 Tirez le filtre vers le haut 2 Ouvrez le filtre comme illustré 3 Retirez doucement les peluches à l aide d une brosse douce ou du bout des doigts 4 Réenclenchez le filtre et poussez le en place Nettoyage du condenseur 1 Enlever la plaque de protection 2 Tou...

Page 23: ...tte opération se poursuit jusqu à ce que la porte s ouvre FR 47 Afin d assurer un séchage efficace dans les meilleures conditions ne pas ouvrir la porte lors des cycles de séchage automatiques 1 Tirez doucement le r é s e r v o i r j u s q u à l extraire complètement Tenez le fermement à deux mains Lorsque le réservoir est plein il pèse environ 4 kg 2 Inclinez le réservoir d eau pour vidanger l ea...

Page 24: ...le la surface intérieure et le joint de la porte avec un chiffon humide ATTENTION Il est possible que le tambour la porte et la charge soient très chauds Départ Différé NETTOYAGE ET ENTRETIEN DE ROUTINE La fonction départ différé permet de différé le départ du cycle de séchage de 1 à 24 heures Lorsque cette fonction est selectionnée pour la première fois l afficheur indique un délai d une heure Il...

Page 25: ...iche est elle bien branchée sur l alimentation de secteur Ya t il une panne de courant Le fusible a t il sauté La porte est elle bien fermée Le sèche linge est il en position de marche au niveau du courant de secteur et de la machine La période de séchage ou le programme a t il été sélectionné La machine a t elle été remise en marche après l ouverture de la porte Le sèche linge s est il arrêté par...

Page 26: ...n Voor Het Drogen Bediening Indicatielampjes Het Programma Kiezen Deur En Filter De Deur Openen Filter Filter Schoonmaken Indicatielampje Watercontainer Om Het Reservoir Te Verwijderen Condensator De Condensator Verwijderen Bediening Het Programma Annuleren En Resetten Start Uitstel Functie Schoonmaken En Onderhoudsbeurten Schoonmaken Van De Droger Technische Specificaties Problemen Oplossen Klant...

Page 27: ...verminderd fysiek motorisch of mentaal vermogen of personen zonder ervaring en kennis tenzij zij onder toeziend oog staan of instructies hebben gekregen over de machine door een persoon die verantwoordelijk is voor hun veiligheid Kinderen moeten in de gaten gehouden worden om erop toe te zien dat ze niet spelen met de machine WAARSCHUWING Misbruik van een droogtrommel kan brand veroorzaken Deze ma...

Page 28: ...Milieu Controleer het apparaat op zichtbare beschadigingen vooraleer u het gebruikt Gebruik het niet als het beschadigd is maar neem contact op met GIAS Service Gebruik geen adapters meervoudige stekkers en of verlengsnoeren Installeer de droger nooit tegen gordijnen aan en zorg ervoor dat er geen artikelen achter de droger kunnen vallen en zich daar kunnen ophopen De machine mag niet worden geïns...

Page 29: ...ogen worden wanneer de droger in werking is Afzuiglucht mag niet in een via een afvoer waarlangs uitlaatstoffen van mechanismen die gas of andere brandstoffen verbranden worden afgevoerd Controleer regelmatig dat de lucht die door de droger stroomt niet geblokkeerd wordt Controleer na gebruik de pluizenfilter en maak die indien nodig schoon De aanvoeren en afvoeren moeten vrij gehouden worden van ...

Page 30: ...ervolgens de schroeven U zou nu een gat moeten zien aan de achterkant van de kast naast het deksel 8 Plaats de afvoerslang door de opening van de kast 9 Verbindt de grijze slang en bevestig de slang aan de brug met behulp van de plastic tie rap 10 Schuif voorzichtig het werkblad terug op zijn plaats en bevestig deze met de 3 schroeven Zorg ervoor dat de slang niet geknelt raakt 11 S l u i t d e n ...

Page 31: ...innen Handdoeken jersey katoen beden tafellinnen Synthetische stoffen Blouses overhemden overalls enz gemaakt van polyester of p o l y a m i d e e v e n a l s v o o r g e m e n g d katoen synthetisch Op de temperatuur van het drogen Sorteer op strijkdroog kastdroog enz Voor fijn goed druk op de knop om een lage droogtemperatuur in te stellen Wol zijde fijn goed nylon kousen fijn borduurwerk stoffe...

Page 32: ...container vol is Programma Display De bijbehorende lampjes branden bij het gekozen programma Indicator zal branden als de eco programma is geselecteerd Refresh Brandt als het programma begint met de koelfase De Hoover Sensor Wasdroger biedt veel opties voor het gewenste drogen van de was In de onderstaande tabel staan de programma s en functie van ieder programma Vermeld Opmerking De sensor zal mi...

Page 33: ...e stoffen te drogen Tijd 1u voor 2kg synthetische overhemden ongeveer 10 overhemden 1u en 20 min voor 3 kg katoenen overhemden ongeveer 10 overhemden U kan droogtijden kiezen gaande van 30 tot 180 minuten Door 20 min te selecteren kiest u een koel programma ideaal om kleren te verfrissen en mogelijke geuren te verwijderen Droogt tot 4 kg Jeans ongeveer 5 stuks Het programma werkt ongeveer 2u maar ...

Page 34: ...luizenfilter schoon is 1 Trek de filter omhoog 2 Open de filter zoals getoond wordt 3 Haal de pluizen met een zacht borsteltje of met uw vingertoppen voorzichtig weg 4 Klik de filter samen en duw hem terug op zijn Plaats NL 58 De Condens Filter Schoonmaken 1 V e r w i j d e r d e schopplaat 2 D r a a i d e t w e e sluithendels tegen de klok in en haal de condensator uit de machine 3 Haal de conden...

Page 35: ...ma te hervatten zorg dat de deur gesloten is 7 Als de cyclus bijna ten einde is zal de machine een koelfase ingaan om de kleding af koelen 8 Als het programma klaar is zal het END indicatielampjeop het display gaan branden 9 Nadat de cyclus is afgerond zal de trommel met tussenpozen draaien om kreukelvorming te minimaliseren Er zal een signaal klinken dit stopt als u de machine uitgeschakeld of de...

Page 36: ...nendeur regelmatig schoonmaken met een natte doek WAARSCHUWING De trommel de deur en het wasgoed kunnen erg warm zijn Start Uitstel SCHOONMAKEN EN ONDERHOUDSBEURTEN Uitgestelde start functie geeft de mogelijkheid de start van de droogcyclus uit te stellen van 1 to 24 uur Wanneer de functie is gekozen toont het bedieningspaneel een uitstel van 1 uur Iedere volgende druk op de knop zal de uitgesteld...

Page 37: ... de stroom uitgevallen Is de zekering doorgeslagen Is de deur helemaal dicht Staat de droger aan zowel bij de netspanning als bij de machine Is de droogtijd of het programma ingesteld Is de machine opnieuw ingeschakeld nadat de deur open is geweest Is de droger gestopt omdat het waterreservoir vol is en geleegd moet worden KLANTENSERVICE Reserveonderdelen GIAS Service Als er nog steeds een problee...

Page 38: ...40008074 ...

Reviews: