BEFORE USING THE APPLIANCE
BEFORE USING THE APPLIANCE
1. Packing
The packing material is 100% recyclable and
bears the recycling symbol. Comply with the
local regulations for disposal. Keep the
packing materials (plastic bags, polystyrene
parts, etc.) out of the reach of children, as
they are a potential source of danger.
2. Scrapping/Disposal
The appliance is manufactured using
recyclable material.
This appliance is marked in compliance with
European Directive 2002/96/EC on Waste
Electrical and Electronic Equipment (WEEE).
By ensuring the correct scrapping of this appli-
ance, you can help prevent potentially negative
consequences for the environment and the
health of persons.
The symbol on the appliance, or on the acc-
ompanying documents, indicates that this
appliance should not be treated as domestic
waste but must be taken to a suitable collec-
tion centre for the recycling of electrical and
electronic equipment.When scrapping the
appliance, make it unusable by cutting off the
power cable and removing the doors and shel-
ves so that children cannot easily climb inside.
Scrap the appliance in compliance with local
regulations on waste disposal, taking it to a
special collection centre; do not leave the app-
liance unattended even for a few days, since it
is a potential source of danger for children. For
further information on the treatment, recovery
and recycling of this appliance, contact your
competent local office, the household waste
collection service or the shop where you pur-
chased the appliance.
. Your new appliance is designed exclusively
for domestic use.
To ensure best use of your appliance,
carefully read the operating instruct-
ions which contain a description of
the appliance and advice on storing
and preserving food.
Keep this handbook for future reference.
1. After unpacking the appliance, make sure
it is not damaged and that the door closes
properly. Any damage must be reported to
the dealer within 24 hours of delivery of
the appliance.
2. Wait at least two hours before switching the
appliance on, in order to ensure that the
refrigerant circuit is fully efficient.
3. Make sure installation and the electrical
connection are carried out by a qualified
technician according to the manufacturer's
instructions and in compliance with the local
safety regulations.
4. Clean the inside of the appliance before
using it.
BEFORE USING THE APPLIANCE
BEFORE USING THE APPLIANCE
Information:
This appliance does not contain CFC (the
refrigerant circuit contains R134a) or HFC
(the refrigerant circuit contains R600a)
(refer to the rating plate inside the
appliance).
Appliances with isobutane (R600a):
Isobutane is a natural gas without environ-
mental impact but is flammable. Therefore,
make sure the refrigerant circuit pipes are
not damaged.
Declaration of conformity
. This appliance is intended for storing food
and is manufactured in conformity with
European regulation (EC) No. 1935/2004.
. This product has been designed, manufact-
ured and marketed in compliance with:
- the safety objectives of Low Voltage
Directive 73/23/EEC;
- the protection requirements of
EMC
Directive 89/336/EEC, amended by Directive
93/68/EEC.
. Electrical safety of the appliance is guaran-
teed only if it is connected to an efficient
and approved earthing system.
1
Summary of Contents for ITLP 130
Page 2: ...USER S MANUAL 6 FULJRULIHUR 7 RHIULJHUDWRU 1 Réfrigérateur 26 36 FR Koelkast 37 47 NL ...
Page 3: ......
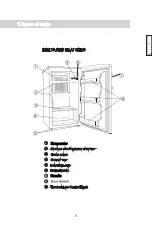
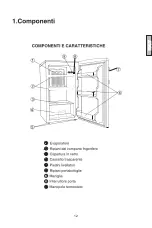
Page 6: ...9 Evaporator ENGLISH ENGLISH Handle 3 ...
Page 7: ... À À À À 4 ...
Page 8: ...5 ...
Page 10: ...7 ...
Page 11: ...8 ...
Page 12: ...9 ...
Page 14: ...11 ...
Page 15: ...9 ITALY ITALY 12 ...
Page 16: ...13 ...
Page 17: ...14 ...
Page 18: ...15 ...
Page 19: ...16 ...
Page 20: ...17 ...
Page 21: ...1 Návod na obsluhu 18 ...
Page 24: ... 8 NA7 O 8 7 7 3 6 Z 7 7 A 33 O3C 4 M I 3D 46 I B Ǒ 7 U 7 V P 0 A P B 5 P CMZ 21 ...
Page 25: ...Q 5 7 7 E KǑ Κ A KǑ B R 4E A J OǑ OǑǑ OǑǑ Κ OǑǑ P M 22 ...
Page 27: ...ΚU E 7 69E A A N E W E7 O E5 A E7 E O E5 7 J B A J B O3 B Ǒ A W X R V c 24 ...
Page 28: ...5O 7E 8O AN E7 E A 9 7 CMZ Ǒ Κ P 25 ...
Page 56: ...53 ...
Page 57: ...54 ...
Page 58: ...55 ...
Page 59: ...56 ...
Page 66: ...63 Rear spacer ...
Page 67: ...How to drive the screw of door handle if there is handle for this model 64 ...
Page 68: ...65 Entretoise arrière ...
Page 70: ...67 Afstandsstuk achter ...
Page 72: ...CK ...

