IMPORTANT SAFETY INSTRUCTIONS
These warnings are provided in the interests of your safety. Ensure that you understand
Please read this
instruction book carefully
before use and retain
for future reference.
all before installing or using this appliance. Your safety is of paramount importance.
unsure about any of the meanings or these warnings contact the Customer
Them
If you are
Care Department.
Installation
Child Safety
During Use
This appliance is heavy. Care should be taken
It is dangerous to alter the specifications or
attempt to modify this product in any way.
Ensure that the appliance does not stand on
the electrical supply cable. If the supply cord is
damaged, it must be replaced by a special
cord available from your local Service Force
Centre.
Any electrical work required to install this
appliance should be carried out by a qualified
electrician or competent person.
Parts which heat up should not be exposed.
Whenever possible, the back of the appliance
should be close to a wall but leaving the
required distance for ventilation as stated in
the installation instructions.
The appliance should be left for 2 hours after
installation before it is turned on, in order to
allow the refrigerant to settle.
when moving it.
This appliance is designed for domestic use only,
specifically for the storage of edible foodstuffs only.
Frozen food should not be refrozen once it has
thawed out.
Do not place carbonated or fizzy drinks in the
freezer.
Ice lollies can cause 'frost/freezer burns' if
consumed straight from the freezer.
Do not remove items from the freezer if your
hands are damp/wet, as this could cause
skin abrasions or frost/freezer burns.
Maintenance and Cleaning
Switch off, and unplug the appliance before
carrying out any cleaning or maintenance
work.
Do not use sharp instruments to scrape
off frost or ice. (See defrosting instructions).
Servicing
This product should be serviced by an
authorised engineer, and only genuine spare
parts should be used.
Under no circumstances should you attempt to
repair the machine yourself. Repairs carried
out by inexperienced persons may cause injury
or serious malfunctioning. Contact your local
Service Force Centre.
At the End of the Appliance Life
Before discarding your wine cooler, switch it off and
disconnect it from the power supply. Cut off and
render any plug useless.
Ensure that the door cannot shut completely,
regardless of whether or not it can be pushed
open from the inside (removing the door is best).
NOTE:
Before discarding an old wine
cooler, switch off and disconnect it from the
power supply. Cut off and render any plug
useless. Ensure that the door cannot jam
(removing it is best), regardless of whether
or not it can be pushed open from inside.
AN OLD WINE COOLER CAN BE A DEADLY
PLAYTHING FOR CHILDREN!
This appliance is not intended for use by young
children or infirm persons unless they have
been adequately supervised by a responsible
person to ensure that they can use the appliance
safely.
Yong children should be supervised to ensure
that they do not play with the appliance.
CAUTION:
You must not use any mechanical
equipment or other way that quicken up the
defrosting process to defrost the appliance.
Do not damage the refrigerant circuit.
You must not use any electric appliance inside
the appliance except that are commended by
the manufacturer.
CAUTION:
You must keep the appliance
stand in the place where is ventilative anytime.
CAUTION:
At the end of the function life of
the appliance it must be disposed in accordance
with the W.E.E.E directive (See below). You
appliance contains R600a refrigerant and
inflammable gas in the insulating foam.
2
Summary of Contents for ITLP 130
Page 2: ...USER S MANUAL 6 FULJRULIHUR 7 RHIULJHUDWRU 1 Réfrigérateur 26 36 FR Koelkast 37 47 NL ...
Page 3: ......
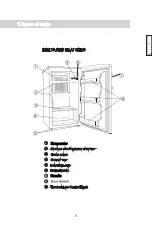
Page 6: ...9 Evaporator ENGLISH ENGLISH Handle 3 ...
Page 7: ... À À À À 4 ...
Page 8: ...5 ...
Page 10: ...7 ...
Page 11: ...8 ...
Page 12: ...9 ...
Page 14: ...11 ...
Page 15: ...9 ITALY ITALY 12 ...
Page 16: ...13 ...
Page 17: ...14 ...
Page 18: ...15 ...
Page 19: ...16 ...
Page 20: ...17 ...
Page 21: ...1 Návod na obsluhu 18 ...
Page 24: ... 8 NA7 O 8 7 7 3 6 Z 7 7 A 33 O3C 4 M I 3D 46 I B Ǒ 7 U 7 V P 0 A P B 5 P CMZ 21 ...
Page 25: ...Q 5 7 7 E KǑ Κ A KǑ B R 4E A J OǑ OǑǑ OǑǑ Κ OǑǑ P M 22 ...
Page 27: ...ΚU E 7 69E A A N E W E7 O E5 A E7 E O E5 7 J B A J B O3 B Ǒ A W X R V c 24 ...
Page 28: ...5O 7E 8O AN E7 E A 9 7 CMZ Ǒ Κ P 25 ...
Page 56: ...53 ...
Page 57: ...54 ...
Page 58: ...55 ...
Page 59: ...56 ...
Page 66: ...63 Rear spacer ...
Page 67: ...How to drive the screw of door handle if there is handle for this model 64 ...
Page 68: ...65 Entretoise arrière ...
Page 70: ...67 Afstandsstuk achter ...
Page 72: ...CK ...

