11
26
III. ELECTRICAL CHARACTERISTICS
•
Battery voltage:
3.7 VDC
•
Battery capacity:
850mAh
•
BATTERY CHARGER STANDARDS:
-
Input:
AC115V – 230V
-
Output:
4.5 VDC, 1.0 A
•
Charging time:
maximum 3 hour
IV. CLEANING AND STERILIZATION OF THE PUMP
Caution: NEVER WASH OR STERILIZE the LCD Display Pump (j).You can wipe it using a soft,
non-abrasive cloth.
Please clean and sterilize the electric pump before initial use and after each use, follow
the instructions below.
Sterilization method:
1.Pull the LCD Display Pump (j) to relocate it elsewhere. Separate all parts, a, b, c, d, e, f, g,
h, I, k, l, m, then wash in warm soapy water and rinse thoroughly. Do not use antibacterial
or abrasive cleaners/detergents.
2.Sterilize all parts in steam sterilizer, or by boiling for 10 minutes. When you use a steam
sterilizer, the pump will remain sterile in the sterilizer for 4 hours minimum, provided the
lid is not removed.
CLEANING SUGGESTIONS
1.Use steam sterilizer for sterilizing the pump. Boiling is not recommended. The product is
easy to damage, if exposed to improper sterilization. This unscientific method of
sterilization cannot achieve the complete effect. If you decide to use boiling as a method of
sterilization, please, pour more water into the pot so that the parts can be completely
covered with water. Do not leave the product unattended during sterilization. Do not boil
for too long – maximum 10 minutes.
2. For the nursing mothers who breastfeed once every 2 – 3 hours, it is not recommended
to sterilize and clean after each use. Excessive disinfection and cleansing can easily lead to
premature aging and reduce of the life of breast pump. It is recommended to thoroughly
clean the stains and sterilize once a day.
3. Store the parts in a clean container.
IMPORTANT! If the breast pump is for the purpose of storage of the milk, you should take
care of the disinfection of all washable parts of the pump, otherwise the milk may go bad,
as it is a product difficult to store.
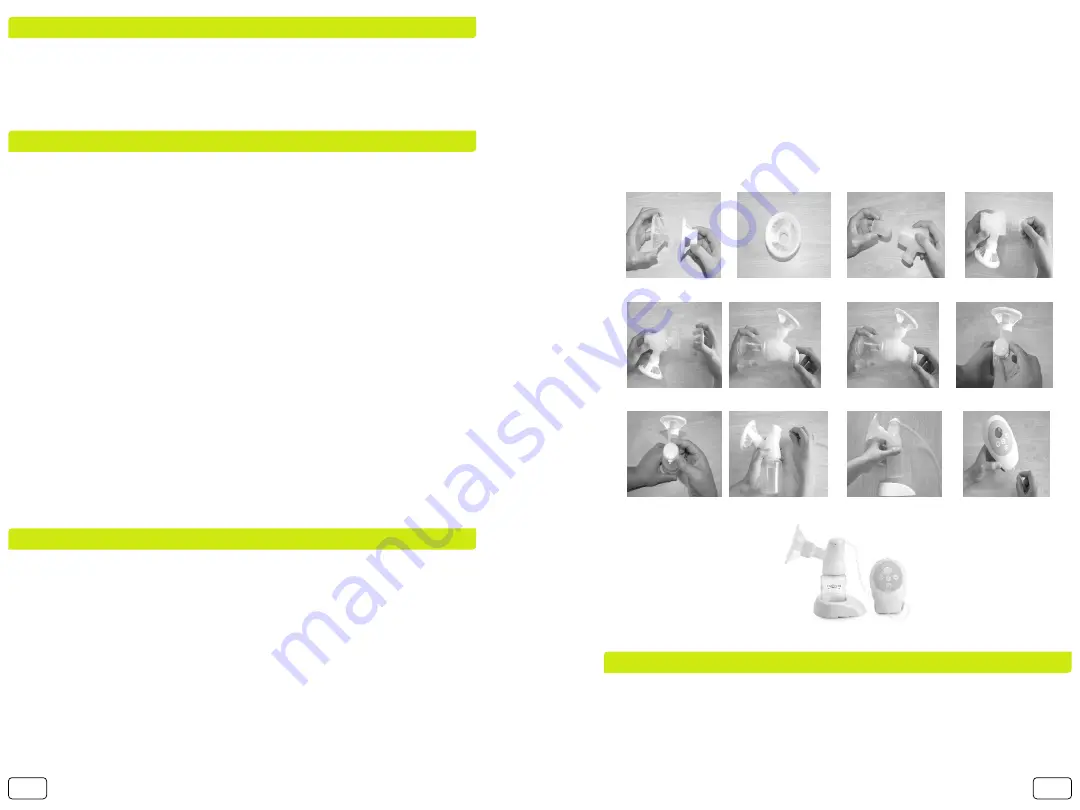
V. ASSEMBLY OF THE ELECTRIC BREAST PUMP
1. Step 1:
Put the silicone massage pad (fig. a) on the shield brace (fig. b). Make sure your
hands are clean.
2. Step 2:
Carefully put the silicone piston (fig. e) in the pump body (fig. c). Make sure the
fit is tight.
3. Step 3:
After that put the breast shield on the pump body (fig. c) and turn carefully. Do
not turn too vigorously, so that the silicone massage pad does not get twisted.
4. Step 4:
Put the silicone valve (fig. g) in the lower end of the pump body. Make sure it is
fixed properly around the edges of the pump body opening, intended for it.
Warning! If
the valve is loose or not properly installed, not enough vacuum can be created!
5. Step 5:
Fix the feeding bottle (fig. h) to the pump body (fig. c) and turn the bottle gently
In clockwise direction, so that the thread of the bottle can fit exactly to the thread of the
pump body.
6.1. Step 6.1:
Put the cover on (fig. d) on the top of the pump body (fig. c).
6.2. Step 6.2:
Turn in clockwise direction so that it is fixed.
7.1. Step 7.1:
Put one end of the tubing(f) in the pump body(b).
Βήμα 3
Βήμα 1a
Βήμα 2
Βήμα 1b
Βήμα 4
Βήμα 5
Βήμα 6.1
Βήμα 6.2а
Βήμα 7.1
Βήμα 7.2a
Βήμα 8
Βήμα 6.2b
Βήμα 7.2b
VI. ΦΟΡΤΙΣΗ ΤΗΣ ΑΝΤΛΙΑΣ
Σύνδεση στην τροφοδοσία:
1. Συνδέστε το καλώδιο του φορτιστή για την τροφοδοσία στην LCD οθόνη της αντλίας.
2. Συνδέστε το φορτιστή στην ηλεκτρική πρίζα.
5.
Βήμα
5: Τοποθετήστε το μπιμπερό (εικ. h) προς το σώμα της αντλίας (εικ. c) καθώς
γυρίσετε τη φιάλη ήπια δεξιόστροφα, έτσι ώστε το νήμα της φιάλης να συμπίπτει ακριβώς
με το σπείρωμα του σώματος της αντλίας.
6. 1.
Βήμα
6.1: Τοποθετήστε το καπάκι (εικ. d) πάνω από το σώμα της αντλίας (εικ. c).
6.2.
Βήμα
6.2: Γυρίστε δεξιόστροφα ώστε να καθοριστεί.
7.1.
Βήμα
7.1: Τοποθετήστε τη μία πλευρά του σωληνάριου (f) στο σώμα της αντλίας (c).
7.2.
Βήμα
7.2: Στη συνέχεια, τοποθετήστε την άλλη πλευρά του σωληνάριου στην LCD
οθόνη της αντλίας (j). Έτσι, μπορείτε να χρησιμοποιήσετε το θήλαστρο.
8.
Βήμα 8
: Για να φιξάρεται ακόμη καλύτερα η αντλία, βάλτε τα μπιμπερό στη βάση της (i).
Παρακαλούμε, ακολουθήστε τа συνημμένα σχέδια για τη συναρμολόγηση του προϊόντος.


