4
Set Up the Radio
Connect the Power Source
The DC adapter must be plugged in for the unit to fully function. Plug the DC adapter cable into the
standard 120v wall socket and the DC adapter jack on the back of the unit.
Installing/Replacing the Batteries
The unit requires a 9v battery be installed to provide continuous alarm, clock, and biometric operations.
When the battery low icon appears on the display it’s time to change the battery.
Open the battery compartment cover on the back of the unit.
Make sure the DC adapter is connected, otherwise all settings for the clock may be lost.
Plug the 9v into the plug matching the + and – terminals and place into battery compartment.
Close the compartment door.
Setting the Time and Date Using the iPhone/iPod Time Sync
Some older iPod Touch’s, iPod Nano’s, and iPod Classics may not allow this feature.
Important:
The iPhone/iPod must be in the dock station to sync.
The unit must be in the
OFF
position.
Press and hold the
TIME
button for 3 seconds.
Once sync is completed, the updated time will appear on the display.
Press
TIME
button once to see the Month and Date.
Setting the Time and Date Manually
Important
: The iPhone/iPod cannot be in the dock station.
The unit must be in the
OFF
position.
Press and hold the
TIME
button until the Year appears and flashes on the display.
Press the
VOL +
or
VOL –
to adjust the Year.
Press the
>>|
button, the Month will appear and flash. Adjust by using the
VOL +
or
VOL –
button.
Press the
>>|
button, the Date will appear and flash. Adjust by using the
VOL +
or
VOL –
button.
Press the
>>|
button, the clock display format will appear and flash (12hr or 24hr clock). Adjust
by using the
VOL +
or
VOL –
button.
Press the
>>|
button, the Hour section of the time will appear and flash. Adjust by using the
VOL +
or
VOL –
button.
Press the
>>|
button, the Minute section of the time will appear and flash. Adjust by using the
VOL +
or
VOL –
button.
The
|<<
or
>>
| buttons can be used to go back or forward between the Date and Time settings.
At any point in the process the
OK
button can be pressed to exit and confirm changes
Summary of Contents for RadioVault
Page 1: ...RadioVault Owner s Manual REV 1 4 12 ...
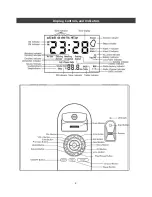
Page 3: ...2 Display Controls and Indicators ...
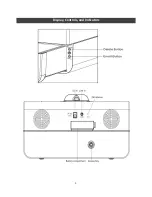
Page 4: ...3 Display Controls and Indicators ...
Page 12: ...11 Notes ...
Page 13: ...12 Notes ...
Page 15: ...14 ...


