background image

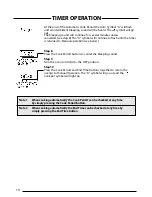
At the end of the Automatic Cook Period the Auto Symbol "A" will flash

and an intermittent bleeping sound will be heard. The       symbol will go

out. 

The bleeping sound will continue for several minutes unless 

cancelled. (see step 8) The "A" symbol will continue to flash until the timer

is returned to Manual operation (see below).
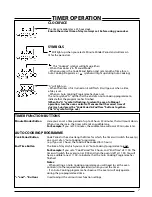
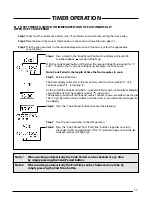
Step 8

Press the Cook Period button to cancel the bleeping sound. 

Step 9

Turn the oven control(s) to the OFF position.

Step 10
Press the Cook Period and End Time buttons together to return the
oven(s) to Manual Operation. The "A" symbol will go out and the
Cookpot symbol will light up

10

TIMER OPERATION

Note 1

When cooking automatically the Cook Period can be checked at any time
by simply pressing the Cook Period button.

Note 2

When cooking automatically the End Time can be checked at any time by
simply pressing the End Time button.

Summary of Contents for 10545G

Page 1: ...structions The cooker must be installed in accordance with the regulations in force and only used in a well ventilated space Read these instructions prior to using the cooker and retain them for future reference Part no 195040612 04 ...

Page 2: ... OPERATION 7 HOTPLATE 13 TOP OVEN 15 TOP OVEN COOKING CHART 16 GRILL 18 MAIN OVEN 20 MAIN OVEN COOKING CHART 22 THE SLOW COOK SETTING 24 CARE AND CLEANING 25 SOMETHING WRONG WITH YOUR COOKER 27 INSTALLATION INSTRUCTIONS 29 SERVICE INFORMATION Back Cover 2 CONTENTS ...

Page 3: ...ventilated e g open a window or use an extractor fan and that persons who may be sensitive to the odour avoid any fumes It is suggested that any pets be removed from the room until the smell has ceased This odour is due to any temporary finish and also any moisture absorbed by the insulation 3 INTRODUCTION Our policy is one of continual improvement in design and development therefore strict accura...

Page 4: ...ill doors closed when the cooker is not in use ALWAYS place pans centrally over the hotplate burners and position them so that the handles cannot accidentally be caught or knocked or become heated by other burners ALWAYS keep the cooker clean as a build up of grease or fat from cooking can cause a fire ALWAYS allow the cooker to cool before cleaning ALWAYS follow the basic principles of food handl...

Page 5: ... UNATTENDED WHILE COOKING NEVER place flammable or plastic items on or near the hotplate NEVER use proprietary spillage collectors on the hotplate NEVER use the cooker as a room heater NEVER dry clothes or place other items over or near to the hotplate or oven grill doors NEVER wear garments with long flowing sleeves whilst cooking NOTE The use of a gas cooking appliance results in the production ...

Page 6: ...pared by frying the meat and vegetables should be cooked as soon as possible 5 We advise dishes containing left over cooked poultry or meat for example Shepherds Pie should not be cooked automatically if there is to be a delay period 6 Stews and joints should be cooked by the long slow method so that the delay period is kept to a minimum 7 On warm days to prevent harmful bacterial growth in certai...

Page 7: ...o out Here you can set a time period of up to 23 hours 59 minutes that will count down When it reaches zero the timer will emit an audible tone For Example If you set 20 minutes the audible tone will occur 20 minutes later Cook Period is the actual length of time for which the timer will switch the oven s on as part of an Auto Cooking programme e g If you set 2 hours the food will be cooked for 2 ...

Page 8: ...Minder Button Step 3 With the Minute Minder button held in set the required Minute Minder time using the and buttons a symbol will light up Release all buttons and the timer display will revert back to the time of day Bell symbol will remain lit to signify that a Minute Minder period has been set At the end of the set time a bleeping sound will be heard and the symbol will go out The bleeping soun...

Page 9: ...d the timer will revert back to the time of day The A symbol will remain lit to signify that an Auto Cooking Programme has been set The symbol will go out When the Auto Cook Programme starts the will then light up again Step 7 Turn the oven control s to the required temperature and if necessary select the appropriate oven 9 TIMER OPERATION There are two Auto Cooking programmes that can be selected...

Page 10: ... Press the Cook Period button to cancel the bleeping sound Step 9 Turn the oven control s to the OFF position Step 10 Press the Cook Period and End Time buttons together to return the oven s to Manual Operation The A symbol will go out and the Cookpot symbol will light up 10 TIMER OPERATION Note 1 When cooking automatically the Cook Period can be checked at any time by simply pressing the Cook Per...

Page 11: ...al operation see below Step 6 Press the Cook Period button to cancel the bleeping Step 7 Turn the oven control s to the OFF position Step 8 Press the Cook Period and End Time buttons together to return the cooker to Manual operation The A symbol will go out and the Cookpot symbol will light up 11 TIMER OPERATION b TO SET TIMER TO SWITCH ON IMMEDIATELY AND OFF AUTOMATICALLY AFTER A SET COOK PERIOD ...

Page 12: ...he device within the timer will switch the oven s on and off at the required time 5 When setting an Auto Cooking Programme and a mistake is made to clear a Press and hold in the Cook Period and End Time buttons together to return the cooker to manual operation b Start the sequence again 6 If at any time the display shows three flashing zero s 0 00 It is likely that the electricity supply to the ov...

Page 13: ...the control knob fully clockwise to the symbol O DO NOT use the hotplate unless all pan supports are in position DO NOT use mis shapen pans which may be unstable DO NOT use round base woks directly on the pan supports DO NOT use the glass lid as a working surface Each burner is fitted with a spark ignitor for lighting the gas To ensure rapid lighting of the burners every time they are used the ign...

Page 14: ...hot oil or fat Frozen foods in particular will cause frothing and spitting if added too quickly 5 Always keep the outside of the pan clean and free from streaks of oil or fat HOW TO DEAL WITH A FAT FIRE 1 Do not move the pan 2 Turn off the hotplate burners 3 Smother the flames with a fire blanket or damp cloth to extinguish the fire Do not use water or a fire extinguisher as the force of it may sp...

Page 15: ...n shelf in the chosen position refer to cooking chart 3 Push in and turn the top oven grill control knob fully anti clockwise Press the ignition button until the sparks light the gas 4 Turn the control knob clockwise to the required setting refer to cooking chart 5 There is a delay of about one minute whilst the safety device operates before the burner comes on full 6 To turn off turn the control ...

Page 16: ...per lb 30 mins Pork 5 3 40 mins per lb 40 mins Chicken 5 3 25 mins per lb 25 mins Duckling Goose 5 3 25 mins per lb 25 mins Turkey 4 3 or baseplate 15 20 mins per lb 15 20 mins Casseroles 3 3 2 4 hrs depending on meat used VEGETABLES Baked jacket potatoes 5 2 11 2 2 hrs PUDDINGS Milk Puddings 500ml 1pt 3 2 11 2 2 hrs Baked Custard 500ml 1pt 3 2 45 mins 1 hr in bain marie of cold water Baked Sponge...

Page 17: ...ones 16 per tray 7 2 12 15 mins Shortbread 1 x 180mm 7 2 2 45 mins 1 hr depending on thickness Biscuits 4 6 2 15 25 mins Shortcrust Pastry 6 2 15 mins 1 hr depending on recipe Rich Short Crust 5 2 20 30 mins Flaky Puff Pastry 7 2 10 30 mins depending on recipe Choux Pastry 6 2 25 35 mins YEAST MIXTURES Bread rolls plait 7 2 or 3 25 35 mins Tea breads etc 5 2 25 30 mins MISCELLANEOUS Yorkshire Pudd...

Page 18: ... can hold fat intensify the heat and create a fire hazard RELIGHTING THE BURNER In the event of the burner flames being accidentally extinguished turn off the burner control and do not attempt to re ignite the burner for at least one minute 18 GRILL A B C CAUTION ACCESSIBLE PARTS MAY BECOME HOT WHEN THE GRILL IS USED YOUNG CHILDREN SHOULD BE KEPT AWAY GRILL PAN AND HANDLE The grill pan handle is d...

Page 19: ... grid finish clean in soapy water as described in CARE AND CLEANING section Always ensure that the grill pan handle is correctly fitted to the grill pan If necessary tighten any loose screws with a screwdriver 19 GRILL Shelf Position Food Toast pikelets crumpets bacon thin sausages beefburgers tomato halves steak rare and medium kippers gammon kidneys and toasted snacks Toast toasted snacks thick ...

Page 20: ...imum size of baking tray that should be used is 300mm x 350mm 12 x 14 TO USE THE MAIN OVEN 1 Check that the electricity supply is switched on and the timer is set to manual mode 2 Place oven shelves in the chosen positions refer to cooking charts 3 Push in and turn the oven control knob fully anti clockwise Sparking will continue until the burner is lit 4 Turn the control knob clockwise to the req...

Page 21: ...asic principles of food handling and hygiene to prevent the possibility of bacterial growth 1 If food is to be frozen or not served immediately cool it in a clean container as quickly as possible 2 Completely thaw frozen food in the refrigerator before re heating 3 Re heat food thoroughly and quickly either on the hotplate or in a hot oven Mk 6 and then serve immediately 4 Only re heat food once C...

Page 22: ...n 5 4 25 mins per lb 25 mins Duckling gosling 5 4 25 mins per lb 25 mins Turkey 4 or 5 4 or 5 15 20 mins per lb 20 mins Game birds 6 4 Casseroles 3 3 or 4 11 2 6 hrs depending on type of meat PUDDINGS Milk Puddings 3 3 or 4 Baked Custard 3 3 or 4 45 mins in bain marie Baked sponges 4 3 40 50 mins Baked Apples 3 4 Meringue puddings 1 4 or 5 15 mins or until tinged with brown Apple Pie 1x9 230mm 6 3...

Page 23: ...tray 2 or 3 Shortbread 7 180mm round 2 4 55 1hr depending on thickness Biscuits 2 trays 4 1 and 3 15 20 mins depending on recipe 1 tray 2 or 3 YEAST MIXTURES Bread 7 or 8 3 or 4 45 50 mins Rolls 7 or 8 2 or 3 15 20 mins Chelsea buns 5 2 or 3 30 40 mins MISCELLANEOUS Yorkshire Pudding large 7 1 or 2 45 50 mins individual 7 1 or 2 25 30 mins Soufflés 4 3 30 mins Meringues Baked Potatoes 4 or 5 3 11 ...

Page 24: ... should be used when cooking pork joints and poultry The internal temperature of the food should reach at least 88 C 6 This method is unsuitable for stuffed meat and stuffed poultry 7 Always bring soups casseroles and liquids to the boil before putting in the oven 8 Cover casseroles with foil and then the lid to prevent loss of moisture 9 Always thaw frozen food completely before cooking 10 Root v...

Page 25: ...rmal cooking However if roasting is done frequently or high temperatures are not used regularly it may be necessary to run the oven empty at Mark 8 for about two hours It should not normally be necessary to clean the linings with water but if desired wipe them over with a soapy cloth followed by a wipe with a damp clean cloth OVEN DOORS The inner glass panel can be removed for easy cleaning Unscre...

Page 26: ... Wash with a cloth wrung out in warm soapy water only DO NOT USE ABRASIVES Aluminium Hotplate side trims hotplate burner bodies Similar to paint cleaning above Use a nylon brush to remove any cleaning materials water or dirt from the hotplate burner bodies Glass As for enamel cleaning Polish with a clean dry cloth or kitchen roll Chromium Plating Oven shelves grill pan grid grill pan handle suppor...

Page 27: ...the electricity supply is turned on If the electricity supply has failed the hotplate grill and top oven burners can be lit by a match If only one burner fails to ignite Check that the burner is dry and that spillage of food or cleaning fluid remains are not affecting the ignitor or burner ports Clean away any debris with a dry nylon brush such as an old toothbrush If a wire wool pad has been used...

Page 28: ...r taste The electricity supply to the cooker may have been been interrupted but has now come back on again set the correct time of day by following the instructions given in the timer section of this book Timer Display shows 0 00 with A Flashing To minimise the risk of injury to children please dispose of your product carefully and safely Remove all doors and lids Remove the mains cable where fitt...

Page 29: ...o ensure compliance with the law In the UK CORGI registered installers work to safe standards of practice The cooker must also be installed in accordance with BS 6172 Failure to install the cooker correctly could invalidate the warranty liability claims and could lead to prosecution LOCATION The cooker may be located in a kitchen kitchen diner or a bed sitting room but not in a room containing a b...

Page 30: ...eration adjustment None Electrical connection Flexible cord fitted with a 3 pin 13 amp plug 230 240V a c 50Hz 3A fuse INSTALLATION INSTRUCTIONS HEAT INPUT LPG MODELS BURNER INJECTOR 3 9 kW GRILL 135 2 7 kW MAIN OVEN 120 2 0 kW TOP OVEN 100 3 0 kW HOTPLATE Front left and rear right 128 1 9 kW HOTPLATE Front right and rear left 102 HEAT INPUT INJECTOR 3 3 kW 95 2 4 kW 75 2 0 kW 60 3 0 kW 90 1 7 kW 7...

Page 31: ... walls cupboards etc The wall behind the cooker between the hotplate and 450mm above and the width of the cooker must be a non combustible material such as ceramic wall tiles If the cooker is to be fitted close to a corner on the left hand side ensure that there is a clearance of at least 50mm to allow the main oven door to open fully for when removing oven shelves COOKER HOODS If a cooker hood is...

Page 32: ... of the cooker CAUTION Some soft floor coverings may get damaged if the cooker is not moved carefully STABILITY BRACKET The back of the cooker has a slot for engagement of a stability bracket which can be obtained as an extra from the cooker supplier The leaflet included with the bracket should be read in conjunction with the following instructions Push cooker to its intended position Draw pencil ...

Page 33: ...t must be chased into the wall Connection to the cooker should be made with an approved appliance flexible connection to BS 669 A length of 0 9 to 1 25m is recommended The length of hose chosen should be such that when the cooker is in situ the hose does not touch the floor The temperature rise of areas at the rear of the cooker that are likely to come in contact with the flexible hose do not exce...

Page 34: ...symbol or coloured green or green and yellow The wire which is coloured blue must be connected to the terminal which is marked with the N or coloured black The wire which is coloured brown must be connected to the terminal which is marked with the letter L or coloured red When wiring the plug ensure that all strands of wire are securely retained in each terminal Do not forget to tighten the mains ...

Page 35: ...steady flame on the low setting 2 Check that with the main oven set to mark 9 the burner ignites at low rate and then increases to full rate within 60 seconds Leave the oven full on with the door closed for 10 minutes and check that when the control is turned to the Slow Cook setting that the flame reduces 3 Check that with the top oven set to mark 8 the burner ignites at low rate and then increas...

Page 36: ...709 066 066 Monday to Friday 8am to 7 30pm Saturday 8 30am to 5 30pm Sunday 9 30am to 3 30pm www cannonservice co uk Republic of Ireland 1850 302 200 Note Our operators will require the following information Model number Serial number Extended Warranties UK 08709 088 088 Monday to Sunday 8am to 8pm www cannonservice co uk Republic of Ireland 1850 502 200 Genuine Parts Accessories UK 08709 077 077 ...

Reviews: