background image

26

Something Wrong with your Cooker?

Before contacting your nearest Service Centre/Installer, check the problem guide below; there may be nothing wrong
with your cooker.

Problem

Check

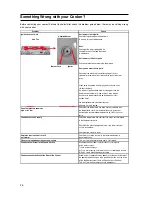
Ignition does not work

If all burners fail to ignite:

Hotplate Burner

Check that sparks appear at the burners;

Hob Top

A clicking noise should be heard.

If not 

Check that the plug is plugged in to a

13amp Electric socket and the supply
is switched on.

If all burners still fail to ignite

Check and replace if necessary the 13amp fuse

Burner Ports                Ignitor

If only one burner fails to ignite

Check that the burner is dry and that spillage of food or
cleaning fluid remains are not affecting the Ignitor or burner

ports.

Clean away any debris with a dry nylon brush such as an

old dry toothbrush.
If a wire wool pad has been used for cleaning around the 

burner ensure the Ignitor is free from any stray strands.

Any water on the burner should be dried with a cloth or 
kitchen towel.

On the hotplate make sure that all burner
parts are correctly seated

Oven Temperature seems too

Check that the temperature has been set in accordance with

high or too low

the temperature charts. It may be necessary to increase or

decrease the recommended temperature by 10 C to suit your
taste

Oven does not cook evenly.

Check the temperature and shelf position are as recommended
in the temperature charts

Check that the Utensil being used in the oven allow sufficient
air flow around them.

Check that the cooker is level.

Hotplates are slow to boil or will

Check that your pans conform to the recommendations in 

not simmer

these instructions.

Odour or smoke when using your new cooker

This is normal and should cease after a short period.

Condensation / Steam in the Oven After Use

Condensation and steam is a by product of cooking food

with a water content.
To help minimise always:

A) Try to avoid leaving food in the oven to cool after being cooked

B) Use a coved Utensil wherever possible

Condensation on the Wall at the Rear of the Cooker

Steam and/or condensation may appear from the vent at the rear of

the appliance when using an oven, particularly when cooking foods
with a high water content (Such as Oven Chips or Chicken). 

This is normal and any excess should be wiped off

Summary of Contents for 110cm Free Standing Gas Cooker C110DPX

Page 1: ...hen think To the Installer Before installation fill in the product details on the back cover this book The information can be found on the rating plate To the User You must read the instructions prior...

Page 2: ...st OVEN 15 Electronic Clock Automatic Cooking Feature 16 1st Oven The Intelligent Cooking System 20 Care and Cleaning 24 Cooking Results Not Satisfactory 25 Something Wrong With Your Cooker 26 Technic...

Page 3: ...that any pets be removed from the room until the smell has ceased This odour is due to temporary finish on oven liners and elements and also any moisture absorbed by the insulation The guarantee is s...

Page 4: ...the outside no air vent is required even when the volume is between 5m3 and 11m3 b During prolonged use of the appliance you may consider it necessary to open a window to the outside to improve venti...

Page 5: ...cookers is a threaded G 1 2 gas female fitting Connecting the gas supply To make the connection a flexible hose should be used corresponding to the current gas regulations which are the hose must neve...

Page 6: ...ioned in or next to the tap pin until the flame is small but steady N B in the case of liquid gas the regulation screw must be screwed in to the bottom check that the flame does not turn off when you...

Page 7: ...er see fig A l Pull and open the junction blok lid Important the wires in the mains lead are coloured in accordance with the following code Green Yellow Earth Blue Neutral Brown Live As the colours of...

Page 8: ...116 286 Semi Fast Medium S 75 1 65 0 4 30 64 120 118 96 157 Auxiliary Small A 55 1 00 0 4 30 50 73 71 71 95 Double flame DCDR internal 30 0 90 0 40 30 44 65 64 74 86 Double flame DCDR external 2 nozzl...

Page 9: ...es are kept away from the edge of the hob and cannot become heated by other hotplate pans l Take care to avoid heat steam burns when operating the controls l Turn off the electricity supply at the wal...

Page 10: ...l Never place flammable or plastic items on or near the hob l Never fill a deep fat frying pan more than 1 3 full of oil or use a lid DO NOT LEAVE UNATTENDED WHILE COOKING l Never operate the grill wi...

Page 11: ...11 Features 1650W 1000W 1650W 4100W 900W 3000W CONTROL PANEL 2nd OVEN Compartement opening Adjustable feet 1nd OVEN...

Page 12: ...on the display or by closing the door Cooling Fan The cooling fan operates with the ovens and grill The fan will operate at full speed for a few seconds and then reduce to a lower speed The cooling fa...

Page 13: ...s every time they are used the ignitors must be kept clean and dry Remove any food spillage or cleaning materials from the electrode using a small nylon brush such as a tooth brush Access to the elect...

Page 14: ...stat is working and is maintaining the temperature at a constant level Oven light This is switched on by turning the SELECTOR knob to any position other than 0 It remains lit as long as the oven is op...

Page 15: ...l knob Roast Chicken specially created for cooking excellent roast poultry This mode can be used to roast chickens duck turkey and other poultry to perfection Each heating element is used in the cycle...

Page 16: ...prevent bacterial growth in food Wine or beer may ferment and cream may curdle during the delay period so it is best to add these ingredients just before serving Foods which discolour should be protec...

Page 17: ...and the time will count down THE MINUTE MINDER IS NOW SET At the end of the set time an audible tone will be heard and the bell symbol will go out After a few seconds the audible tone will stop and af...

Page 18: ...a cooking temperature This can be changed by turning the control knob The oven will start STEP 4 Press the Time Mode button until the cooking duration symbol is flashing STEP 5 Turn the control knob...

Page 19: ...ime plus the cooking duration you set in STEP 5 The end time symbol will flash STEP 7 Turn the control knob to set the time you wish the cooking to end After a few seconds the display the temperature...

Page 20: ...formance flexibility and features over traditional cooking products See cooking charts for temperatures and shelf positioning Cooking temperature ranges The intelligent cooking system will automatical...

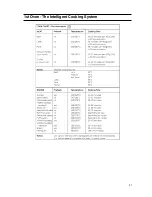
Page 21: ...21 1st Oven The Intelligent Cooking System...

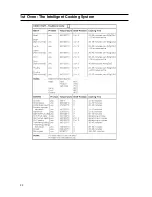
Page 22: ...22 1st Oven The Intelligent Cooking System...

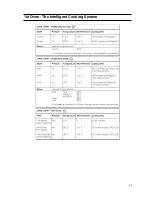
Page 23: ...23 1st Oven The Intelligent Cooking System...

Page 24: ...with a heat reflective layer After cleaning rinse and dry with a soft cloth For slight soiling the inner glass panel may be cleaned while still warm without removing it from the door Warning Oven must...

Page 25: ...ng at too high a temperature 2 Using normal creaming method with soft margarine Over Under cooking Fast Slow cooking Refer to the cooking times and temperatures given in the oven temperature charts ho...

Page 26: ...ly seated Oven Temperature seems too Check that the temperature has been set in accordance with high or too low the temperature charts It may be necessary to increase or decrease the recommended tempe...

Page 27: ...ubsequent modifications 90 396 EEC of 29 06 90 Gas and subsequent modifications only for models which use gas 93 68 EEC of 22 07 93 and subsequent modifications 2002 96 EC The European Directive 2002...

Page 28: ...e 36 Litres Voltage and Frequency see data plate Burners Adaptable for use with all the types of gas indicated on the data plate ENERGY LABEL Directive 2002 40 EC on the label of electric ovens Standa...

Page 29: ...ormed To stop the function open the compartment and turn the SELECTOR knob to 0 The OPERATION indicator light will switch off Troubleshooting It may happen that the compartment does not function prope...

Page 30: ...30...

Page 31: ...31...

Page 32: ...co uk Republic of Ireland 1850 302 200 Note Our operators will require the following information Model number Serial number Extended Warranties UK 08709 088 088 Open 8 to 8 Mon Sun www cannonservice...

Reviews: