background image

4

Installation

The appliance must only be installed by a competent person. In the UK, CORGI registered installers undertake
to work to safe and satisfactory standards.

Before moving your cooker check that it is cool, and switch off at the cooker control unit. Movement of your cooker is
most easily achieved by lifting the front as follows:
Open the grill door sufficiently to allow a comfortable grip on the underside front edge of the oven roof, avoiding any
grill elements.

Note: 

Take care in moving the cooker as it is heavy. Take care to ensure that any floor covering is not damaged.

(FIG. C)
Splashplate optional, apply to Parts Department (see Back Cover for contact number.)

The following instructions should be read by a qualified technician to ensure that the appliance is installed,
regulated and technically serviced correctly in compliance with current regulations.

Important: remember to unplug the appliance from the mains before regulating the appliance or
carrying out any maintenance work.

Positioning
Important:

 this unit may be installed and used only in permanently ventilated rooms according to the British

Standards Codes Of Practice: B.S. 6172/B.S. 5440, Par. 2 and B.S. 6891 Current Editions. The following requirements
must be observed:

a)

The cooker should not be installed in a bed sitting room with a volume of less than 20m

3

. If it is installed in a

room of volume less than 5m

3

 an air vent of effective area of 110cm

2

 is required, if it is installed in a room of

volume between 5m

3

 and 10m

3

 a supplementary airvent area of 50cm2 is required, if the volume exceeds 11m

3

no airvent is required. However, if the room has a door or a window which opens directly to the outside no air
vent is required even when the volume is between 5m

3

 and 11m

3

.

b)

During prolonged use of the appliance you may consider it necessary to open a window to the outside to
improve ventilation.

c)

If there are other fuel burning appliances in the same room, B.S.5440 Part 2 Current Edition, should, be
consulted to determine the requisite air vent requirements.

Installation of the cooker

For a correct installation of the cooker the following precautions must be followed:

The height of the cooker can be adjusted by means of adjustable feet in the plinth (900mm - 915mm). Adjust the feet by
tilting the cooker from the side. Then install the product into position.

NOTE: This appliance must not be fitted on a platform.

The cooker is designed to fit between kitchen cabinets spaced 500mm apart. The space either side need only be sufficient
to allow withdrawal of the cooker for servicing. It can be used with cabinets one side or both as well as in a corner setting.
It can also be used free-standing.
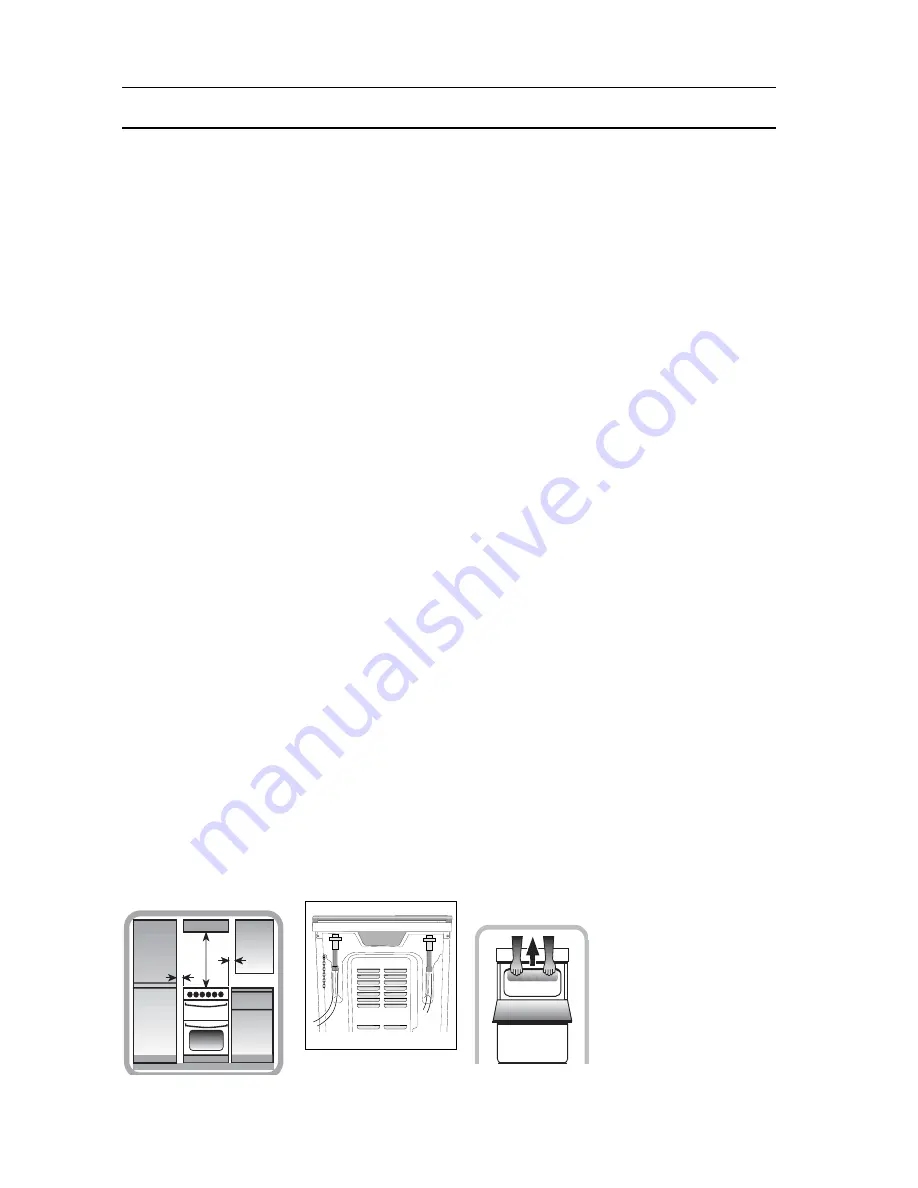
Adjacent side walls which project above hob level, must not be nearer to the cooker than 150mm and should be protected
by heat resistant material. Any overhanging surface or cooker hood should not be nearer than 650mm. (Fig.A)

a)

The cooker may be located in a kitchen, a kitonen/diner or bed sitting room, but not in a bathroom or
shower room.

b)

The hoods must be installed according to the requirements in the hood handbook.

c)

The wall in contact with the back of the cooker must be of flameproof material.

d)

The cooker is fitted with a safety chain that must be attached to a hook, secured to the wall behind the
appliance.

Note:

 some models can have their gas connection inverted. It is important to make sure the safety chain

is always situated on the side which corresponds to the hose holder (Fig. B).

150 mm

150 mm

650 mm


Moving the Cooker

Fig. A

Fig. B

Fig. C

Summary of Contents for 110cm Free Standing Gas Cooker C110DPX

Page 1: ...hen think To the Installer Before installation fill in the product details on the back cover this book The information can be found on the rating plate To the User You must read the instructions prior...

Page 2: ...st OVEN 15 Electronic Clock Automatic Cooking Feature 16 1st Oven The Intelligent Cooking System 20 Care and Cleaning 24 Cooking Results Not Satisfactory 25 Something Wrong With Your Cooker 26 Technic...

Page 3: ...that any pets be removed from the room until the smell has ceased This odour is due to temporary finish on oven liners and elements and also any moisture absorbed by the insulation The guarantee is s...

Page 4: ...the outside no air vent is required even when the volume is between 5m3 and 11m3 b During prolonged use of the appliance you may consider it necessary to open a window to the outside to improve venti...

Page 5: ...cookers is a threaded G 1 2 gas female fitting Connecting the gas supply To make the connection a flexible hose should be used corresponding to the current gas regulations which are the hose must neve...

Page 6: ...ioned in or next to the tap pin until the flame is small but steady N B in the case of liquid gas the regulation screw must be screwed in to the bottom check that the flame does not turn off when you...

Page 7: ...er see fig A l Pull and open the junction blok lid Important the wires in the mains lead are coloured in accordance with the following code Green Yellow Earth Blue Neutral Brown Live As the colours of...

Page 8: ...116 286 Semi Fast Medium S 75 1 65 0 4 30 64 120 118 96 157 Auxiliary Small A 55 1 00 0 4 30 50 73 71 71 95 Double flame DCDR internal 30 0 90 0 40 30 44 65 64 74 86 Double flame DCDR external 2 nozzl...

Page 9: ...es are kept away from the edge of the hob and cannot become heated by other hotplate pans l Take care to avoid heat steam burns when operating the controls l Turn off the electricity supply at the wal...

Page 10: ...l Never place flammable or plastic items on or near the hob l Never fill a deep fat frying pan more than 1 3 full of oil or use a lid DO NOT LEAVE UNATTENDED WHILE COOKING l Never operate the grill wi...

Page 11: ...11 Features 1650W 1000W 1650W 4100W 900W 3000W CONTROL PANEL 2nd OVEN Compartement opening Adjustable feet 1nd OVEN...

Page 12: ...on the display or by closing the door Cooling Fan The cooling fan operates with the ovens and grill The fan will operate at full speed for a few seconds and then reduce to a lower speed The cooling fa...

Page 13: ...s every time they are used the ignitors must be kept clean and dry Remove any food spillage or cleaning materials from the electrode using a small nylon brush such as a tooth brush Access to the elect...

Page 14: ...stat is working and is maintaining the temperature at a constant level Oven light This is switched on by turning the SELECTOR knob to any position other than 0 It remains lit as long as the oven is op...

Page 15: ...l knob Roast Chicken specially created for cooking excellent roast poultry This mode can be used to roast chickens duck turkey and other poultry to perfection Each heating element is used in the cycle...

Page 16: ...prevent bacterial growth in food Wine or beer may ferment and cream may curdle during the delay period so it is best to add these ingredients just before serving Foods which discolour should be protec...

Page 17: ...and the time will count down THE MINUTE MINDER IS NOW SET At the end of the set time an audible tone will be heard and the bell symbol will go out After a few seconds the audible tone will stop and af...

Page 18: ...a cooking temperature This can be changed by turning the control knob The oven will start STEP 4 Press the Time Mode button until the cooking duration symbol is flashing STEP 5 Turn the control knob...

Page 19: ...ime plus the cooking duration you set in STEP 5 The end time symbol will flash STEP 7 Turn the control knob to set the time you wish the cooking to end After a few seconds the display the temperature...

Page 20: ...formance flexibility and features over traditional cooking products See cooking charts for temperatures and shelf positioning Cooking temperature ranges The intelligent cooking system will automatical...

Page 21: ...21 1st Oven The Intelligent Cooking System...

Page 22: ...22 1st Oven The Intelligent Cooking System...

Page 23: ...23 1st Oven The Intelligent Cooking System...

Page 24: ...with a heat reflective layer After cleaning rinse and dry with a soft cloth For slight soiling the inner glass panel may be cleaned while still warm without removing it from the door Warning Oven must...

Page 25: ...ng at too high a temperature 2 Using normal creaming method with soft margarine Over Under cooking Fast Slow cooking Refer to the cooking times and temperatures given in the oven temperature charts ho...

Page 26: ...ly seated Oven Temperature seems too Check that the temperature has been set in accordance with high or too low the temperature charts It may be necessary to increase or decrease the recommended tempe...

Page 27: ...ubsequent modifications 90 396 EEC of 29 06 90 Gas and subsequent modifications only for models which use gas 93 68 EEC of 22 07 93 and subsequent modifications 2002 96 EC The European Directive 2002...

Page 28: ...e 36 Litres Voltage and Frequency see data plate Burners Adaptable for use with all the types of gas indicated on the data plate ENERGY LABEL Directive 2002 40 EC on the label of electric ovens Standa...

Page 29: ...ormed To stop the function open the compartment and turn the SELECTOR knob to 0 The OPERATION indicator light will switch off Troubleshooting It may happen that the compartment does not function prope...

Page 30: ...30...

Page 31: ...31...

Page 32: ...co uk Republic of Ireland 1850 302 200 Note Our operators will require the following information Model number Serial number Extended Warranties UK 08709 088 088 Open 8 to 8 Mon Sun www cannonservice...

Reviews: