background image

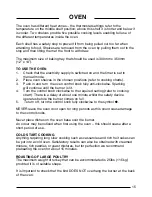
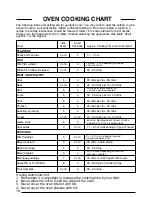
The oven has different heat zones – the thermostat settings refer to the
temperature on the middle shelf position; above this shelf it is hotter and below it
is cooler. Two shelves provide five possible cooking levels enabling full use of
the different temperatures inside the oven.

Each shelf has a safety stop to prevent if from being pulled out too far when
attending to food. Shelves are removed from the oven by pulling them out to the
stop and then lifting them at the front to withdraw.

The maximum size of baking tray that should be used is 300mm x 350mm 
(12” x 14”).

TO USE THE OVEN
1.

Check that the electricity supply is switched on and the timer is set to 
manual mode.

2.

Place oven shelves in the chosen positions (refer to cooking charts).

3.

Push in and turn  the oven control knob fully anti-clockwise. Sparking
will continue until the burner is lit.

4.

Turn the control knob clockwise to the required setting (refer to cooking 
chart). There is a delay of about one minute whilst the safety device 
operates before the burner comes on full.

5.

To turn off, turn the control knob fully clockwise to the symbol 

.

NEVER leave the oven door open for long periods as this could cause damage
to the control knobs.

Never place dishes on the oven base over the burner.
An odour may be noticed when first using the oven – this should cease after a
short period of use.

COLD START COOKING
Anything requiring long slow cooking such as casseroles and rich fruit cakes can
be put into a cold oven. Satisfactory results can also be obtained with creamed
mixture, rich pastries or yeast mixtures, but for perfection we recommend
preheating the oven for about 15 minutes.

ROASTING OF LARGE POULTRY
The maximum weight of turkey that can be accommodated is 25lbs (11.5kg)
provided it is of suitable shape.

It is important to check that the bird DOES NOT overhang the burner at the back
of the oven.

15

OVEN

Summary of Contents for Winchster

Page 1: ...ce with the regulations in force and only used in a well ventilated space Read these instructions prior to installing or using the cooker and retain them for future reference The Data Badge is located...

Page 2: ......

Page 3: ...SER S INSTRUCTIONS 5 Automatic Cooking 6 Electronic Clock Operation 7 Hotplate 13 Grill 14 Oven 15 Oven Cooking Chart 18 Care and Cleaning 20 Something Wrong With Your Cooker 23 INSTALLATION INSTRUCTI...

Page 4: ...ntilated e g open a window or use an extractor fan and that persons who may be sensitive to the odour avoid any fumes It is suggested that any pets be removed from the room until the smell has ceased...

Page 5: ...in use ALWAYS place pans centrally over the hotplate burners and position them so that the handles cannot accidentally be caught or knocked or become heated by other burners ALWAYS keep the cooker cl...

Page 6: ...flammable or plastic items on or near the hotplate NEVER use proprietary spillage collectors on the hotplate NEVER use the cooker as a room heater NEVER dry clothes or place other items over or near t...

Page 7: ...Pan Grid Timer Splash Back Side Trim Pan Supports Hotplate Top Control Knobs Outer Side Panel Grill Pan Grill Shelf Splashback Hotplate Burners Hotplate Control Fascia Oven Door Handle Ignition Button...

Page 8: ...bles should be cooked as soon as possible 5 We advise dishes containing left over cooked poultry or meat for example Shepherds Pie should not be cooked automatically if there is to be a delay period 6...

Page 9: ...t Here you can set a time period of up to 23 hours 59 minutes that will count down When it reaches zero the timer will emit an audible tone For Example If you set 20 minutes the audible tone will occu...

Page 10: ...and the timer display will revert back to the time of day Bell symbol will remain lit to signify that a Minute Minder period has been set At the end of the set time a bleeping sound will be heard and...

Page 11: ...ymbol will remain lit to signify that an Auto Cooking Programme has been set The symbol will go out When the Auto Cook Programme starts the will then light up again Step 7 Turn the oven control s to t...

Page 12: ...8 Press the Cook Period button to cancel the bleeping sound Step 9 Turn the oven control s to the OFF position Step 10 Press the Cook Period and End Time buttons together to return the oven s to Manua...

Page 13: ...8 Press the Cook Period and End Time buttons together to return the cooker to Manual operation The A symbol will go out and the Cookpot symbol will light up 15 00 A U T O 15 00 A U T O Minute Minder C...

Page 14: ...s together to return the cooker to manual operation b Start the sequence again 6 If at any time the display shows three flashing zero s 0 00 It is likely that the electricity supply to the oven has be...

Page 15: ...ise to the symbol DO NOT use mis shapen pans which may be unstable DO NOT use round base woks directly on the pan supports SAFETY REQUIREMENTS FOR DEEP FAT FRYING 1 Never fill chip pans more than one...

Page 16: ...ockwise to the desired setting Only turn the control knob between the large flame symbol and the small flame symbol for adjusting the setting 5 To turn off turn the control knob fully clockwise to the...

Page 17: ...burner is lit 4 Turn the control knob clockwise to the required setting refer to cooking chart There is a delay of about one minute whilst the safety device operates before the burner comes on full 5...

Page 18: ...the oven 8 Cover casseroles with foil and then the lid to prevent loss of moisture 9 Always thaw frozen food completely before cooking 10 Root vegetables will cook better if cut into small pieces 11 A...

Page 19: ...a clean container as quickly as possible 2 Completely thaw frozen food in the refrigerator before re heating 3 Re heat food thoroughly and quickly either on the hotplate or in a hot oven mk 6 and the...

Page 20: ...4 25 mins per lb 25 mins Duckling gosling 5 4 25 mins per lb 25 mins Turkey 4 or 5 4 or 5 15 20 mins per lb 20 mins Game birds 6 4 Casseroles 3 3 or 4 11 2 6 hrs depending on type of meat PUDDINGS Mi...

Page 21: ...ortcrust pastry 6 2 or 3 15 mins 1 hr depending on recipe Rich Shortcrust pastry 1 tray 5 2 20 40 mins depending on recipe Flaky puff pastry 2 trays 7 1 3 10 30 mins depending on recipe 1 tray 2 or 3...

Page 22: ...f back and side linings are coated with a special enamel which has a continuous cleaning action The higher the oven temperature the more effective the action In most cases this cleaning operation will...

Page 23: ...ll fascia CLEANING METHOD Clean with a cloth wrung out in hot soapy water Stubborn stains can be removed with a cream paste or liquid cleaner or by gently rubbing with well moistened liberally soaped...

Page 24: ...pan handles Control knobs and buttons Oven door handle CLEANING METHOD Wipe with a cloth wrung out in hot soapy water A liberally soaped very fine steel wool pad e g Brillo Ajax etc or a chrome or sta...

Page 25: ...ectricity supply is turned on If the electricity supply has failed the hotplate burners and grill can be lit by a match If only one burner fails to ignite Check that the burner is dry and that spillag...

Page 26: ...g the minute minder Adjust the pitch of the bleeper audible tone by following the instructions given in the Notes on Timer Operation section of this book Difficulty hearing Timer Bleeper Audible tone...

Page 27: ...the above regulations It is in your interest and that of safety to ensure compliance with the law In the UK CORGI registered installers work to safe standards of practice The cooker must also be insta...

Page 28: ...models Propane G31 at 37 mbar convertible to Butane G30 at 28 30 mbar Grill Injector None None for Natural Gas LPG models hotplate burners adjustable see page 31 for details Flexible cord fitted with...

Page 29: ...all cupboards above hotplate level must also be 125mm away as shown Where cupboards or any overhead surfaces are fitted above the cooker allow a clearance of 500mm from the top of the grill to the und...

Page 30: ...overings may get damaged if the cooker is not moved carefully STABILITY BRACKET The back of the cooker has a slot for engagement of a stability bracket which can be obtained as an extra from the cooke...

Page 31: ...slots at the front of the grill Carefully pull the carrier downwards until it locks into position INSTALLATION INSTRUCTIONS 1 LOCATE UNDER GRILL FRAME DO NOT ENGAGE IN SLOT 3 LOCATE FRONT PEGS OF CARR...

Page 32: ...not touch the floor The temperature rise of areas at the rear of the cooker that are likely to come in contact with the flexible hose do not exceed 70 C GAS CONNECTION CONNECTING TO THE GAS SUPPLY The...

Page 33: ...all Front Right and Rear Left Burners If the appliance is converted the rating plate located under the bottom of the main oven door seal should be corrected to show the current gas adjustment conditio...

Page 34: ...or by the earth symbol or coloured green or green and yellow The wire which is coloured blue must be connected to the terminal which is marked with the N or coloured black The wire which is coloured...

Page 35: ...ports and grill pan referring to the instructions for use where necessary 1 Check that the hotplate and grill burners ignite correctly and burn with a steady flame Check for a steady flame on the low...

Page 36: ...r and concise details of the query or fault Place and Date of purchase Please keep the receipt as evidence will be required when the engineer calls Extended Warranty To join UK 08709 088 088 Republic...

Reviews: