background image

4

134910 Rev 1.

ENGLISH

TRIGGER/JEKYLL - OWNERS MANUAL SUPPLEMENT

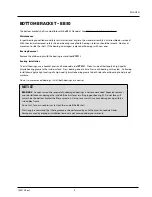
Carbon frames have a 46 mm I.D. bottom bracket bearing system press interface.  The shell width is 83mm.    

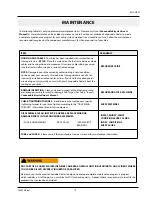
Maintenance

In general, you should inspect the condition of the bearings annually (at a minimum) or  anytime the crankset assembly is 
disassembled ,  serviced, or if a problem is indicated.  

To inspect, when the crankset is removed, rotate the inner bearing race of both bearings; rotation should be smooth, and 
quiet.  Execesssive play, roughness or corrossion indicates a damaged bearing.  

Removal

To avoid serious damage to the frame, it is important to remove bearing systems very carefully using proper tools 
indicated by the manufacture’s service instructions.  Make sure the bearings(cup or adpater parts) are driven out squarely 
and evenly from inside the shell!!!  Do not pry components from shell.

Replacement

PressFit BB30 bearings are not removable from the adapters or cup systems that are pressed into the frame bottom 
bracket shell.   Therefore, damaged bearings must be removed and replaced as new entire sets.  Before installing any new 
bearing units into the shell, thoroughly clean the inside surface of the bottom bracket shell with a clean dry shop towel.   
Also, make sure both bearing units and the BB shell surfaces  are clean and dry.  Do not apply grease to either.

Follow the manufacture’s instruction for assembly and installtion of the bearing system.    Use a headset press such as Park 
Tool HHP-2. See  http://www.parktool.com/product/bearing-cup-press-HHP-2 Select appropriate press  and adapters to 
ensure  that force is only applied to the cup and not the bearing inside.   Press until the both cup flanges are mated to the 
BB shell edge.  

NOTICE

Consult with your Cannondale Dealer on the quality and compatibilty of any proposed replacement 
component.   
Make sure the PRESSFIT BB30  system is intended for use with with a 46 mm I.D.  BB shell.   Confirm acutal 
part dimensions with a micrometer.   

Do not use chemical solvents to clean.   Do not remove frame material or use surfacing tools on bottom 
bracket shell. 

Frame damage, caused by improper  components, component installation or removal is not covered by your 
warranty.

BOTTOM BRACKET - PF30

Summary of Contents for TRIGGER

Page 1: ...Read this supplement and your Cannondale Bicycle Owner s Manual Both contain important safety information Keep both for future reference TRIGGER JEKYLL OWNER S MANUAL SUPPLEMENT ENGLISH...

Page 2: ......

Page 3: ...y manual supplement from our website http www cannondale com Your Authorized Cannondale Dealer To make sure your bike is serviced and maintained correctly and that you protect applicable warranties pl...

Page 4: ...rge you to read PART II Section D Inspect For Safety in your Cannondale Bicycle Owner s Manual BEFORE you ride YOU CAN BE SEVERELY INJURED PARALYZED OR KILLED IN AN ACCIDENT IF YOU IGNORE THIS MESSAGE...

Page 5: ...untain REAR TRAVEL 145 mm 165mm RECOMMENDED SAG 30 17 mm 30 18 mm EYE TO EYE STROKE 210 mm 55 mm 230 mm 60 mm REAR BRAKE 160 180 Flat Mount REAR AXLE 148 X 12 Maxle 180 mm length MAXIMUM WEIGHT LIMIT...

Page 6: ...ore damaged bearings must be removed and replaced as new entire sets Before installing any new bearing units into the shell thoroughly clean the inside surface of the bottom bracket shell with a clean...

Page 7: ...nside surface Press bearing one at a time Press each bearing until seated Following installation apply a light coating of a high quality bicycle bearing grease to both sides of each bearing to help re...

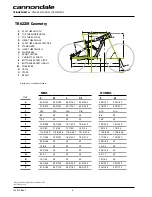
Page 8: ...0 16 5 H K 1 2 0 5 H H H 1 2 0 5 H L 34 5 13 6 H H H 34 5 13 6 H M 4 4 1 7 H H H 4 4 1 7 H N 10 7 4 2 H H H 10 7 4 2 H O 58 3 23 0 59 5 23 4 60 6 23 9 61 8 24 3 58 3 23 0 59 5 23 4 P 41 4 16 3 43 7 17...

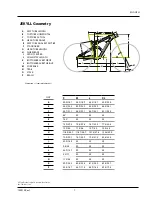
Page 9: ...0 3 H H H L 34 9 13 7 H H H M 4 4 1 7 H H H N 11 4 4 5 H H H O 59 2 23 3 60 4 23 8 61 5 24 2 62 6 24 7 P 42 5 16 7 44 7 17 6 46 9 18 5 49 4 19 5 O D G P B F L I H K J A M N E 75mm C ENGLISH All Speci...

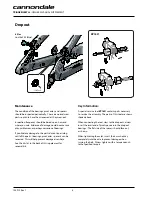
Page 10: ...ely into the axle to prevent damage when turning the bolt Always tighten with a torque wrench to the specified torque Maintenance The condition of the bearings pivot axles and spacers should be inspec...

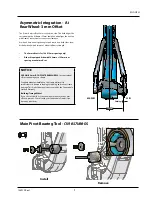
Page 11: ...equipped bike with 142mm or 135mm rear spacing use a 6mm offset NOTICE USE ONLY 3mm Ai OFFSET REAR WHEELS Incorrect wheel offset can damage your frame Standard wheel assembled on this frame will resul...

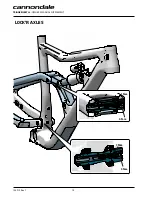
Page 12: ...10 134910 Rev 1 1 N m 5 N m 1 N m 5 N m LOCK R AXLES TRIGGER JEKYLL OWNERS MANUAL SUPPLEMENT...

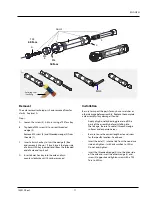
Page 13: ...nto the axle and turn counter clockwise until it can be removed Installation Be sure to inspect the parts for any burrs scratches or other damage before assembly Replace the complete axle assembly if...

Page 14: ...LGI 2 pgs 15 TRIGGER JEKYLL OWNERS MANUAL SUPPLEMENT Tightening Torques Correct tightening torque for the fasteners bolts screws nuts on your bicycle is very important to your safety durability and pe...

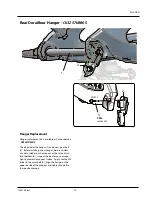
Page 15: ...new pivot bolt 3 Before installing a new hanger be sure to clean any dirt or debris on the dropout with a nylon brush old toothbrush Inspect the area for any damage Lightly grease the dropout surface...

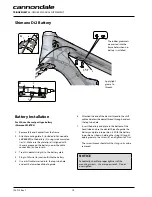
Page 16: ...al string 5 to the battery plate 4 Plug in Di2 wire to junction B into the battery 5 Use a shift cable inserted into the top tube hole and out the lower head tube to guide 6 Attached the end of the de...

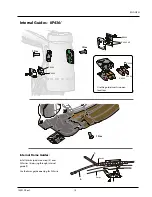
Page 17: ...mm 5 4mm 5 mm 4mm 1 Nm 1 Nm 1 Nm ENGLISH Internal Guides KP436 Internal Frame Guides Install plastic spiral wire wrap 5 over Di2 wires 6 passing through internal guide 7 Use the 4mm guide opening for...

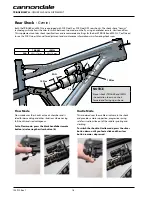
Page 18: ...ks com Rear Shock Gemini Flow Mode Flow mode uses the shock s entire air chamber and is ideal for descending and other situations where having full shock travel is advantageous Set to Flow mode press...

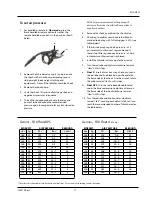
Page 19: ...11 7 10 160 73 184 12 7 9 170 77 197 13 6 8 180 82 210 14 5 7 190 86 223 15 4 6 200 91 236 16 3 5 210 95 249 17 2 5 220 100 262 18 1 4 Fully close the rebound dial turn clockwise until dial stops To...

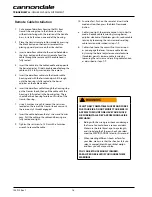
Page 20: ...odle end opposite the barrel adjuster Slide the cable noodle along the cable until it is fully inserted into the remote 5 Insert the derailleur cable into the Gemini cable housing end with the ferrule...

Page 21: ...frame between where cables and housing rub due to movement Overtime cable rubbing can wear into the frame itself causing very serious frame damage NOTE Damage to your bike caused by cable rubbing is n...

Page 22: ...ardware B CK3177U00OS Trigger Pivot Bearings C CK3227U00OS Trigger Shock Bolts D CK3257U00OS Jekyll Trigger Rear Der Hanger E KP421 160 Brake Mount Flat 160mm KP421 180 Brake Mount Flat 180mm F CK3237...

Page 23: ...ring BB Pressfit 30 SRM M KP388 Seatbinder MTN 34 9 ID CODE DESCRIPTION N K32027 Internal Di2 Battery Mount 0 CK3117U00SM Trigger Crb DT Protector SM CK3117U00MD Trigger Crb DT Protector MD CK3117U00L...

Page 24: ...s X D CK3187U00OS Jekyll Trigger Grommets X X E KP388 Seatbinder MTN 34 9 X X F KP436 Cable Guides Scalpel Si X KP197 SRM Kit Bearing BB Pressfit 30 SRM X KB6180 Bearing BB Si 2PCS BLU X QC616 Circlip...

Page 25: ...K CK3217U00OS Jekyll AL CSTAY Protector X L CK3197U00OS Jekyll CRB CSTAY Protector X M K34078 Jekyll CRB Chainsuck Protector X N C21698M00L1 27 5 M Jekyll CRB Link w bearings All sizes both carbon and...

Page 26: ...1 800 726 BIKE 2453 CANNONDALE EUROPE Cycling Sports Group Europe B V Mail Postbus 5100 Visits Hanzepoort 27 7570 GC OLDENZAAL Netherlands Tel 41 61 551 14 80 Fax 31 54 151 42 40 WWW CANNONDALE COM 20...

Reviews: