background image

Share Your Memories with SELPHY

Compact, Stylish, Powerful!
Save your precious moments with SELPHY. 

CO

PY

Summary of Contents for 3501B001

Page 1: ...ENGLISH Printer User Guide Make sure you read this guide before using the printer Store this guide safely so that you can use it in the future COPY ...

Page 2: ...Share Your Memories with SELPHY Compact Stylish Powerful Save your precious moments with SELPHY COPY ...

Page 3: ...ly 4 Read This First 5 Conventions Used in this Guide 5 Getting Familiar with SELPHY 6 For Your Safety 7 Setting Up SELPHY 8 Getting Started 9 Setting the Display Language 12 Printing Images 13 Printing a Variety of Images 18 Printing from Your Computer 21 Printing From Your Digital Camera 26 Printing Images Using Camera Specified Settings DPOF Print 27 SELPHY Settings 28 Using the Battery Pack 29...

Page 4: ... 18 Color Ink Cassette Label Set KC 18IL 8 label sheets 18 Color Ink Cassette Paper Set KW 24IP Wide Size 24 Paper Cassette PCW CP100 2 1 Some accessories may not be available depending on the region Please purchase separately 2 Please purchase the paper cassette in addition to the dedicated Color Ink Paper Set Card size paper cassette may not be supplied depending on region Printer User Guide Thi...

Page 5: ...onventions Used in this Guide This printer will be referred to as SELPHY or printer The various types of memory cards that can be used in this printer are collectively referred to as memory cards Icons are used in the text to represent SELPHY s buttons Language that displays on the screen appears inside square brackets Buttons are represented by the following icons Things you should be careful abo...

Page 6: ...ver Paper Ejection Slot Screen LCD Monitor Display images settings screens or error messages Turn the power on or off Display the menu screen Set the selected item Go back one screen cancel printing Start printing Switch images change settings Specify number of copies select setting items Controls Currently used memory card slot Print Settings p 18 Borders Page Layout Date Correct Red Eye My Color...

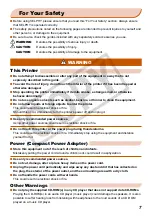
Page 7: ...lectrical shock or fire Should this occur immediately turn the printer s power off and unplug it Use only recommended power sources Using other power sources could result in electrical shock or fire Do not touch this printer or the power plug during thunderstorms This could result in electrical shock or fire Immediately stop using the equipment and distance yourself from it This Printer Power Comp...

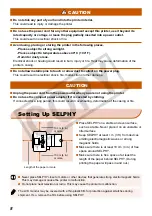
Page 8: ...printer Do not use the compact power adapter if it is covered by clothing If connected for a long period this could result in overheating deformation of the casing or fire CAUTION Setting Up SELPHY Place SELPHY on a stable and even surface such as a table Never place it on an unstable or tilted surface Keep SELPHY at least 1 m 3 ft from devices emitting electromagnetic waves or strong magnetic fie...

Page 9: ...ng Started Preparations for printing images The Postcard size Color Ink Cassette Paper Set separately sold p 4 will be used as an example Preparing the color ink cassette Check the color ink cassette Check that the paper size and the size shown on the color ink cassette Card Size Postcard Size etc match Check that the ink sheet is taut with no slack If the ink sheet is slack push and turn the spro...

Page 10: ...Prints will not be desirable if the print surface becomes dirty or wet Spring 4 Close the lid Close the inner lid until it clicks into place Leave the outer lid open during printing For Wide size paper cassette sold separately close the inner lid first then slide the inner lid until it clicks to the opposite direction of the arrow 3 Set the paper Set the paper into the paper cassette that you prep...

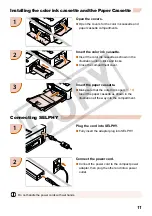
Page 11: ...tte as shown in the illustration until it clicks and locks Close the compartment cover 3 Insert the paper cassette Make sure that the outer lid is open p 10 Insert the paper cassette as shown in the illustration all the way into the compartment 1 Plug the cord into SELPHY Fully insert the adapter plug into SELPHY Connect the power cord Connect the power cord to the compact power adapter then plug ...

Page 12: ...ss the u or d buttons to select Printer Setup then press o Setting the Display Language 3 Select a language Press the u d l or r buttons to select a language then press o Pressing the m BACK button twice will restore the image display screen 2 Display the language setting screen Press the u or d buttons to select Language Press o COPY ...

Page 13: ... Card 2 Reduced Size MultiMediaCard For memory cards requiring an adapter be sure to first insert the memory card into the adapter before inserting the adapter into the appropriate card slot If you insert the memory card into a card slot without using an adapter you may not be able to remove the memory card from SELPHY Use a memory card formatted in the device used for taking the images A memory c...

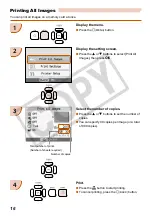
Page 14: ...e images you want to print all the way into the appropriate memory card slot The screen in Step 3 appears Label side Select an image Press the l or r buttons to select an image to print If you hold the l or r buttons pressed the display jumps by 5 images Select the number of copies Press the u or d buttons to select a value If you hold the u or d buttons pressed the number increases or decreases b...

Page 15: ...move the paper cassette from SELPHY Refill new paper and reinsert the paper cassette into SELPHY p 11 6 Never pull out the paper cassette open the color ink cassette cover or remove the memory card during printing or directly after turning on the printer This may cause the printer to malfunction When the total number of copies p 14 is set to 0 and you press the p button the currently displayed ima...

Page 16: ... You can specify 99 copies per image or a total of 999 copies Total number of prints Number of sheets required 1 Display the menu Press the m MENU button 2 Display the setting screen Press the u or d buttons to select Print All Images then press o Number of copies Print Press the p button to start printing To cancel printing press the m BACK button 4 COPY ...

Page 17: ...ophane Color may change over time or depending on storage conditions Canon assumes no liability for color changes 17 After you finish printing follow the steps below for cleaning and storing SELPHY Turn the power off p 14 Unplug the power cord from the power outlet and disconnect the adapter plug from SELPHY If the compact power adapter is hot wait until it has cooled down before you store it Remo...

Page 18: ...n SELPHY 1 Display the menu Press the m MENU button 2 Display the setting screen Press the u or d buttons to select Print Settings then press o 3 Setting Date to On Press the u or d buttons to select Date Press the l or r buttons to select On Pressing the m BACK button twice will restore the image display screen Select an image and print p 14 The printed image will show the shooting date on the lo...

Page 19: ...images on a memory card as an index print Correcting Red Eyes and Printing Correct Red Eye Correct images with red eye Off On Red eye may not be automatically detected or optimally corrected when faces appear extremely small large dark or bright in relation to the overall image with faces turned to the side or at a diagonal or faces with a portion hidden Portions other than the eyes may be mistake...

Page 20: ...d correctly Setting Various Functions Set the functions introduced in the Various Functions section p 19 You can set various functions using the same operation Display the settings screen Press the m MENU button Press the u or d buttons to select Print Settings then press o 1 Select the item and change the settings Press the u or d buttons to select an item Press the l or r buttons to change the s...

Page 21: ...e above OS should be pre installed on computers with built in USB ports CPU Pentium 1 3 GHz or higher PowerPC G4 G5 or Intel Processor RAM Windows Vista 1 GB or more Windows XP 512 MB or more 512 MB or more Interface USB Free Hard Disk Space 80 MB or more 100 MB or more Display 1 024 x 768 pixels or more 1 024 768 pixels or more System Requirements Even though these are recommended system requirem...

Page 22: ...LPHY to the computer Refer to the user guide included with the cable or computer for handling instructions 3 Commercially available USB cable Install the software Windows Place the CD ROM in the computer s CD ROM drive and click Easy Installation when the screen on the left appears Follow the onscreen instructions to proceed Macintosh Place the CD ROM in the computer s CD ROM drive and double clic...

Page 23: ...d registering your printer click SELPHY Photo Print from the Dock the bar at the bottom of the desktop and the screen at the left will appear Turn on SELPHY Press the q button to turn on SELPHY Windows When the installation finishes click Restart to restart the computer and complete the installation 5 SELPHY may not operate correctly if it is connected to a computer via a USB hub SELPHY may not fu...

Page 24: ... can make prints with frames stamps and speech bubbles by clicking Decoration print You can make prints with calendars added by clicking Calender print 2 Select an image Images will display in a list within the My Pictures folder in Windows and the Pictures folder in Macintosh 3 Click the selected image for printing The background color changes and the image is set for printing Use the same proced...

Page 25: ...f the screen 5 Macintosh If paper is depleted refill the paper cassette and perform the operations below to restart printing Click on the Dock the bar that appears at the bottom of the screen and the screen at the left will appear upper screen is 10 4 lower screen is 10 5 Click print jobs as shown on the left In 10 4 click Start Jobs In 10 5 open the Edit menu and select Select All then click Resu...

Page 26: ...blished by the Camera Imaging Products Association CIPA It allows any digital camera or video camera regardless of the manufacturer or model to print images taken with the camera directly to a printer without using a computer 1 Check that there is no memory card inserted and that no computer is connected to SELPHY 2 Insert the USB cable included with the camera into the camera and SELPHY 3 First t...

Page 27: ...images appears on the screen Press o Print Press the p button to start printing 1 3 4 2 Print type set with the camera Index Standard Date and File No set with the camera Number of sheets required The date and file number are the DPOF settings made with the camera these settings cannot be changed with SELPHY The screen in Step 3 can be also displayed when you press the m MENU button and select DPO...

Page 28: ...elect Off then press the m BACK to make the setting Pressing the m BACK button again will restore the image display screen Changing the Date Style You can change the order of the date p 18 when imprinting the date 1 Display the settings screen Press the m MENU button Press the u or d buttons to select Printer Setup then press o 2 Make settings Press the u or d buttons to select Date Format Press t...

Page 29: ...ile the battery is charging and you press any button other than the q button will appear after approximately 10 seconds If SELPHY is idle for 5 minutes the power turns off in order to save energy O O O CAUTION RISK OF EXPLOSION IF BATTERY IS REPLACED BY AN INCORRECT TYPE DISPOSE OF USED BATTERIES ACCORDING TO LOCAL REGULATION 1 Remove the battery cover Slide and hold the cover lock towards then re...

Page 30: ...mitted maximum data size varies depending on the mobile phone Data transmission time increases when data size is large Accordingly it may take some time before printing starts Movies E mails phone directories or image data for example downloaded from a URL attached to an E mail may not be printable Depending on the mobile phone model images saved on the memory card may not be printed Printing cann...

Page 31: ...porarily stop operating This is not a malfunction Wait until the temperature drops and SELPHY resumes If SELPHY is connected to a computer a message will appear on the computer screen Do not cancel the print Wait until printing resumes Cannot print from memory card image does not display Is the memory card inserted all the way into the slot with the label facing upward pp 13 14 Make sure you are u...

Page 32: ... of the paper cassette p 4 Paper is Not Feeding Properly Check the paper and paper cassette are correctly inserted p 11 Frequent Paper Jams Has too much paper been placed in the paper cassette Do not place 19 or more sheets in the cassette 13 or more for Wide size Have 19 or more sheets 13 or more for Wide size collected on top of the paper cassette Make sure that you are using the dedicated paper...

Page 33: ...ou do not intend to print The initialization process consumes ink and the equivalent of several pages could be wasted Be careful not to spray the equipment with insecticides or volatile substances In addition do not store the equipment in contact with rubber or vinyl products for long periods of time This may cause alteration of the casing Depending on the room temperature SELPHY may overheat and ...

Page 34: ...c Approx 60 sec Feeding System Automatic paper feed from paper cassette Ejection System Automatic paper ejection on top of paper cassette Screen 2 5 inch type TFT LCD color Monitor Interface USB Connecting to a PictBridge compliant device USB compliant Type A connector Connecting to a computer USB compliant Type B connector Wireless Bluetooth 2 Memory Cards CF CompactFlash Card Microdrive xD Pictu...

Page 35: ...nt does cause harmful interference to radio or television reception which can be determined by turning the equipment off and on the user is encouraged to try to correct the interference by one or more of the following measures Reorient or relocate the receiving antenna Increase the separation between the equipment and receiver Connect the equipment into an outlet on a circuit different from that t...

Page 36: ...tained in this guide is accurate and complete However if you notice any errors or omissions please contact the Canon Customer Support Help Desk indicated on the customer support list included with the product The above items notwithstanding Canon accepts no liability for damages due to mistaken operation of the products This product is designed to achieve excellent performance when used with genui...

Reviews: