have to turn on your device or select Play mode manually
after connecting the device to the machine. Perform
necessary operations before connecting your device
referring to its instruction manual.
If the error is still not resolved, check if you can print another
photograph.
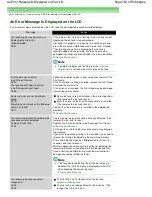
Failed to scan.
Check orientation/position and check
that platen/sheet is clean.
<See manual>
Scanning the print head alignment sheet has failed.
Press the
OK
button to dismiss the error, then take the
actions described below.
Make sure that the print head alignment sheet is set in
the correct position and orientation on the Platen Glass.
Make sure the Platen Glass and the print head alignment
sheet are not dirty.
Make sure the type and size of loaded paper is suitable
for Automatic Print Head Alignment.
For Automatic Print Head Alignment, always load one
sheet of A4 or letter-sized plain paper.
Make sure if Print Head nozzles are clogged.
Print the nozzle check pattern to check the status of the
Print Head.
Routine Maintenance
If the error is not resolved, connect the machine to the
computer and align the Print Head on the printer driver.
Aligning the Print Head Position
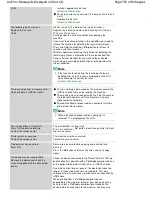
An unsupported USB hub is connected.
Remove the hub.
If a PictBridge compliant device is connected via a USB hub,
remove the hub and connect it directly to the machine.
B200
Printer error has occurred.
Unplug the power cord and contact the
service center.
Turn off the machine, and unplug the power cord of the
machine from the power supply.
Contact the service center.
****
Printer error has occurred.
Turn off power then back on again.
If problem persists, see the manual.
"****" is displayed in the alphanumeric character and
depends on the error occurred.
5100/5110 is displayed:
Cancel printing, and turn off the machine. Then clear the
jammed paper or protective material that is preventing
the Print Head Holder from moving, and turn on the
machine again.
Important
Be careful not to touch the components inside the
machine. The machine may not print out properly if
you touch it.
If the problem is not resolved, contact the service
center.
6000 is displayed:
If any object is placed in front of the machine, remove it.
Open the Paper Output Tray gently, then turn the power
off and back on.
In other cases:
Turn off the machine, and unplug the power cord of the
machine from the power supply.
Plug the machine back in and turn the machine back on.
If the problem is not resolved, contact the service center.
Scanner is not operating correctly.
Turn off the machine, and unplug the power cord of the
machine from the power supply.
After a while, plug the power cord of the machine back in,
and then turn on the machine. If the same error occurs,
contact the service center.
The card is currently writable from PC.
The Card Slot is set to Writable from USB PC or Writable
Page 784 of 949 pages
An Error Message Is Displayed on the LCD
Summary of Contents for 3747B003
Page 19: ...Page top Page 19 of 949 pages Printing Photos Saved on the Memory Card USB Flash Drive ...
Page 22: ...Page top Page 22 of 949 pages Using Various Functions ...
Page 28: ...Page top Page 28 of 949 pages Inserting the USB Flash Drive ...
Page 73: ...Page top Page 73 of 949 pages Loading Paper ...
Page 81: ...Page top Page 81 of 949 pages Loading Paper in the Rear Tray ...
Page 87: ...2 Close the Document Cover gently Page top Page 87 of 949 pages Loading Originals ...
Page 101: ...Page top Page 101 of 949 pages Printing the Nozzle Check Pattern ...
Page 105: ...See Cleaning the Print Head Deeply Page top Page 105 of 949 pages Cleaning the Print Head ...
Page 148: ...Page top Page 148 of 949 pages Printing Photos ...
Page 173: ...See Help for details on the Edit screen Page top Page 173 of 949 pages Editing ...
Page 182: ...Page top Page 182 of 949 pages Printing ...
Page 191: ...Adjusting Images Page top Page 191 of 949 pages Correcting and Enhancing Photos ...
Page 228: ...Page top Page 228 of 949 pages Printing an Index ...
Page 230: ...Page top Page 230 of 949 pages Printing ID Photos ID Photo Print ...
Page 249: ...Page top Page 249 of 949 pages Printing Dates on Photos ...
Page 270: ...Page top Page 270 of 949 pages Borderless Printing ...
Page 329: ...Page top Page 329 of 949 pages Smoothing Jagged Outlines ...
Page 525: ...Page top Page 525 of 949 pages Memory Card Screen Scan Import Window ...
Page 606: ...Page top Page 606 of 949 pages Scanning in Advanced Mode ...
Page 608: ...Page top Page 608 of 949 pages Scanning in Auto Scan Mode ...
Page 637: ...Scanning in Basic Mode Page top Page 637 of 949 pages Basic Mode Tab ...
Page 660: ...Page top Page 660 of 949 pages Scanner Tab ...
Page 747: ...Page top Page 747 of 949 pages Printer Cannot be Registered ...
Page 761: ...Page top Page 761 of 949 pages Advanced settings ...
Page 780: ...Page top Page 780 of 949 pages If an Error Occurs ...
Page 823: ...Page top Page 823 of 949 pages Jammed Paper Is Not Removed out When Automatic Duplex Printing ...
Page 889: ...Page top Page 889 of 949 pages Using Easy PhotoPrint EX ...
Page 898: ...Page top Page 898 of 949 pages Canon IJ Network Tool Dialog Box ...
Page 917: ...Page top Page 917 of 949 pages How to Set a Network Key Network Password ...

