7-6
Tr
oubleshooting
13
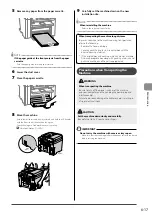
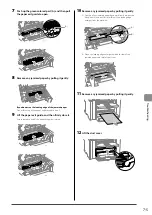
Remove any paper loaded in the paper cassette.
14
Remove any jammed paper by pulling it gently.
15
Reload paper into the paper cassette and lower
the dust cover.
Next, continue to clear jams in the rear cover.
16
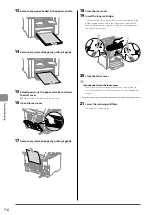
Open the rear cover.
17
Remove any jammed paper by pulling it gently.
18
Close the rear cover.
19
Insert the toner cartridge.
Fit the protrusions (A) on each side of the toner cartridge into the
guides located on each side of the machine,and then slide the
toner cartridge into the machine until the toner cartridge meets
the back of the machine.
(A)
(A)
20
Close the toner cover.
If you cannot close the toner cover
Ensure that the toner cartridge properly set in the machine. Do
not try to forcefully close the toner cover, as this may damage the
machine.
21
Lower the scanning platform.
The machine is ready to print.
Summary of Contents for 4509B061
Page 18: ...xv ...
Page 30: ...1 12 Before Using the Machine ...
Page 48: ...2 18 Document and Paper Handling ...
Page 58: ...3 10 Copying ...
Page 64: ...4 6 Printing from a Computer ...
Page 68: ...5 4 Using the Scan Functions ...
Page 86: ...6 18 Maintenance ...
Page 115: ......


