background image

 Operation  guide 


 Océ  VarioPrint

®

 6000

+

 Line 

Summary of Contents for 6160

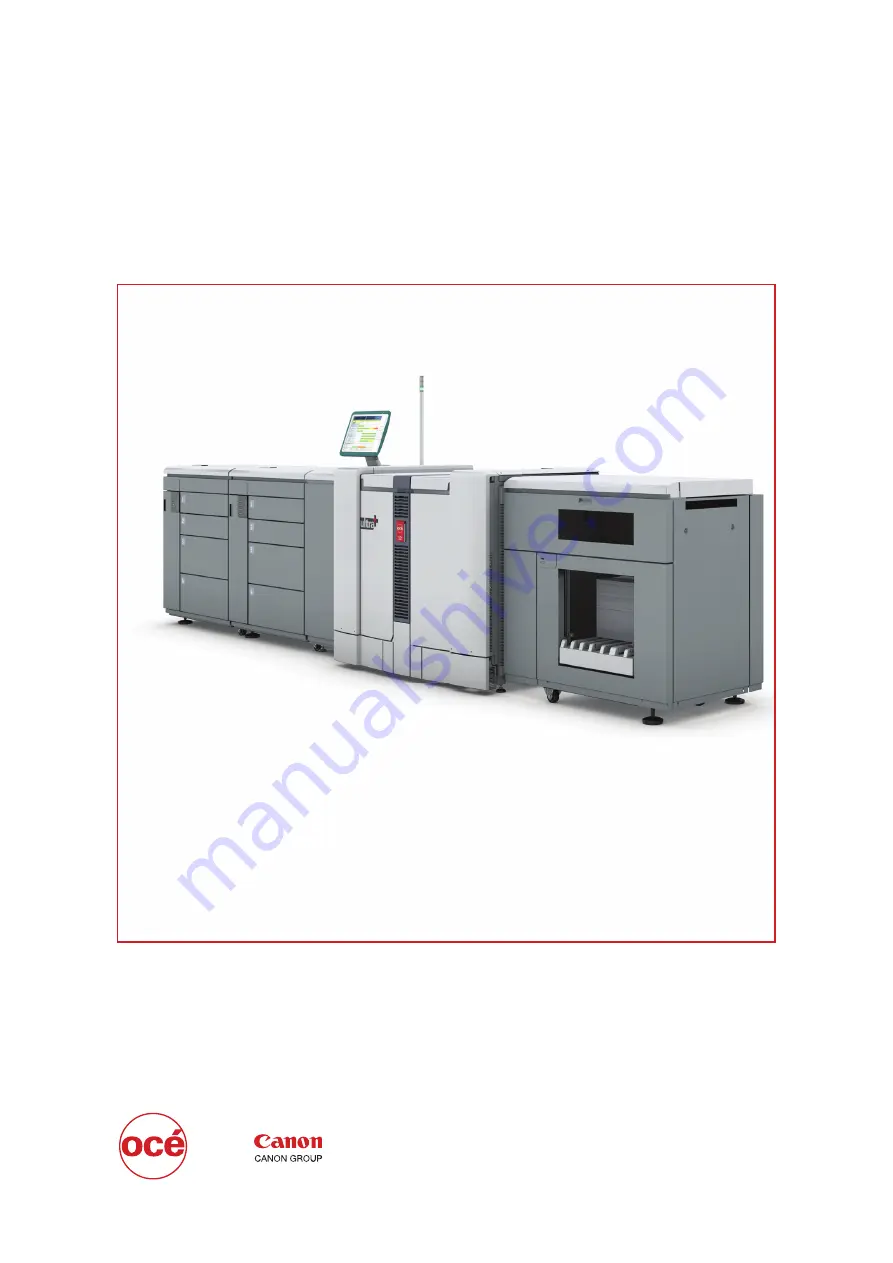
Page 1: ...Operation guide Océ VarioPrint 6000 Line ...

Page 2: ...es no representation or warranties with respect to the contents hereof and specifically disclaims any implied warranties of merchantability or fitness for any particular purpose Furthermore Océ reserves the right to revise this publication and to make changes from time to time in the content hereof without obligation to notify any person of such revision or changes Edition 2013 06 US ...

Page 3: ...1 Access the Settings Editor 32 Change a number of settings in the Settings Editor via the operator panel 33 Introduction to the Setup section 36 Work with the workflow profiles 38 Make an intermediate check print 42 Changing the language 43 Change the warning time 44 Disable the warning time 45 Truncate the job name 46 Adjust the brightness and contrast of the operator panel 47 Chapter 6 Media ha...

Page 4: ... 82 Change the advanced media settings Change the Paper quality 83 Change the advanced media settings Start the Paper quality test 84 Chapter 7 Carry out print jobs 85 The print function 86 Introduction to the print function 86 Print a job using the printer driver How to print a job using a Windows driver 87 Print a job using the printer driver How to print a job using an Apple Mac OS X driver 87 ...

Page 5: ...o handle the Media message in the tray to media mode 156 Create a transaction setup How to create a new transaction setup 157 Create a transaction setup How to change the IPDS parameters 157 Create a transaction setup How to change the PCL parameters 159 Create a transaction setup How to modify a transaction setup 160 Exchange all setups between printers 161 Chapter 8 Remote Service ORS optional 1...

Page 6: ...n to the Printer section 196 Check the status of the toner reservoirs 197 Add toner 198 Check the status of the staple cartridges 199 Finisher Add staples 200 Get access to the staplers 200 Add staples 201 Close the doors and covers 204 Check the status of the puncher waste box 205 Troubleshooting 206 Appendix A Miscellaneous 209 Product specifications 210 Index 213 Contents 6 ...

Page 7: ...Chapter 1 Preface ...

Page 8: ...Path and FreeFlow are registered trademarks of Xerox Corporation Adobe and PostScript are registered trademarks of Adobe Systems Incorporated Products in this publication are referred to by their general trade names In most if not all cases these designations are claimed as trademarks or registered trademarks of their respective companies Trademarks 8 Chapter 1 Preface ...

Page 9: ... getters Word Icon Indicates WARNING Indicates a warning concerning operations that may lead to death or injury to persons if not performed correctly To use the machine safely always pay at tention to these warnings CAUTION Indicates a caution concerning operations that may lead to injury to persons if not performed correctly To use the machine safely always pay attention to these cautions IMPORTA...

Page 10: ... overview of the main content of the user manuals Main Content of the User Manuals User Manual Main content Operating information Overview of the main system components Working with the operator panel Handling and managing jobs on the operator panel Optional finishers and other devices Add media toner and staples Maintenance tasks Replacing parts Cleaning parts Solve a paper jam in the engine modu...

Page 11: ...Chapter 2 Introduction ...

Page 12: ...gives a short description of the main features of the printer Overview of the main features Océ Gemini Instant Duplex Technology that enables the printing of both sides of a sheet at the same time Advanced scheduling concept on the operator panel to keep the machine running Load and assign the media while the printer prints Unload the media while the printer prints Assign the media while the print...

Page 13: ...Chapter 3 Power information ...

Page 14: ...You can find the energy saving settings in the Settings Editor under Preferences System settings Energy save modes The power modes Power mode Operator panel Description Off Off The printer and the controller are completely off The printer cannot receive or print any job Ready On The printer is ready to print jobs Low power mode Off The low power mode is an energy save mode To use the low power mod...

Page 15: ...wakes up when You press the Sleep button on the operator panel or A wake up timer expires provided that the wake up timer is enabled in the Settings Editor or A job arrives in the list of Scheduled jobs provided that the Automatic wake up enabled setting in the Settings Editor is set to Yes Press the Sleep button at the right hand side of the op erator panel to put the printer into the sleep mode ...

Page 16: ...Turn on the system Procedure 1 Press the Sleep button at the right hand side of the operator panel The power switch must be turned on Turn on the system 16 Chapter 3 Power information ...

Page 17: ...he message Are you sure you want to shut down 2 Press Yes A message indicates when the shut down will begin When the shut down is complete the operator panel will be off 3 To shut down the system completely switch the On Off button of each connected finishing unit into the O position Shut down the system Chapter 3 Power information 17 ...

Page 18: ...nder Support Troubleshooting or via the printer operator panel Illustration 2 Restart the system Procedure 1 Touch System Setup Shut down system The operator panel displays the message Are you sure you want to shut down 2 Press Restart Restart the system 18 Chapter 3 Power information ...

Page 19: ...Chapter 4 Main parts ...

Page 20: ...ou can only use 1 or 2 paper modules A combination of 3 paper modules and a roll feeder is not possible The op erator panel displays the roll feeder and gives feedback about the status of the roll feeder For example whether the roll is full or empty Please refer to the documenta tion of the roll feeder manufacturer for more informa tion for example about replacing an empty roll 4 Paper module The ...

Page 21: ...tacker The stacker is the output location of a default configura tion The system supports up to 3 stackers see The out put locations on page 29 8 Finisher optional The finisher on top of the stacker is an optional output location for the print jobs The finisher can staple the jobs see The output locations on page 29 Introduction to the main system components Chapter 4 Main parts 21 ...

Page 22: ... the following for example Check the content of all paper trays Load a new media type into a paper tray Change the media type which is available in one of the paper trays 4 USB port Insert a USB drive into the USB port to Print any documents on the USB drive 5 Schedule button Access the Schedule view to manage the jobs in the schedule 6 Jobs button Manage and print the jobs in the lists of Waiting...

Page 23: ... toner reser voir and staple cartridges 10 Status LED The status LED displays the status of the system Red LED The machine has stopped for example because a required media type is not available or an error has occurred Operator attention is required now Orange LED The machine will stop soon for example because more paper is required Operator attention is re quired soon The orange light illuminates...

Page 24: ...ation shows the dashboard while the machine is busy The vertical status bar is green No action is required 5 The dashboard No action is required The following illustration shows the dashboard while the machine is busy The vertical status bar is orange Next to the status bar the dashboard displays a message that indicates which action is required soon 6 The dashboard Action is required soon The par...

Page 25: ...ors of the LED on the operator panel and the operator attention light When the color is or ange or red a message indicates the required action Orange means that action is required soon How long before an up coming action the operator panel starts to display the message de pends on the defined warning time Change the warning time on page 44 Red means that action is required now NOTE The operator pa...

Page 26: ... However the recommended way to open the paper trays and assign the media is via the Schedule view You can also open the paper trays and or assign the media via the Trays view see Assign the media to a paper tray on page 59 The control panel 1 2 3 4 1 2 3 4 1 3 2 5 4 7 The control panel on the paper modules Each paper module contains a control panel next to the upper paper tray The control panel c...

Page 27: ... button applies to the paper tray where you just put the media You can press the Not assigned button when you load a new media type into a paper tray without defining this media type on the operator panel first Then the printer cannot accidentally use the media in this paper tray before the media is correctly defined on the operator panel You can define the media type in the Trays view on the oper...

Page 28: ...f the operator attention light Color Description Red The machine has stopped for example because a required media type is not available or an error has occurred Operator attention is required now Orange The machine will stop soon for example because an output loca tion is almost full The orange light lights up when the machine reaches the warning time Operator attention is required soon Green The ...

Page 29: ...artridges Therefore the stacker cannot be the output location for jobs that require staples 2 System output The system output is the output location for the following prints Error prints Sample prints Configuration reports Job tickets The test sheets for the media registration The test sheets for the media quality Make sure that you regularly remove the sheets from the system out put 3 Finisher op...

Page 30: ...the upper output is mainly intended for large media or jobs with mixed size media The maximum capacity of the upper output is 500 sheets 80 g m or 20 lb bond NOTE The upper output does not contain staple cartridges There fore the upper output cannot be the output location for jobs that require staples The output locations 30 Chapter 4 Main parts ...

Page 31: ...Chapter 5 Adapt printer settings to your needs ...

Page 32: ...o change all settings except for the settings in the Configuration tab The system administrator password to change all settings including the settings in the Configuration tab Procedure 1 Open your web browser NOTE When the Settings Editor does not display the correct language you can change the preferred language in the Internet options of your Internet browser The desired language must be first ...

Page 33: ...hrough the operator panel Settings available via the operator panel Group of settings Available settings Short description About Serial number read only Version of printer software read on ly Upgrade software from USB Upgrade software from server The About section allows you to look up the serial number and software version of the printer Software licenses Upload license When you have a new licens...

Page 34: ...ort Connectivity MAC address read only Host name Link speed and connection type IPv4 settings IPv6 settings DNS settings WINS settings Test the TCP IP connection The Connectivity section contains the main settings to integrate the printer into a network After you have adapted the network settings you can test the connection from here Follow the instructions on the operator panel when you adapt the...

Page 35: ...l all length values will be dis played in inches Procedure NOTE The key operator PIN or the system administrator password is required to make changes in this section 1 Touch System Setup Local key operator settings under Advanced 2 Touch the button of the group that contains the setting you want to change or view 3 Touch the required setting 4 Look up the required information or make the required ...

Page 36: ...w profile These settings are read only Workflow profile button Define a workflow profile that match es your needs Work with the workflow profiles on page 38 Language button Change the language of the operator panel Changing the language on page 43 Warning time button Define the moment when the system warns you about an action that is re quired soon for example 10 minutes in advance Change the warn...

Page 37: ...the advanced me dia settings on page 80 Intermediate check print button Print a test sheet of a running job to check the quality Make an intermediate check print on page 42 PrintGuard module but ton Enable or disable the use of the PrintGuard optional Local key operator set tings button Get direct access to a number of im portant key operator settings in the Settings Editor on the PRISMAsync contr...

Page 38: ...section makes recommendations about when to use which workflow profile Furthermore this section describes the settings and the effects of the settings NOTE The Workflow profile button in the Setup section of the System view displays the name of the selected workflow profile When you customized the settings of a workflow profile the button displays the text Custom The workflow profiles 11 The workf...

Page 39: ...Receive settings Print settings Destination of print job Confirm start of job Check first set Standard Scheduled jobs Off As in job Job by job As in job On As in job Check and print Scheduled jobs Off On Manual planning Waiting jobs Off As in job Unattended As in job Off Off The following table gives an overview of the default Output settings of each workflow profile The Output settings Workflow p...

Page 40: ...d layout of the first set before the machine prints the remaining sets Off The machine will print the whole job without stopping after the first set As in job The machine will print the jobs as indicated in the job ticket Confirm start of job On The machine always stops before the next scheduled job You must press the Release key to start each job Off The machine prints the scheduled jobs one afte...

Page 41: ...sets in a job is lower than or equal to N the sets are not stacked with an offset However the whole job is stacked with an offset with respect to the previous job Sets as in job Each printed set is delivered to the output location as in dicated in the job ticket Therefore the sets can be stacked in one straight line or with an offset Banners Each banner page of a job is delivered to the output lo ...

Page 42: ...cribes how to make an intermediate check print NOTE You can also press the Intermediate check print button when a job has not yet started As soon as you start printing a copy of the first sheet of the job will be printed NOTE In the Settings Editor you can also set the Interval of intermediate check print 12 Make an intermediate check print Procedure 1 On the operator panel press the System button...

Page 43: ...em button 2 Press the Setup button 13 Changing the language 3 Press the Language button in the Operator panel section An overview of the available languages appears 14 Overview of the available languages 4 Select your language for example English UK 5 Press OK The language is changed Changing the language Chapter 5 Adapt printer settings to your needs 43 ...

Page 44: ...ashboard starts to display the warning 10 minutes before an action becomes inevitable If you do not respond to the warning message the printer will stop Depending on the urgency of the warning message the LED on the operator panel and the operator attention light are orange or red NOTE You can only change the warning time when the Warning in advance function is enabled 15 Change the warning time P...

Page 45: ...ning function 16 Disable the warning time Procedure 1 Touch System Setup Warning time under Operator panel When the box for Warning in advance has a check mark and states On the function is enabled 2 Touch the Warning in advance button The check mark disappears The status On changes into Off 3 Press OK Disable the warning time Chapter 5 Adapt printer settings to your needs 45 ...

Page 46: ...he job names This allows you to keep the identifying part of the job name You can choose to truncate the job name at the beginning or at the end of the name Illustration 17 Job name truncation Procedure 1 Touch System Setup Job name truncation under Operator panel 2 For Truncate job name at select Beginning or End 3 Touch the or button to indicate the number of characters before truncation 4 Press...

Page 47: ...evel 20 to 100 in steps of 1 The higher the value the higher the brightness Contrast You can increase or decrease the contrast from level 10 to 100 in steps of 1 The higher the value the higher the contrast Illustration 18 Adjust brightness and contrast Procedure 1 Touch System Setup Operator panel settings 2 Touch Auto adjust to optimize the brightness and contrast of the screen automatically 3 T...

Page 48: ...5 Touch to decrease or to increase the Contrast 6 Press OK Adjust the brightness and contrast of the operator panel 48 Chapter 5 Adapt printer settings to your needs ...

Page 49: ...Chapter 6 Media handling ...

Page 50: ...re the media toolbar does not indicate the required amount of sheets The Schedule view 19 The Schedule view 1 The Jobs Pane The jobs pane shows the jobs on a timeline The width of the job corresponds to the remaining print time A vertical line separates the jobs The vertical line moves to the left as the printing of a job progresses An icon and the job name represent a job The icon indicates the s...

Page 51: ...e in most cases the operator panel will display bars for these small jobs The possible display of small jobs Image Description Green The required media is available Orange The media is required in the future but not available then For example because the paper trays do not contain sufficient sheets of the required media Red The media is required now but not available The job can only start when yo...

Page 52: ...the bars Color of the bar Description Green The output location is required and available Orange The output location is required in the future but not available then For example because the output location will be full soon Red The output location is required now but not available For example be cause the output location is full Gray The output location is required but availability is unknown 5 Th...

Page 53: ... media that is not available in the paper trays The Schedule displays an orange bar next to a required media The orange bar indicates that a scheduled job requires media which is either not available in the paper trays or which is available but not in sufficient quantity to finish the job The current job requires more of the same media than is currently loaded in the paper trays You can add more o...

Page 54: ...n for the media you want to load for example Special A4 2 Press Load The Trays view appears 3 On the screen touch the paper tray where you want to load the media 4 Touch OK to open the paper tray 5 Load the media into the paper tray The system assumes you loaded the selected media type in this example Special A4 The system will automatically assign Special A4 to that paper tray NOTE You can always...

Page 55: ...Related information Introduction to the Schedule view on page 50 Load media via the Schedule view Chapter 6 Media handling 55 ...

Page 56: ...egistration This section describes the items of the Trays view NOTE The machine can have 1 2 or 3 paper modules possibly combined with a roll feeder When the machine has more than 1 paper module the Trays view displays all the available paper modules 21 Example of a configuration with 1 paper module The items of the Trays view Description of the Trays view Item Function Content of the paper trays ...

Page 57: ...or example 80 g The media color The special characteristics of the media for example cyclic or punched In brackets additional information is given about these media for example the cycle count or the number of holes for punched media The Trays view displays the following icons for each paper tray The meaning of the icons Icon Description The paper tray is empty The paper tray is full NOTE Each lin...

Page 58: ...at must be processed as inserts The paper tray contains inserts The paper tray contains media that are fed over the long edge LEF The paper tray contains media that are fed over the short edge SEF Introduction to the Trays view 58 Chapter 6 Media handling ...

Page 59: ... NOTE The list displays all the media in the media catalog that match the position of the paper guides inside the closed paper tray When the list is empty the media catalog does not contain media that match the position of the paper guides 7 Touch the name of the loaded media for example Premium Label 8 Press OK Assign the media to a paper tray Change the currently assigned media type Procedure 1 ...

Page 60: ...5 Press OK Assign the media to a paper tray Change the currently assigned media type 60 Chapter 6 Media handling ...

Page 61: ... items of the Media section Num ber Item Function More information 1 List of all the media that are available in the Media catalog Display the current content of the Media catalog 2 List of temporary media Display the temporary me dia that are currently avail able on the system What are temporary media on page 63 3 To catalog button Add temporary media to the media catalogue Add temporary media to...

Page 62: ...he registration for in dividual media You can do a media registration for standard size media and large media Perform a media registra tion for standard size me dia on page 65 Perform a media registra tion for large media on page 72 Introduction to the Media section 62 Chapter 6 Media handling ...

Page 63: ...alog is only recommended not compulsory When you use the Media catalog the operator panel the printer drivers and other applications all display the same list of predefined media The operator panel and the printer driver automatically retrieve and show the latest version of the Media catalog NOTE Refer to the Online Help of the Settings Editor for information about the media attributes that you ca...

Page 64: ...ia tab of the System view When you plan to use a temporary media more often you can add the media to the Media catalog This section describes how to add temporary media to the Media catalog Procedure 1 Touch System Media The names of the temporary media are displayed in the section 2 Select the media you want to add to the Media catalog 3 Press To catalog The media is added to the Media catalog NO...

Page 65: ...l 3 test sheets The system calculates the average value of the measurements This section describes how to perform a media registration for standard size media media with a length of less than 390 mm 15 35 NOTE It is recommended to perform the media registration when the list of Scheduled jobs is empty Before you begin 1 On the operator panel press the System button 2 Press Media 3 Select a media f...

Page 66: ... r y d i a m o n d s h a p e X l e n g t h L 24 The ruler Perform a media registration for standard size media Adjust the Z position of side 1 Procedure 1 Take the first test sheet 2 Align the start of the ruler with point B of the test sheet Test bitmap REGISTRATION Size 210 x 297 mm 2006 10 09 14 08 36 Page 1 1 Primary image A C G I 0 5 0 0 5 3 w e k s t e e h S B H D F 1 0 0 0 1 0 5 0 1 1 0 0 1...

Page 67: ...the second test sheet 6 Repeat the steps 2 4 7 Take the third test sheet 8 Repeat the steps 2 4 Perform a media registration for standard size media Adjust the Z position of side 1 Chapter 6 Media handling 67 ...

Page 68: ...5 0 1 9 0 0 1 9 5 0 2 0 0 0 2 0 5 0 2 1 0 0 2 1 5 0 2 2 0 0 2 2 5 0 2 3 0 0 2 3 5 0 2 4 0 0 2 4 5 0 2 5 0 0 2 5 5 0 2 6 0 0 2 6 5 0 2 7 0 0 2 7 5 0 2 8 0 0 5 0 0 5 0 P r i m a r y X i m a g e p o s i t i o n P r i m a r y Z i m a g e p o s i t i o n P r i m a r y d i a m o n d s h a p e X l e n g t h L F 1 5 0 0 1 5 5 0 1 6 0 0 1 6 5 0 1 7 0 0 1 7 5 0 1 8 0 0 1 8 5 0 1 9 0 0 1 9 5 0 2 0 0 0 2 0 5 ...

Page 69: ... 0 0 2 6 5 0 2 7 0 0 2 7 5 0 2 8 0 0 P r i m a r y d i a m o n d s h a p e X l e n g t h K N L P 1 0 0 0 1 0 5 0 1 1 0 0 1 1 5 0 1 2 0 0 1 2 5 0 1 3 0 0 1 3 5 0 1 4 0 0 1 4 5 0 1 5 0 0 1 5 5 0 1 6 0 0 1 6 5 0 1 7 0 0 1 7 5 0 1 8 0 0 1 8 5 0 1 9 0 0 1 9 5 0 2 0 0 0 2 0 5 0 2 1 0 0 2 1 5 0 2 2 0 0 2 2 5 0 2 3 0 0 2 3 5 0 2 4 0 0 2 4 5 0 2 5 0 0 2 5 5 0 2 6 0 0 2 6 5 0 5 0 0 5 0 P r i m a r y X i m a...

Page 70: ...0 1 6 0 0 1 6 5 0 1 7 0 0 1 7 5 0 1 8 0 0 1 8 5 0 1 9 0 0 1 9 5 0 2 0 0 0 2 0 5 0 2 1 0 0 2 1 5 0 2 2 0 0 2 2 5 0 2 3 0 0 2 3 5 0 2 4 0 0 2 4 5 0 2 5 0 0 2 5 5 0 2 6 0 0 2 6 5 0 2 7 0 0 2 7 5 0 2 8 0 0 5 0 0 5 0 P r i m a r y X i m a g e p o s i t i o n P r i m a r y Z i m a g e p o s i t i o n P r i m a r y d i a m o n d s h a p e X l e n g t h L 1 D 5 0 0 5 0 28 Align the ruler with the edge of ...

Page 71: ... 0 0 P r im a r y d ia m o n d s h a p e X le n g t h K N L P 5 0 0 5 0 P r i m a r y X i m a g e p o s i t i o n P r i m a r y Z i m a g e p o s i t i o n 0 5 0 0 5 t i s o p e g a m i X y r a d n o c e S 5 N 5 0 0 5 0 29 Align the ruler with N 3 Read the value at the edge of the test sheet 4 Enter the value 5 Take the second test sheet 6 Repeat the steps 2 4 7 Take the third test sheet 8 Repeat ...

Page 72: ...on all 3 test sheets The system calculates the average value of the measurements This section describes how to perform a media registration for large media media with a length of 390 mm 15 35 or more NOTE It is recommended to perform the media registration when the list of Scheduled jobs is empty Before you begin 1 On the operator panel press the System button 2 Press Media 3 Select a media from t...

Page 73: ... 4 0 0 2 4 5 0 2 5 0 0 2 5 5 0 2 6 0 0 2 6 5 0 2 7 0 0 2 7 5 0 2 8 0 0 5 0 0 5 0 P r i m a r y X i m a g e p o s i t i o n P r i m a r y Z i m a g e p o s i t i o n P r i m a r y d i a m o n d s h a p e X l e n g t h L 31 The ruler Perform a media registration for large media Adjust the Z position of side 1 Procedure 1 Take the first test sheet 2 Align the start of the ruler with point B of the te...

Page 74: ...ake the second test sheet 6 Repeat the steps 2 4 7 Take the third test sheet 8 Repeat the steps 2 4 Perform a media registration for large media Adjust the Z position of side 1 74 Chapter 6 Media handling ...

Page 75: ...he Calculator assistant enter the DE value and press OK 4 Align the start of the ruler with point E and read the value at point F Test bitmap REGISTRATION Size 420 x 297 mm 2006 10 09 14 08 22 Page 1 1Primary image 50 0 50 3 Sheet skew B H E D F 1 0 0 0 1 0 5 0 1 1 0 0 1 1 5 0 1 2 0 0 1 2 5 0 1 3 0 0 1 3 5 0 1 4 0 0 1 4 5 0 1 5 0 0 1 5 5 0 1 6 0 0 1 6 5 0 1 7 0 0 1 7 5 0 1 8 0 0 1 8 5 0 1 9 0 0 1 ...

Page 76: ...r y X i m a g e p o s i t i o n P r i m a r y Z i m a g e p o s i t i o n P r i m a r y d i a m o n d s h a p e X l e n g t h L K 5 0 0 5 0 35 Align the ruler with K 3 Read the value at the edge of the test sheet 4 Enter the value 5 Take the second test sheet 6 Repeat the steps 2 4 7 Take the third test sheet 8 Repeat the steps 2 4 NOTE After step 8 the machine prints another 3 test sheets to meas...

Page 77: ...0 1 6 5 0 1 7 0 0 1 7 5 0 1 8 0 0 1 8 5 0 1 9 0 0 1 9 5 0 2 0 0 0 2 0 5 0 2 1 0 0 2 1 5 0 2 2 0 0 2 2 5 0 2 3 0 0 2 3 5 0 2 4 0 0 2 4 5 0 2 5 0 0 2 5 5 0 2 6 0 0 2 6 5 0 2 7 0 0 2 7 5 0 2 8 0 0 5 0 0 5 0 P r i m a r y X i m a g e p o s i t i o n P r i m a r y Z i m a g e p o s i t i o n P r i m a r y d i a m o n d s h a p e X l e n g t h L 1 D 5 0 0 5 0 36 Align the ruler with the edge of the shee...

Page 78: ...he value 5 Take the second test sheet 6 Repeat the steps 2 4 7 Take the third test sheet 8 Repeat the steps 2 4 Result A pop up message appears The message asks you whether you want to print an extra test sheet to verify the result of the registration You can do one of the following Press Yes if you want to print an extra test sheet to verify the result Wait for the sheet and check the result Anot...

Page 79: ...d media It takes several minutes until Low temperature mode is reached The Low temperature mode should not be enabled when you use media heavier than 120 g m2 This could lead to print problems A secondary benefit to pre printed support is to save energy The preheater operates on a lower temperature Double sheet detection Double sheet detection warns you if 2 or more sheets have been separated from...

Page 80: ...Lower respectively Then the test stops and the print job continues without interruption Check the last set fifth of the empty sheets to see if the Paper quality setting is cleaning the print process properly The sheets should show no pollution NOTE When the system goes into standby mode before the Paper quality test has finished the Paper quality test starts again Before you begin 1 On the operato...

Page 81: ...ch the Double sheet detection button The text on the button changes from On to Off NOTE Each time you touch the button the setting changes from On to Off and the other way round 2 Press OK Change the advanced media settings Disable the double sheet detection Chapter 6 Media handling 81 ...

Page 82: ...equipped with an optional finisher Procedure 1 Touch the Enhanced media mode button The text on the button changes from Off to On NOTE Each time you touch the button the setting changes from Off to On and the other way round 2 Press OK Change the advanced media settings Enable the enhanced media mode 82 Chapter 6 Media handling ...

Page 83: ... settings Change the Paper quality Procedure 1 Touch the Paper quality button A drop down list appears 2 Touch the desired value 3 Press OK Change the advanced media settings Change the Paper quality Chapter 6 Media handling 83 ...

Page 84: ...s displayed on the button and the text on the button changes from Start to Stop NOTE The test stops automatically after the fifth set You do not have to stop the Paper quality test yourself NOTE When you touch the button again the test is stopped The text on the button changes from Stop to Start Change the advanced media settings Start the Paper quality test 84 Chapter 6 Media handling ...

Page 85: ...Chapter 7 Carry out print jobs ...

Page 86: ...n the workflow settings the print job will appear in one of the following destinations List of Waiting jobs List of Scheduled jobs The list of Printed jobs can store jobs temporarily The Schedule view enables you to plan your daily print jobs The Jobs view enables you to manage the print jobs in the different queues Introduction to the print function 38 The jobs view The print function 86 Chapter ...

Page 87: ...iver Via the Settings Editor on the PRISMAsync controller navigate to Support Software Download printer driver From the web site of the printer manufacturer NOTE The online helps of the printer drivers contain detailed information about all functions of the printer drivers Procedure 1 From the File menu of the application click Print 2 Select the Océ VarioPrint 6000 Line in the Printer area of the...

Page 88: ...rocedure describes the most important settings for daily use Procedure 1 Prepare the document 39 Lay out preparation with Océ PRISMAprepare 2 Use the media catalog to define the media With Océ PRISMAprepare you can export the media catalog to Océ PRISMAsync controllers of Océ black white and color systems 40 The media catalog in Océ PRISMAprepare Print a job using Océ PRISMAprepare optional 88 Cha...

Page 89: ...3 Define the required finishing options NOTE See the online help of Océ PRISMAprepare for detailed information Print a job using Océ PRISMAprepare optional Chapter 7 Carry out print jobs 89 ...

Page 90: ...iles 5 Touch Print to send the file to the list of Scheduled jobs immediately or 6 Touch Save to save a copy of the file to another location on your printer such as the list of Waiting jobs Then you can edit the file first and print the file from the other location The locations you can select depend on your system configuration 7 Touch to eject the USB drive 8 Remove the USB drive from the operat...

Page 91: ...cteristics of the output Generic settings that apply to the whole job 41 The job properties Number Pane Description 1 Original The Original pane shows information of the job 2 Output The Output pane shows the generic settings you can define for the whole job 3 Job The Job pane shows the settings you can define for the job 4 Preview The preview displays the settings you defined for the output Furth...

Page 92: ...e Landscape left The output has a horizontal format width height The binding edge of the original is at the left hand side When you turn a sheet over the binding edge the text or im age is in readable form Landscape top The output has a horizontal format width height The binding edge of the original is at the top When you turn a sheet over the binding edge the image on the back side of the sheet i...

Page 93: ...ages with no special layout settings Booklet The printer prints the pages in booklet order The pages 1 and 4 are printed on the front side of a sheet The pages 2 and 3 are printed on the back side of a sheet Same up The printer prints the same image multiple times next to each other By default the system keeps the size of the origi nals When you print A4 originals with the setting Same up and Imag...

Page 94: ...mage on the sheet Top left moves the image to the upper left corner of the sheet Top center Top center moves the image to the center at the top of the sheet Top right Top right moves the image to the upper right corner of the sheet Center left Center left moves the image to center of the left side of the sheet Center Center moves the image to the center of the sheet Center right Center right moves...

Page 95: ... you can de fine the values for the front side and the back side separate ly Image shift Use this setting to shift the image horizontally or vertically By default the values of the front side and the back side are interlocked This means that the values for the front side and the back side remain identical If you want to define a different value for each side press The icon changes to the unlocked ...

Page 96: ...to an output location will be shifted on top of the previous set This setting is only available when in the workflow profile offset stacking is set to Sets as in job Off All the sets or jobs that get to an output location will be stacked in one straight pile Advanced set tings Sheet order Face up Deliver the prints face up first sheet on top Face up reverse Deliver the prints face up last sheet on...

Page 97: ...h the header at the bottom side and in portrait position vertical Header down SEF Deliver the prints with the header at the bottom side and in landscape position horizontal Advanced set tings Print order Front back Default value The front page on the front the back page on the back Back front Puts the front page on the back and the back page on the front Advanced set tings Rota tion 0 degrees 180 ...

Page 98: ...cations for the 1 staple option Top left Top right Bottom left Bottom right The available locations for the 2 staples option Left edge Top edge Bottom edge Right edge Check the preview for the result of the selection Settings for the whole job Setting Values Description Job name Displays the job name of the print job You can change the job name of a print job Number of sets Use this setting to def...

Page 99: ...led a separate sheet will be inserted automatically before each set of a job to create a clear distinction between two sets Separator sheets are always empty In the Settings Editor you can se lect a media from the Media catalog to be used as separator sheets There you can also indicate the feed direction of the separator sheets long edge feed or short edge feed Off No separator sheet will be inser...

Page 100: ...ew pane informs you how to solve the contradictions The contradicting settings are marked The system indicates with a green check mark which setting you need to change to resolve the contradiction However if required you can change the other marked settings to resolve the contradiction Contradiction handling 100 Chapter 7 Carry out print jobs ...

Page 101: ...me button to continue printing NOTE It depends on the set size and the moment you press the Stop button when the printer will stop For example when you have a large set of 1 000 pages and you press the Stop button after the first page the printing will continue for a couple of minutes As soon as possi ble Press the Stop button 2x The printer stops when the printer buffer is empty as soon as possib...

Page 102: ...ive Workflow profile is set to On Then the printer stops automatically after each job NOTE When you print streaming jobs or jobs that consist of 1 large set you must press the Stop button 2x to stop the printer as soon as possible Automatic stop When Then The Check first set setting in a Workflow profile is On and The Check first set setting is also enabled in the job The printer stops each time t...

Page 103: ...o the correct location then touch Select All Jobs with available media Go to the correct location then touch Select Jobs with availa ble media Jobs with label Go to the correct location then touch Select Jobs with label NOTE For the list of Printed jobs you can indicate in the Settings Editor that the list must be cleaned automatically at specified times The factory default is 1 day Furthermore in...

Page 104: ...jobs Not all buttons are available for streaming jobs 42 The Scheduled jobs view The items of the Scheduled jobs view of the Jobs view Description of the Scheduled jobs view Item Function More information Scheduled jobs Display the active print job and the jobs that are scheduled for printing Properties button Check or change the properties of a job The button is only enabled when you select 1 job...

Page 105: ...an overview of the main job settings and job parameters The button is only enabled when you se lect 1 job Print the job parameters on page 118 Select button Select a number of jobs at the same time You can use one of the follow ing All select all the jobs in the list None deselect all the jobs in the list Invert selection turn the selected jobs into deselected jobs and the other way round Jobs wit...

Page 106: ...hat job Delete button Delete the selected job or jobs The button is enabled when you select 1 or more jobs Delete a job on page 103 Bundle or Split button Bundle Combine a number of jobs into 1 job for example to create a set of documents that are required for a meeting Split Split a bundle job into the orig inal jobs Bundle jobs in the list of Waiting jobs on page 116 Ticket button Print an overv...

Page 107: ...el select all the jobs with a certain label Select more than one job for printing on page 115 Proof button Print 1 copy of a job to check wheth er the result of the print job meets your expectation The button is only enabled when you select 1 job NOTE The proof print is not sub tracted from the number of sets you defined for this job Print a proof on page 119 Print button Move a job from the list ...

Page 108: ...ettings Editor Properties button Check or change the properties of a job The button is only enabled when you select 1 job NOTE You can also press a job 2 times to check or change the properties of that job Delete button Delete the selected job or jobs The button is enabled when you select 1 or more jobs Delete a job on page 103 Copy button Send a copy of a job that has been printed before to the l...

Page 109: ... of the follow ing All select all the jobs in the list None deselect all the jobs in the list Invert selection turn the selected jobs into deselected jobs and the other way round Jobs with available media select all the jobs for which the media are currently available in the paper trays Use Jobs with label to select all the jobs with a certain label Select more than one job for printing on page 11...

Page 110: ...st be printed Procedure 1 Touch Jobs Queues 2 If collapsed first touch to expand the desired list of Waiting jobs 3 Touch the job s you want to print or use the Select button to make a selection To undo the multiple selection and only select 1 job you must touch that job for 2 seconds 4 Press Print The job is moved to the bottom of the list of Scheduled jobs Related information Work with the workf...

Page 111: ...iority to a job in the list of Printed jobs you must first reprint the job see Reprint a job on page 114 The job is sent to the list of Waiting jobs From there you must send the job to the list of Scheduled jobs There you can select the job and touch Print now NOTE If the output location of the priority print job is the same as the active print job the priority print job comes on top of the last p...

Page 112: ... position in the list of Scheduled jobs below the active print job The job will be printed when the active print job is ready Procedure 1 Touch Jobs Queues 2 If collapsed first touch to expand the list of Scheduled jobs 3 Touch the job to which you want to give priority 4 Press To top Related information Print an urgent job immediately on page 111 Give priority to a print job 112 Chapter 7 Carry o...

Page 113: ...Waiting jobs NOTE To select the active print job you must first press the Stop button 2x to stop the job Procedure 1 Touch Jobs Queues 2 If collapsed first touch to expand the list of Scheduled jobs 3 Touch the job or jobs you want to print later or use the Select button to make a selection To undo the multiple selection and only select 1 job you must touch that job for 2 seconds 4 Press Move The ...

Page 114: ...and jobs that were stopped or deleted When you shut down the printer all jobs remain present in the list of Printed jobs The list of Printed jobs can only store jobs To prevent the disk of your system from becoming full jobs must be deleted manually or automatically on a regular basis In the Settings Editor you can indicate the cleaning period then the clean up is carried out at midnight or at the...

Page 115: ... a name or tag that helps you to identify certain jobs on the operator panel When a job is sent to the printer the person who submits the job can add a label to that job The label can be any name that helps to identify certain jobs A label is not connec ted to job settings The label can be defined in the printer driver in a job ticket or via an automated workflow For example the label Customer XYZ...

Page 116: ...anel displays a warning message To change the output location you must first split the bundled job then change the individual job settings and finally bundle the jobs again Main actions on the bundle function The table below describes the main actions you can carry out with regard to the bundle function Main bundle functions Main actions Description Bundle When you touch Bundle after selecting 2 o...

Page 117: ...lows you to make some changes 4 If necessary use the Up and Down buttons to change the job order 5 If necessary change the generic job settings such as Number of bundles 6 Press OK Related information Delete print jobs on page 103 Print a job ticket on page 118 Make a proof on page 119 Bundle jobs in the list of Waiting jobs Chapter 7 Carry out print jobs 117 ...

Page 118: ... the Ticket button The Ticket button is available at the following locations List of Printed jobs if this function is enabled in the Settings Editor List of Scheduled jobs List of Waiting jobs Procedure 1 Press Jobs 2 Go to one of the locations mentioned above 3 Touch one or more jobs of which you want to print the job ticket 4 Press Ticket The job is sent to the bottom of the list of Scheduled jo...

Page 119: ...b For example if you need 10 sets the printer will still print 10 sets after you made the proof This is different from the checking of the first set see Check the first set on page 131 Procedure 1 On the operator panel press the Jobs button 2 In the list of Waiting jobs touch the job of which you want to make a proof NOTE You can select more than 1 job at a time 3 Press Proof A copy of the job goe...

Page 120: ...xed settings 1 sided and 2 sided you can change this setting to 1 sided or 2 sided for the complete job NOTE You cannot change this setting for the active print job Procedure 1 Touch Jobs Queues Scheduled jobs or Waiting jobs 2 Touch the job you want to change 3 Touch Properties or touch the job 2x to open the Properties window 4 Touch the 1 or 2 sided button 5 Touch the desired value 6 Press OK C...

Page 121: ...NOTE You cannot change this setting for the active print job Procedure 1 Touch Jobs Queues Scheduled jobs or Waiting jobs 2 Touch the job you want to change 3 Touch Properties or touch the job 2x to open the Properties window 4 In the preview pane at the right hand side touch the media you want to change When more than 1 media was defined for a job the preview pane displays a separate button for e...

Page 122: ...ences of your changes You can also shift the image or margin more precisely Procedure 1 Touch Jobs Waiting jobs 2 Touch the job you want to change NOTE You cannot change this setting for the active print job 3 Touch Properties or touch the job twice to open the Properties window 4 Touch the Align button 5 Make the required changes 6 Press OK 7 Press OK Shift the image roughly to create binding spa...

Page 123: ... an image relative to the binding edge Image shift has basically the same function However Image shift also allows you to move the image vertically This gives you more freedom in moving the image exactly to the desired position NOTE By default the values of the front side and the back side are linked To define different values for each side touch The changes you make are valid for the whole docume...

Page 124: ...n the Offset stacking setting of the active Workflow profile is set to Sets as in job Advanced settings Finishing equipment often requires that the printed sheets are de livered in a certain order For finishers that are integrated in your printing system the required settings are adapted automatically However sometimes it can be necessary to change a number of settings manually for example when yo...

Page 125: ...t order Front back Default value The front page on the front the back page on the back Back front Puts the front page on the back and the back page on the front Rotation 0 degrees 180 degrees Rotates the prints 180 degrees NOTE You cannot change this setting for the active print job Procedure 1 Touch Jobs Queues Scheduled jobs or Waiting jobs 2 Touch the job you want to change 3 Press Properties 4...

Page 126: ...ditor Procedure NOTE Remember that you can only change the stacking method per job when the active Workflow profile is set to Sets as in job 1 Touch Jobs Queues Scheduled jobs or Waiting jobs 2 Touch the job you want to change 3 Touch Properties or touch the job 2x to open the Properties window 4 Touch the Print delivery button 5 Touch the Offset stacking button to toggle between On and Off The of...

Page 127: ...tions that can staple the jobs for example Finisher because the Stacker cannot staple the jobs If you make a combination that is not possible the operator panel displays an error message Procedure 1 On the operator panel press the Jobs button 2 In the list of Waiting jobs or Scheduled jobs touch the job you want to edit 3 Press Properties NOTE You can also press the job 2 times to access the Prope...

Page 128: ... The table below gives an overview of the possible combinations and the resulting punch orientation Deposit header up or left Deposit header up left Paper Logic Orientation Feed edge Punch example Portrait Long edge feed Landscape Long edge feed Deposit header down or right Deposit header down right not Paper Logic Orientation Feed edge Punch example Portrait Long edge feed Landscape Long edge fee...

Page 129: ...w This function is comparable to double clicking with a mouse 4 Press Punching 5 Select the desired number of holes punched 6 If required define the other settings for the output 7 Enter the generic parameters in the Job section 8 Press OK Punch the output Chapter 7 Carry out print jobs 129 ...

Page 130: ...a lower value than the number of sets that has already been printed Procedure 1 On the operator panel press the Jobs button 2 In the list of Waiting jobs or Scheduled jobs touch the job you want to edit 3 Press Properties NOTE You can also press the job 2 times to access the Properties window This function is comparable to double clicking with a mouse 4 Touch the Number of sets button A numerical ...

Page 131: ... to check the first set You can use 1 of the following methods to indicate that you want to check the first set Use a workflow profile where Check first set is enabled Then the printer stops after the first set Enable the function Check first set in the Properties window for a specific job only However you can only change the Check first set setting there when a workflow profile is selected where ...

Page 132: ...int job Procedure 1 Touch Jobs Queues Scheduled jobs or Waiting jobs 2 Touch the job you want to change 3 Touch Properties or touch the job 2x to open the Properties window 4 Touch the Page range button 5 Touch Pages to print Pages 6 Touch the From button and enter the number of the first page you want to print 7 Touch the To button and enter the number of the last page you want to print 8 Press O...

Page 133: ...e automated workflows in the Settings Editor However you can change this setting trough the operator panel Procedure 1 Touch Jobs Waiting jobs or Scheduled jobs 2 Touch the job of which you want to change the settings NOTE You can only change the settings of the active print job after you stopped the printer press the Stop button two times 3 Press Properties 4 Touch the Separator sheets button to ...

Page 134: ... Settings Editor Media for trailer pages are the same as for banner pages You can specify this media in the media catalogue in the Settings Editor NOTE This setting applies to all jobs from the moment it is enabled Procedure 1 In the Settings Editor go to the Preferences Print job defaults section 2 Change the setting for trailer pages Trailer page enabled Enable or disable the use of trailer page...

Page 135: ...e job name is displayed in the Job name field However you can rename the job Procedure 1 In the job window touch Job name A keyboard appears 2 Touch Backspace until the current name is deleted 3 Touch the characters to enter a new name 4 Press OK Rename a job Chapter 7 Carry out print jobs 135 ...

Page 136: ...ion The use of automated workflows has for example the following advantages The print workflow is automated even more which improves the productivity The programming of individual jobs is eliminated which optimizes the job throughput You can more easily distinguish prioritize and produce jobs in different automated workflows with different properties using less operator involvement You can easily ...

Page 137: ... settings When you put a check mark in front of a setting that setting and its values become enabled Procedure 1 Go to Workflow Automated workflows 2 Click the Add button A pop up window displays the attributes you can specify for the new workflow 3 Put a check mark in front of the attributes you want to define 4 Specify or select the values of the attributes 5 Click OK Add an automated workflow C...

Page 138: ...eck mark in front of a setting that setting and its values become enabled Procedure 1 Go to Workflow Automated workflows 2 Put a check mark in front of the workflow you want to edit 3 Click the Edit button A pop up window displays the attributes you can specify for your workflow 4 Change the attributes 5 Click OK Edit an automated workflow 138 Chapter 7 Carry out print jobs ...

Page 139: ...u can delete that workflow NOTE You cannot delete the factory default automated workflow Procedure 1 Go to Workflow Automated workflows 2 Put a check mark in front of the workflow you want to delete 3 Click the Delete button 4 Click OK Delete an automated workflow Chapter 7 Carry out print jobs 139 ...

Page 140: ...lowing consequences All the automated workflows you added will be removed All the changes in the default workflow will be lost Procedure 1 Go to Workflow Automated workflows 2 Click the Restore button The factory default automated workflow is restored Restore the factory default workflow 140 Chapter 7 Carry out print jobs ...

Page 141: ...tionality in combination with the hotfolder default ticket However if you want to use the settings of the automated workflow where the hotfolder is linked to it is advised not to place a hotfolder default ticket in the hotfolder to prevent mixing up settings Furthermore you must make sure that the Overrule the job ticket setting in that automated workflow is enabled tick the checkbox Before you ca...

Page 142: ... Open the web browser and enter the host name or IP address of your PRISMAsync controller 2 Go to the Workflow Hotfolders section 3 Click Configure 4 At Enabled select Yes to activate the hotfolder function 5 Enter a unique User name and Password Make sure that you filled in the user name and password before you continue with the next step 6 Click OK to confirm the activation of the hotfolder func...

Page 143: ...is procedure the System administrator password is required 1 Open your web browser and enter the host name or IP address of your PRISMAsync controller 2 Go to Workflow Hotfolders 3 Click Add 4 Give the hotfolder a logical name A logical name helps you to recognize the type of jobs you want to process using this hotfolder 5 Select the automated workflow to which you want to link the hotfolder 6 Cli...

Page 144: ...Click Tools Map Network Drive 3 Select a drive letter for the shared network folder 4 Enter the name of the shared network folder for example 12 34 56 78 Booklet or click the Browse button to navigate to the required location NOTE Instead of 12 34 56 78 you must enter the host name or IP address of the PRISMAsync controller Booklet is the name you gave to the hotfolder when you created the automat...

Page 145: ...kbox Otherwise the settings of the automated workflow overrule the settings of the hotfolder default ticket Procedure NOTE This procedure is an example of the procedure on a Microsoft Windows XP operating system For other operating systems the procedure can vary 1 Click Start Settings Printers and Faxes 2 Right click the printer driver of your Océ VarioPrint 6000 Line and select Printing preferenc...

Page 146: ...ou can start transaction jobs you must first activate the transaction mode via the operator panel The Transaction section contains the settings that you need to use transaction printing There you can also shift the image in case of a misalignment The following information is described below An overview of the items in the Transaction section on the operator panel The sequence of steps you must per...

Page 147: ...gs Editor Transaction printing Settings Requested active PDL When the requested active PDL is changed the new PDL becomes effective when you put the printer online 4 Image shift Display and change the active image shift settings for example when the images on the front and back of a sheet are not aligned correctly Sequence of steps to print transaction jobs NOTE Before you begin the list of Schedu...

Page 148: ...inting Settings Switch the printer online or off line 6 Connect to the printer 7 Submit the transaction print jobs 8 Print the transaction print jobs You must perform all the regular activities for example load the media empty the output locations add the supplies and solve errors 9 Put the printer off line when the trans action print jobs are ready Via the operator panel System Transaction Transa...

Page 149: ... recover output All pending pages in the printer will be deleted and the stack will be ejected The host system and the operator are responsible for the recovery The operator must restart the job manually on the correct page The tables below describe what happens when either the normal output recovery or the suppressed output recovery is selected Normal output recovery in IPDS Job Job progress stat...

Page 150: ... mem ory These sheets stay in the host memory When the printer starts printing these pages will be copied and sent to the con troller Suppressed output recovery in IPDS Pages that are copied to the memory of the controller are deleted from the system The operator must send these missing pages as a new transaction print job to the printer Job Job progress states Suppressed output re covery End up i...

Page 151: ...ocation Sheets jammed in the machine The operator panel displays instructions on how to solve the paper jam The opera tor has to remove these the jammed sheets manually These sheets are not delivered to the out put location Sheets in host memo ry Remain in host mem ory Once the error is re solved the printer re starts by printing the first page in the host memory Output recovery in case of an erro...

Page 152: ...e transaction setup are defined in the Settings Editor on the PRISMAsync controller 3 Load the required media into the paper trays if the setup selects the tray to tray mode 4 Touch Transaction online to put the printer online The text on the button changes from Off to On 5 On the host or mainframe connect to the printer and start the job NOTE You can also select a setup and put the printer online...

Page 153: ...e when The transaction print jobs are ready The printer contains no more print data The printer has stopped because all the jobs are ready not because an error has occurred When you switch Transaction online to offline the connection to the host is disconnected automatically 2 Press Transaction printing mode The text on the button changes from On to Off NOTE You can also put the printer offline vi...

Page 154: ...the shift settings for future use you must specify the shift settings in the setup via the Settings Editor Each time that the setup is loaded the shift settings included in the setup will become the active shift settings NOTE Only use the image shift function if you want to shift the image of the whole job The image shift applies to all the media in all the paper trays Procedure 1 On the operator ...

Page 155: ...where the controller misses a media requirement The controller will then ask for the required media via a message on the operator panel This Media message indicates the name or size of the missing media Your response to the Media message depends on the mode in which the printer works either The tray to tray mode or The tray to media mode This section describes how to respond to the Media message f...

Page 156: ...erator panel indicates that a media is missing Select one of the following actions as a response to the message Press Assign media Continue with step 2 when you select this option Press Continue The controller will use the PCL default media and continue the print job Note that this might be an incorrect media Press Cancel stream The print job is stopped You can now solve the problem It is most lik...

Page 157: ... is changed to modified You have to load the setup to make these modifications available on the printer Before you can load a transaction setup you have to switch the transaction printing mode off line 7 Go to Transaction Printing Settings and click Toggle the transaction printing mode to switch the printer off line 8 Go to Transaction Printing Setups and click Load The setup is now available on y...

Page 158: ...TE The settings editor displays only the media for which the media name is consistent with the IPDS media name definitions Valid characters for an IPDS media name are A Z a z 0 9 blank 5 Repeat step 4 for all the logical trays in your setup Create a transaction setup How to change the IPDS parameters 158 Chapter 7 Carry out print jobs ...

Page 159: ...y group click the pencil at the right hand side of the group settings This is the preferred method by item click the pencil behind the individual settings 4 For PCL Tray to media for media 1 assign the Media catalog item from the list The list displays all the media in the media catalog When you assign A3 Ledger like media or want to use short edge feed for other media change the feed direction to...

Page 160: ...e of the group settings This is the preferred method by item click the pencil behind the individual settings 5 Change the settings under the PCL setup tab see Create a transaction setup How to change the PCL parameters on page 159 6 Change the values under the Settings tab NOTE The status of the setup is changed to modified You have to load the setup to make these modification available on the pri...

Page 161: ...transaction setups on two or more printers Procedure 1 In the Settings Editor click Transaction printing Setups 2 Click Export 3 Save the file 4 To import the setups click Import 5 Browse to the location where the setup file is stored 6 Choose either Replace or Merge NOTE After you imported the setup file you must open and load the transaction setup you want to use Exchange all setups between prin...

Page 162: ...Exchange all setups between printers 162 Chapter 7 Carry out print jobs ...

Page 163: ...Chapter 8 Remote Service ORS optional ...

Page 164: ...eed to collect the meter readings manually and send these to the printer dealer The customer can always check the sent data and approve the meter readings Remote Software Upgrade With this function the customer can update the printer with the latest software The software is only retrieved from the printer dealer when the customer wants this Using Remote Service In the Settings Editor all settings ...

Page 165: ...t log files Each log file can contain maximum 10 Mb of data When all 4 files are full the first file is overwritten You can open the audit log files with any text editing application Remote Service Chapter 8 Remote Service ORS optional 165 ...

Page 166: ...Remote Service 166 Chapter 8 Remote Service ORS optional ...

Page 167: ...Chapter 9 Remote Monitor optional ...

Page 168: ...red or going to stop attention light is orange For confidentiality reasons Remote Monitor does not display job information Specifications Remote Monitor specifications URL to access Remote Monitor http printername or IP address remoteinfo Recommended resolution of your computer screen Minimum 640 x 480 pixels Supported web browsers Microsoft Internet Explorer 7 and higher Mozilla Firefox 3 and hig...

Page 169: ...Chapter 10 Optional finishers and other devices ...

Page 170: ...et another type of binding Information about the die sets The die sets are self latching You do not need tools or levers to replace a die set Each die set has an identification label that shows the hole pattern and name You can store 3 additional die sets in a storage area inside the puncher see Main parts on page 171 iXDP integrated eXchangeable Die Punch VarioPrint 6160 only 170 Chapter 10 Optio...

Page 171: ...Operating information Main parts Illustration K3 K7 K3 K7 1 0 K3 K7 6 1 2 3 4 5 51 Main parts of the puncher Operating information Chapter 10 Optional finishers and other devices 171 ...

Page 172: ...e different types of holes in your documents for different types of bind ing You do not need tools or levers to replace a die set see Replace a die set on page 175 4 Chip tray The chip tray collects the paper chips that arise from the punching process You can easily access and empty the chip tray see Empty the chip tray on page 174 5 Storage area for die sets The storage area K6 inside the puncher...

Page 173: ...216 g m 80 lb cover Die sets available for A4 punchers Number of holes shape Type of binding Type of die set 2 round Loose leaf binding 2 Hole 4 round Loose leaf binding 4 Hole 12 round VeloBind binding VeloBind 20 rectangular Plastic Comb binding Plastic Bind 21 rectangular Plastic Comb binding Plastic Bind 23 round Wire binding Wire 02 01 AM 2 holes inch 34 round Wire binding Wire 03 01 AM 3 hol...

Page 174: ... empty the chip tray of the puncher Illustration 52 Empty the chip tray Procedure 1 Open the front door of the puncher NOTE Make sure that you empty the chip tray while the power switch of the puncher is in the I position This enables the sensors to detect the action and automatically reset the punch counter 2 Grasp handle K8 and pull out the chip tray 3 Empty the chip tray 4 Slide the chip tray b...

Page 175: ...he finger hole of the die set and pull firmly Slide the die set out of the slot Make sure that you support the die set with both hands 3 If possible place the removed die set into the storage area inside the puncher cabinet CAUTION The next 2 steps include a possible pinching hazard Keep your fingers and other body parts away from the die set slot and the die set pins 4 Support the die set with bo...

Page 176: ... jams When to do Inspect the die sets after 500 000 punched sheets and consequently each time you lubricate the die sets NOTE See Replace a die set on page 175 for information about how to remove and insert a die set into the die set slot Illustration 54 Inspect the die sets Procedure 1 Put the die set on a table 2 Put your hands on both ends of the die set and push the top plate straight down Che...

Page 177: ...e and VeloBind 2 A felt oil pad on 1 side including a magnet and retaining plate 02 01 AM and 03 01 AM Wire round and square holes 3 A felt oil pad surrounds the punch pins 19 20 21 Hole comb 44 47 Hole coil When to do Lubricate the punch pins every 50 000 punched sheets Lubricate the shoulder bolts and springs every 200 000 punched sheets Required tools Use a high quality machine oil to lubricate...

Page 178: ...ate the shoulder bolts and springs Procedure 1 Apply a thin layer of oil on the shoulder bolts and springs 2 Wipe down the shoulder bolts and springs Make sure that a thin layer of oil remains on the shoulder bolts and springs Lubricate the die sets Lubricate the felt oil pad Procedure 1 Apply a thin layer of oil along the whole felt oil pad Make sure that felt oil pad does not become oversaturate...

Page 179: ...ble problems the puncher can face This section describes the actions you must take to solve the problems Solve a problem Solve a problem Problem Solution The puncher does not punch Check if the power switch of the puncher is in the I posi tion Check if the power cord is correctly attached to the back of the puncher Check if the power cord is correctly plugged into the wall socket You cannot easily...

Page 180: ... K5 K5 K4 K4 K1 1 2 3 K2 K2 56 Clear a paper jam Procedure 1 Open the front door of the puncher 2 Check if the chip tray is not too full 3 Follow the steps in the table Troubleshooting 180 Chapter 10 Optional finishers and other devices ...

Page 181: ...on Then the black lines on the knob 3 and the frame are aligned Slide the die set out Check for jammed media Put the die set back Check the bottom of the paper path Press lever K4 inward and lower the U channel Check for jammed media If necessary turn knob K4 until the paper falls down Check the upward paper path Open latch K5 Check for jammed media If necessary turn knob K5 clockwise until the pa...

Page 182: ... sup ports Punch edge 11 297 4 mm Punch capacity 1 sheet 1 sheet Power supply 115 V 60 Hz single phase 230 V 50 Hz single phase Electrical BTUs hour 1160 BTU HR Watts 300 W BTUs hour 1160 BTU HR Watts 300 W Safety certification TÜV according to UL 60950 1 First Edition CAN CSA C22 2 No 60950 1 IEC60950 1 TÜV GS CE according to EN60950 1 A11 IEC60950 1 Dimensions H x D x W 44 6 x 28 2 x 13 0 1 134 ...

Page 183: ... tray without modifying your paper tray It allows you to increase the media input capacity When you use the Form Assist Module your stack of special media will stay straight This allows you to load more media into the paper tray and to increase your productivity The Form Assist Module is delivered with Installation instructions IMPORTANT The variety of special media makes it difficult to predict w...

Page 184: ...imum weight The following table gives you an indication of the weight of the most common media you can lift with the EasyLift Media Number of sheets weight in kg lbs 100 sheets 500 sheets 1000 sheets 2000 sheets A4 80 gr 0 5 kg 1 1 lbs 2 5 kg 5 5 lbs 5 0 kg 11 0 lbs 10 0 kg 22 0 lbs A3 80 gr 1 0 kg 2 2 lbs 5 0 kg 11 0 lbs 10 0 kg 22 lbs Too heavy Letter 20 lbs 0 5 kg 1 0 lbs 2 3 kg 5 0 lbs 4 5 kg ...

Page 185: ...7 x 10 inch media or JIS B5 you will have to register this media first NOTE If you are printing on 7 x 10 inch media or on JIS B5 it is important that the paper tray contain enough media The dashboard informs you when to load media NOTE Remove the device from the paper tray when you want to load other media than the 7 x 10 inch media or JIS B5 NOTE When you use the 7 x 10 Statement Size Support th...

Page 186: ...Action Illustration 4 Flip the metal plates over to the left hand side over the media 5 Close the paper tray 7 x 10 Statement Size Support 186 Chapter 10 Optional finishers and other devices ...

Page 187: ...l paper tray in the paper module You can only load A4 Letter in the dual paper tray The capacity of the dual paper tray is 3 300 A4 Letter sheets instead of 1 700 sheets bulk tray The control panel of the paper module is described in The paper modules on page 26 1 2 3 4 1 2 3 4 1 Number Description 1 If the LED is lit up the dual paper tray is installed Load the media See the media handling sectio...

Page 188: ...dependent of the actual filling level or empty Therefore the right hand part of the icon for the dual paper tray displays full or empty NOTE The schedule assumes that the right hand part of the dual paper tray is either full although the stack may be partially filled or empty When the first stack becomes empty and the second stack is used the schedule is updated with the actual filling level You a...

Page 189: ...Chapter 11 Counters ...

Page 190: ...section Item Function More information Billing counters Indicate the total number of prints that have been made since the print er was installed You cannot reset the billing counters General counter informa tion on page 192 Day counters Indicates the number of prints that have been made since the latest re set You can always reset the day counters Reset the day counters on page 192 Toner counters ...

Page 191: ... Start maintenance Open the list of the suggested or re quired maintenance tasks NOTE Only a trained and certified operator is allowed to per form the maintenance tasks Introduction to the Maintenance section Chapter 11 Counters 191 ...

Page 192: ...ustomer Toner counters The Toner counters section displays the amount of toner that has been used since the machine was installed You cannot reset the toner counter The Billing counters and the Day counters provide information about the number of 1 sided and 2 sided prints that have been made on standard size and large media The length of the media determines whether a media is standard size or la...

Page 193: ...eset You do not need the day counters for the meter reading The day counters are only intended for your own convenience The toner counter provides information about the amount of toner that has been used since the machine was installed You cannot reset the toner counter This section describes how to find the billing counters and the toner counter Procedure 1 On the operator panel press the System ...

Page 194: ...Find the meter readings 194 Chapter 11 Counters ...

Page 195: ...Chapter 12 Keeping the printer running ...

Page 196: ...rvoirs on page 197 Puncher Indicate the status of the waste box of the puncher Check the status of the puncher waste box on page 205 Finisher Indicate the number of staples that the stapler of the finisher has used since the last refill Check the status of the sta pler cartridges on page 199 Stacker stapler Indicates the number of staples that the stapler of the stacker stapler has used since the ...

Page 197: ...e toner res ervoir is filled over 25 You can add 2 bottles of toner The toner icon is orange The status bar contains no more green blocks The toner reservoir is filled less than 25 The printer can print another 600 sheets You must add up to 3 toner bottles as soon as pos sible The toner icon is red The status bar has a red frame The toner reser voir is empty The printing stops You must add maximum...

Page 198: ...ctions on the bottle 2 Remove the screw cap from the bottle IMPORTANT Do not remove the seal from the bottle 3 Open the front door of the toner reservoir you want to fill 58 Open the front doors 4 Open the lid of the toner reservoir 5 Put the toner bottle into the opening of the toner reservoir NOTE The toner bottle only fits one way 6 When the toner bottle is empty carefully tilt the toner bottle...

Page 199: ...he dashboard NOTE Only when the staple level is low or when one of the staple cartridges is empty the status is visible in the dashboard The meaning of the stapler icons The stapler icons Stapler icon Description The stapler icon is blue The staple cartridges are filled The stapler icon is orange The staple level in one of the staple cartridg es is low Replace the stapler cartridges on page 200 Th...

Page 200: ...aples if your documents contain fewer than 50 sheets Use long staples when your documents contain more than 50 sheets Only use staples of type S25 long staples or S37 short staples When to do When a staple cartridge is empty or almost empty Check the status of the stapler cartridges on page 199 Get access to the staplers Procedure 1 Open the front door of the finisher 2 Open top cover E1 3 Open co...

Page 201: ...e buttons at both sides of the cartridge holder to unlock the lower cover 59 Press the 2 release buttons simultaneously The lower cover opens 60 The lower cover opens 3 Remove the empty staple cartridge in the opposite direction of the arrow Add staples Chapter 12 Keeping the printer running 201 ...

Page 202: ...aple cartridge into the cartridge holder in the direction of the arrow 62 Place a new staple cartridge 5 Push the staple cartridge into the cartridge holder until the cartridge clicks into place Add staples 202 Chapter 12 Keeping the printer running ...

Page 203: ...nto the holder 6 Remove the paper ribbon that secures the staples in the staple cartridge 64 Remove the paper ribbon 7 Close the lower cover 8 Place the cartridge holder in the stapler Add staples Chapter 12 Keeping the printer running 203 ...

Page 204: ... doors and covers Procedure 1 Hold cover E5 while you unlock E6 2 Close cover E5 3 Close top cover E1 4 Close the front door of the finisher Close the doors and covers 204 Chapter 12 Keeping the printer running ...

Page 205: ...x icons The waste box icons Waste box icon Description The waste box icon is blue The waste box inside the icon is grayed out The waste box status is Absent The waste box icon is blue The waste box is not full The waste box status is OK The waste box icon is red The waste box status is Full The printer stops To continue printing empty the waste box see Empty the chip tray on page 174 for the punch...

Page 206: ...l indicate that you must restart the machine Service required Follow the instructions on the operator panel A message on the operator panel will indicate that you must call Service Maintenance re quired Follow the instructions on the operator panel The maintenance wizard appears You need the maintenance PIN to access the mainte nance mode The machine is automatically switched off NOTE Only trained...

Page 207: ...paper dust you can have problems with toner pollution of the prints right after the automatic black image cleaning procedure Therefore it is advised to enable the Paper quality test see Change the advanced media settings Start the Paper quality test on page 84 each time when a new batch of media is used This is to be sure that the correct Paper quality setting is still at the right level for this ...

Page 208: ...degrees A combination of the above pollu tions Change the Paper quality setting from Normal to Low see Change the advanced media settings Change the Paper quality on page 83 Use the Paper quality test to determine if this new setting is the right cleaning mode for this media The sheets of the 5th set must be totally toner free al so at the edges of the media size width When these sheets still show...

Page 209: ...Appendix A Miscellaneous ...

Page 210: ...168 images minute A3 Ledger NOTE For 1 sided printing the print speed of A4 or Letter like media is 125 images minute for all machine types except for the Océ VarioPrint 6320 This machine has a print speed of 157 images per minute for 1 sided printing Supported media sizes Minimum 8 x 8 inch Maximum 12 5 x 19 2 inch Supported media weights 50 300 g m for Océ recommended media 40 135 lb bond for ot...

Page 211: ... 100 sheets Toner Océ VarioPrint 6000 toner Resolution 1200 dpi 180 lpi Warm up time 12 minutes Network connectivity 10 100 Mbit and 1 Gbit Ethernet Network protocols TCP IP IPX SMB Higher level protocols LPR LPD for job submission Socket printing SNMP IPP Supported PDLs Adobe PostScript 3 streaming PostScript PCL 6 combines PCL5e and PCL XL PDF 1 6 Xerox PPP support Supported applications Océ Var...

Page 212: ...Product specifications 212 Appendix A Miscellaneous ...

Page 213: ...s 192 193 Maintenance section 190 Binding 127 Bundle 106 Print jobs 116 Bundled jobs Change job settings 116 C Capacity Input 210 Output 211 Stapling 211 Change media 59 Change Alignment 122 Check first set 131 Image shift 123 Language 43 Margin Shift 123 Media 121 Number of sets 130 Number of staples 127 Offset stacking 124 Output location 124 Page range 132 Print order 124 Rotation 124 Separator...

Page 214: ...s 103 New jobs 103 One by one 103 Printed jobs 103 Delete Automated workflow 139 Printed jobs 108 Scheduled jobs 104 Waiting jobs 106 Destination of print job Workflow 38 DFD 211 DHCP 34 Die sets Die sets available 173 Inspect 176 Lubricate the felt oil pad 178 Lubricate the punch pins 177 Lubricate the shoulder bolts and springs 178 Replace 175 Disable Warning time 45 DNS 1 34 DNS 2 34 DNS settin...

Page 215: ...118 To top 112 Jobs view Overview 104 Jobs with available media 115 Jobs with label 115 K Key operator settings 33 L Label 115 Language Setup section 36 Large media 192 Licences Software 33 Link speed and connection type 34 Load media 53 Schedule view 54 Local key operator settings 33 Setup section 37 Logging Configuration report 34 Datadump file 34 Trace file 34 Low power mode 14 Low temperature ...

Page 216: ...her 29 Finisher 29 Finisher upper output 30 Stacker 29 System output 29 Output recovery 149 Output Punch 128 P Page range All pages 132 Indicate the range 132 Paper module 20 Control panel 26 Green check mark 26 LEDs 26 Not assigned button 26 Red arrows 26 Paper modules 26 Paper quality 79 82 83 84 Paper quality test 79 82 83 84 Start 84 Stop 84 Paper tray 56 Dual paper tray 187 Media 59 Paper tra...

Page 217: ...tration Media 62 Remote assistance 164 Remote connection enabled 34 Remote connection status 34 Remote connection Remote connection enabled 34 Remote connection status 34 Remote Service country code 34 Remote Service custom country code 34 Status 164 Test 164 Test Remote connection 34 Remote Diagnostics 164 Remote Meter Reading 164 Remote Monitor 168 Remote Service 164 Remote Service country code ...

Page 218: ...ter job 104 Stop behavior Stop after a job 101 Stop after a set 101 Stop as soon as possible 101 Stop the printer After a job 101 After a set 101 As soon as possible 101 Automatic 102 Manually 101 Subnet mask 34 System administrator settings 33 System components Engine module 20 Finisher 21 Operator attention light 20 Operator panel 20 Paper module 20 Puncher iXDP 21 Roll feeder 20 Stacker 21 Syst...

Page 219: ...m 16 U Upgrade software server 33 USB 33 Urgent job 111 USB drive Print job 90 Save a file to another location 90 V Version Printer software 33 W Waiting jobs Overview 104 Warm up time 211 Warning time Disable 45 Setup section 36 Waste box Icon 205 Puncher 205 Status 196 205 WINS 1 34 WINS 2 34 WINS settings 34 Workflow profiles Check and print 38 Function 38 Job by job 38 Manual planning 38 Stand...

Page 220: ...Index 220 ...

Page 221: ......

Page 222: ...NC www canon ca CANON EUROPA INC www canon europe com CANON LATIN AMERICA INC ww cla canon com CANON AUSTRALIA PTY LTD www canon com au CANON CHINA CO LTD www canon com cn CANON SINGAPORE PTE LTD www canon com sg CANON HONGKONG CO LTD www canon com hk CANON INC Océ N V 2013 ...

Reviews: