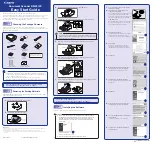
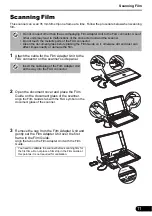
background image

Scanning Film

12

4

Gently close the document cover.
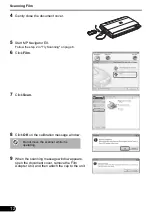
5

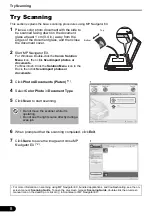
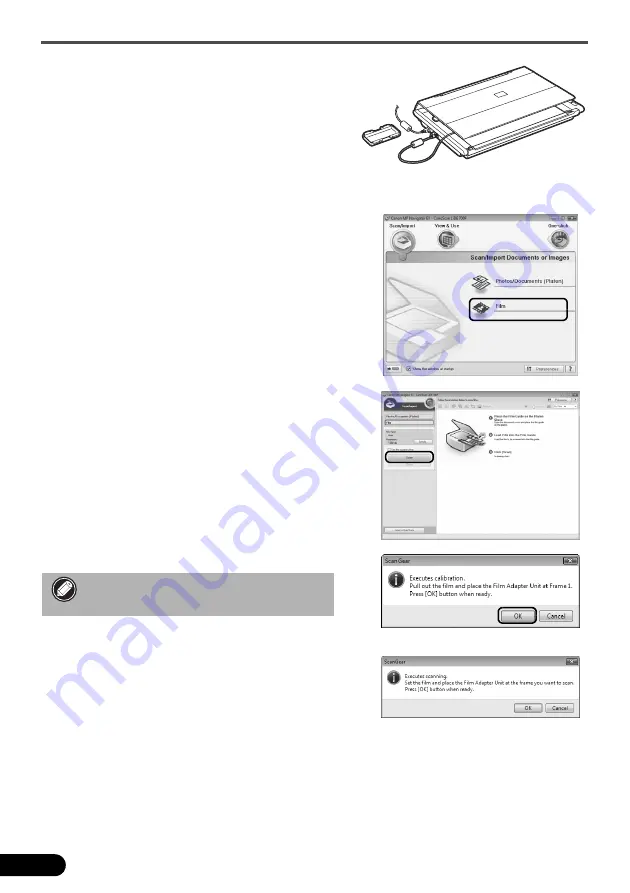
Start MP Navigator EX.

Follow the step 2 in "Try Scanning" on page 8.

6

Click 

Film

.

7

Click 

Scan

.

8

Click 

OK

 on the calibration message window.

9

When the scanning message window appears, 

open the document cover, remove the Film 

Adapter Unit, and then attach the cap to the unit.

Do not move the scanner while it is 
operating.

Summary of Contents for 700F - CanoScan LiDE

Page 1: ...cautions 1 Using the Scanner Buttons 9 Package Contents 3 Scanning with MP Navigator EX 10 Installing the Software 4 Scanning Film 11 Preparing the Scanner 7 Positioning the Scanner 15 Try Scanning 8...

Page 2: ...ations However there is no guarantee that interference will not occur in a particular installation If this equipment does cause harmful interference to radio or television reception which can be deter...

Page 3: ...nner falls it may cause injury When setting up the stand read this guide carefully to place the scanner correctly Keep the document cover close except when necessary Setting the stand incorrectly may...

Page 4: ...t your retailer or Canon Customer Support Help Desk CAUTION Do not release the document cover until it completely opens closes If the document cover falls it may lead to pinch your hands or damage the...

Page 5: ...nu panel software ArcSoft PhotoStudio image editing software On screen Manuals Scanning Guide for ScanGear MP Navigator EX and troubleshooting Manuals for bundled application programs In this guide Wi...

Page 6: ...pted select your language and place of residence and then click Next In some countries these dialog boxes will not appear Do NOT connect the scanner to a computer before installing the software If you...

Page 7: ...acintosh skip step 6 and go to step 7 6 For Windows carefully read the Please Allow All Install Wizard Processes screen and then click Next 7 Follow the on screen instructions to perform the installat...

Page 8: ...l appear For Macintosh After restarting the computer Solution Menu icon will be registered in the Dock Solution Menu You can select either MP Navigator EX the Scanning Guide on screen manual or the On...

Page 9: ...ransport the scanner make sure to slide the lock switch toward the lock mark to fasten the scanning unit Only use the USB cable provided with the scanner Use of other cables may lead to a malfunction...

Page 10: ...he Dock then click Scan import photos or documents 3 Click Photos Documents Platen 1 4 Select Color Photo in Document Type 5 Click Scan to start scanning 6 When prompted that the scanning completed cl...

Page 11: ...page 3 If the scanner buttons do not work properly see Troubleshooting in the on screen manual Scanning Guide For Mac OS X v 10 3 9 Before using the scanner buttons you need to set Image Capture in Ap...

Page 12: ...procedure For Windows Select Start All Programs Canon Utilities MP Navigator EX 2 1 and click MP Navigator EX 2 1 For Macintosh Open Applications Canon Utilities folders then double click the MP Navig...

Page 13: ...he first frame in the Film Guide Align the tab on the Film Adapter Unit with the Film Guide Do not connect other than the accompanying Film Adapter Unit to the FAU connector Use of other units may lea...

Page 14: ...e step 2 in Try Scanning on page 8 6 Click Film 7 Click Scan 8 Click OK on the calibration message window 9 When the scanning message window appears open the document cover remove the Film Adapter Uni...

Page 15: ...Guide 12 Gently close the document cover 13 Click OK on the scanning message window The scanned image is displayed in the preview area 14 Confirm the scanning image and then click Scan to start scanni...

Page 16: ...Adapter Unit and then attach the cap to the unit Remove the film and the Film Guide from the document glass Do not leave the film strip in the Film Guide for an extended period of time as heat from th...

Page 17: ...be scanned in this position Pull out the stand on the bottom of the scanner until it clicks and set the scanner upright on a flat stable surface Gently open the document cover as far as it goes stops...

Page 18: ...or each color RGB 48 bit or 24 bit output 16 bit or 8 bit output for each color RGB Grayscale 16 bit input 16 bit 3 or 8 bit output Scanning Speed 4 Photo or Document Color 33 5 msec line 4800 dpi 33...

Page 19: ...cautions 1 Using the Scanner Buttons 9 Package Contents 3 Scanning with MP Navigator EX 10 Installing the Software 4 Scanning Film 11 Preparing the Scanner 7 Positioning the Scanner 15 Try Scanning 8...

Reviews: