


3
2
1
Thank you for purchasing the Canon FAXPHONE B45.
To get your machine ready for use, please follow the instructions in this Set-Up Sheet before referring
to any other documentation.
RR
RR
EE
EE
AA
AA
DD
DD
TT
TT
HH
HH
II
II
SS
SS
SS
SS
HH
HH
EE
EE
EE
EE
TT
TT
FF
FF
II
II
RR
RR
SS
SS
TT
TT
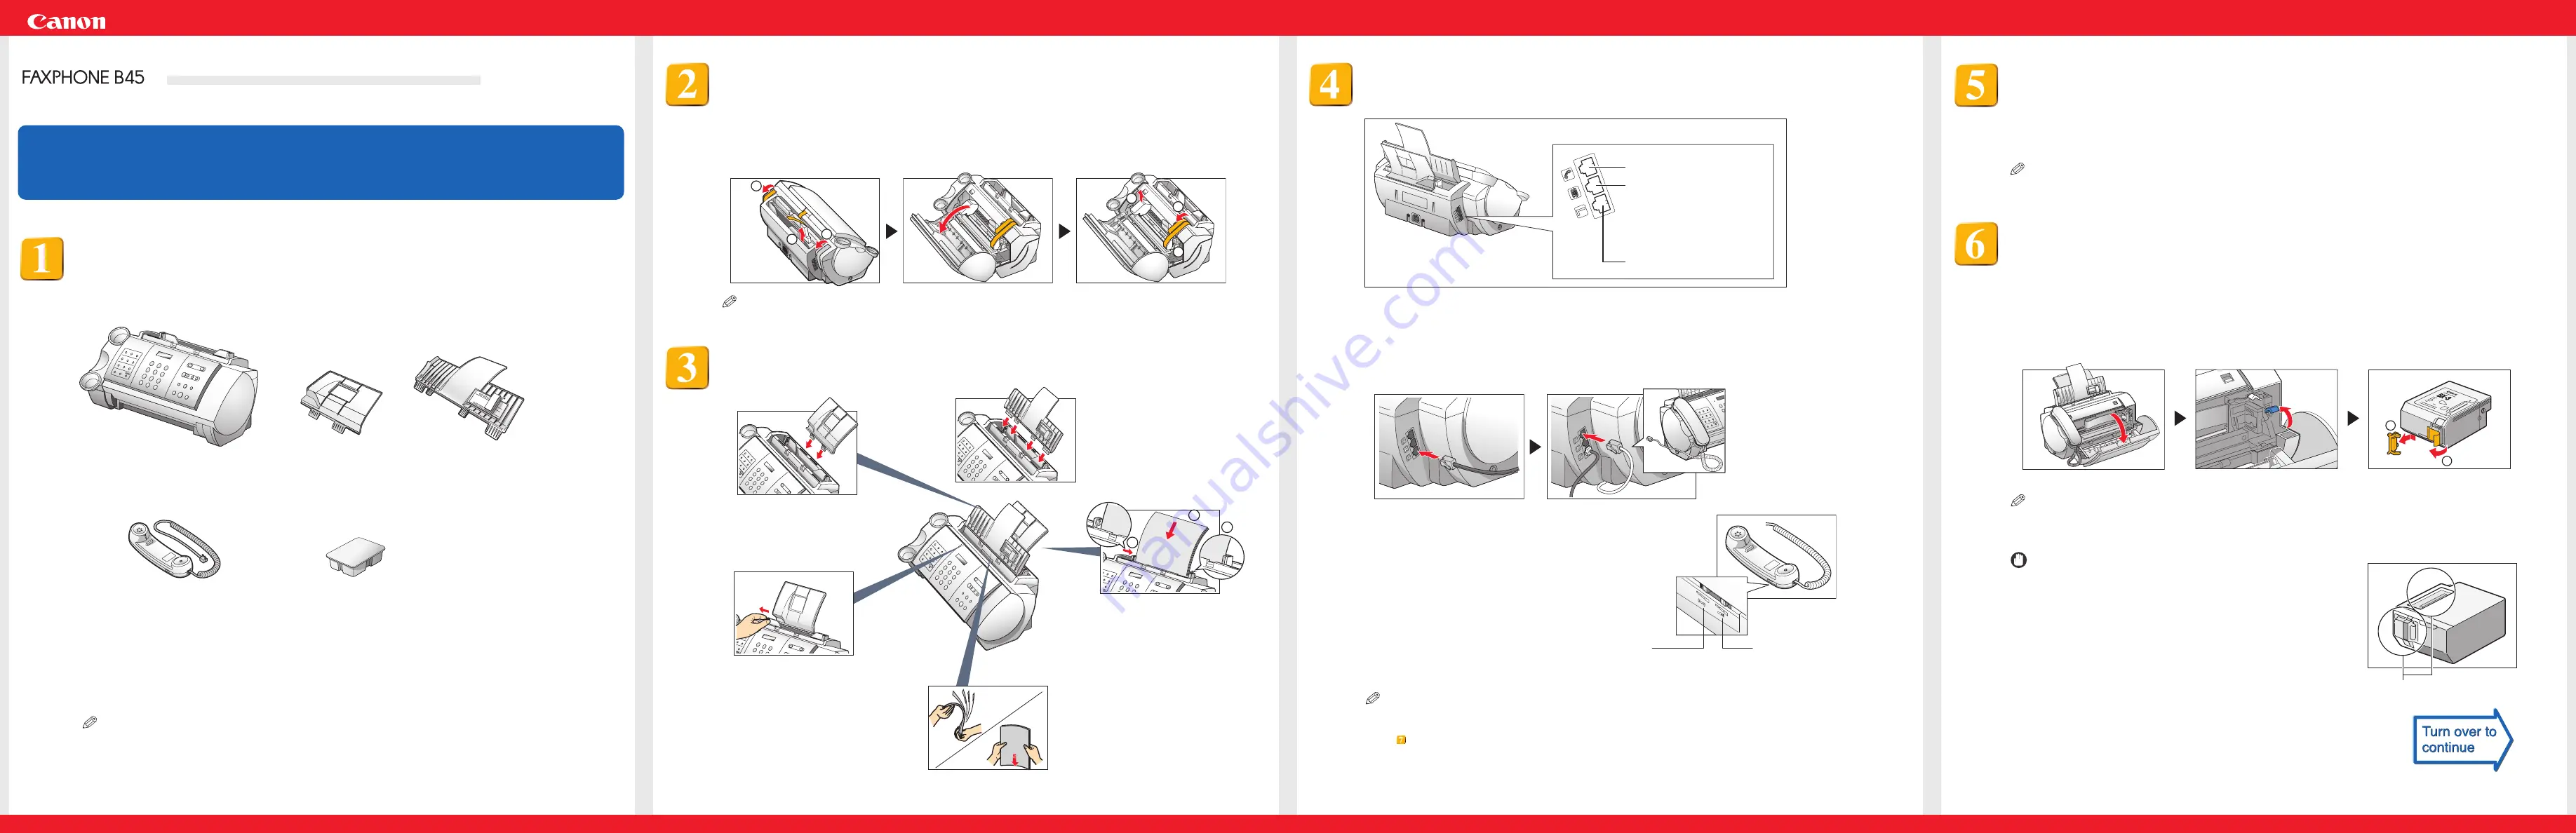
Unpack the machine and its components.
Make sure you have the following items:
Power cord
Telephone line cord
Documentation
• Set-Up Sheet
• FAXPHONE B45 User's Guide
• Registration Card
• Extended Service Plan Guide
Destination labels
NOTE
If any of these items are damaged or missing, contact the Canon Customer Care Center (see
p.ii, "Where to find help," of the User's Guide) immediately.
NOTE
The actual shipping materials may differ in shape, quantity, and position from the ones shown above.
Assemble the machine and load paper.
1 Insert the tabs on
the multi-purpose
tray into the slots
on the unit.
5 Insert the tabs on the
document tray into the
corresponding slots.
Connect the telephone line, handset, and external devices.
There are three jacks on the left side of the fax for connection of the following:
1 Connect the supplied telephone line cord to the
L
jack, then the other end to the
telephone line jack on your wall.
2 Place the handset in its cradle, and connect it to the
h
jack.
Ringer and speaker volume switch
To adjust the volume of the ringer and
speaker, use a pen or other pointed object
to move these switches to HIGH or LOW.
Remove the shipping materials.
1 Remove the shipping tapes
q
from the top of the fax and the taped protective piece
w
.
2 Open the printer cover by gently pulling it towards you.
3 Remove the shipping tapes
q
and the protective pieces
w
.
Close the printer cover until it locks into place.
1
1
2
1
2
2
Set-Up Sheet
Handset
Extension phone (a telephone
that you may wish to have away
from the fax to use at a different
location) See Chapter 6 of the
User‘s Guide.
Telephone line
Main unit
Multi-purpose tray
Document tray
Handset
BX-3 Black BJ cartridge
Install the BJ cartridge.
1 Make sure the fax is plugged in.
2 Open the printer cover.
3 Raise the cartridge lock lever on the cartridge holder.
4 Remove the BJ cartridge from its package, then remove the orange protective cap
q
and tape
w
.
NOTE
Discard the cap and tape. Never attempt to reattach them to the BJ cartridge print head.
1
2
2 Squeeze, then slide the
paper guide to the left.
3 Fan a stack of paper,
then tap the edge of the
stack on a flat surface to
even the stack.
4 Insert the stack into
the multi-purpose tray
q
, and align the right
edge of the stack
w
with the right side of
the multi-purpose tray.
Then slide the paper
guide
e
snugly
against the left edge of
the stack.
Connect the AC power cord.
1 Plug the power cord connector into the rear of the fax.
2 Plug the other end of the power cord into a properly grounded 120 V AC power outlet.
NOTE
There is no power switch on the fax. The fax is on as long as it is plugged in.
• Store BJ cartridges out of the reach of children. If anyone
inadvertently ingests ink, consult a physician immediately.
• Do not touch the metallic areas on the BJ cartridge.
IMPORTANT
Do not touch these metallic areas.
Ringer volume switch
Speaker volume switch
3 Connect an extension phone to the
t
jack.
NOTE
• If you have connected an external device to your fax, be sure to select the correct receive mode (see
step
).
• If the extention phone dose not have its own power supply, any redial data in the extention phone
memory may be lost after an extended fax transmission.


