


NOTE
The ink in the BJ cartridge is difficult to clean up if spilled. Follow the precautions below when handling
the BJ cartridge.
• Carefully remove packaging from BJ cartridges.
• Do not attempt to disassemble or refill BJ cartridges.
• Do not shake or drop BJ cartridges.
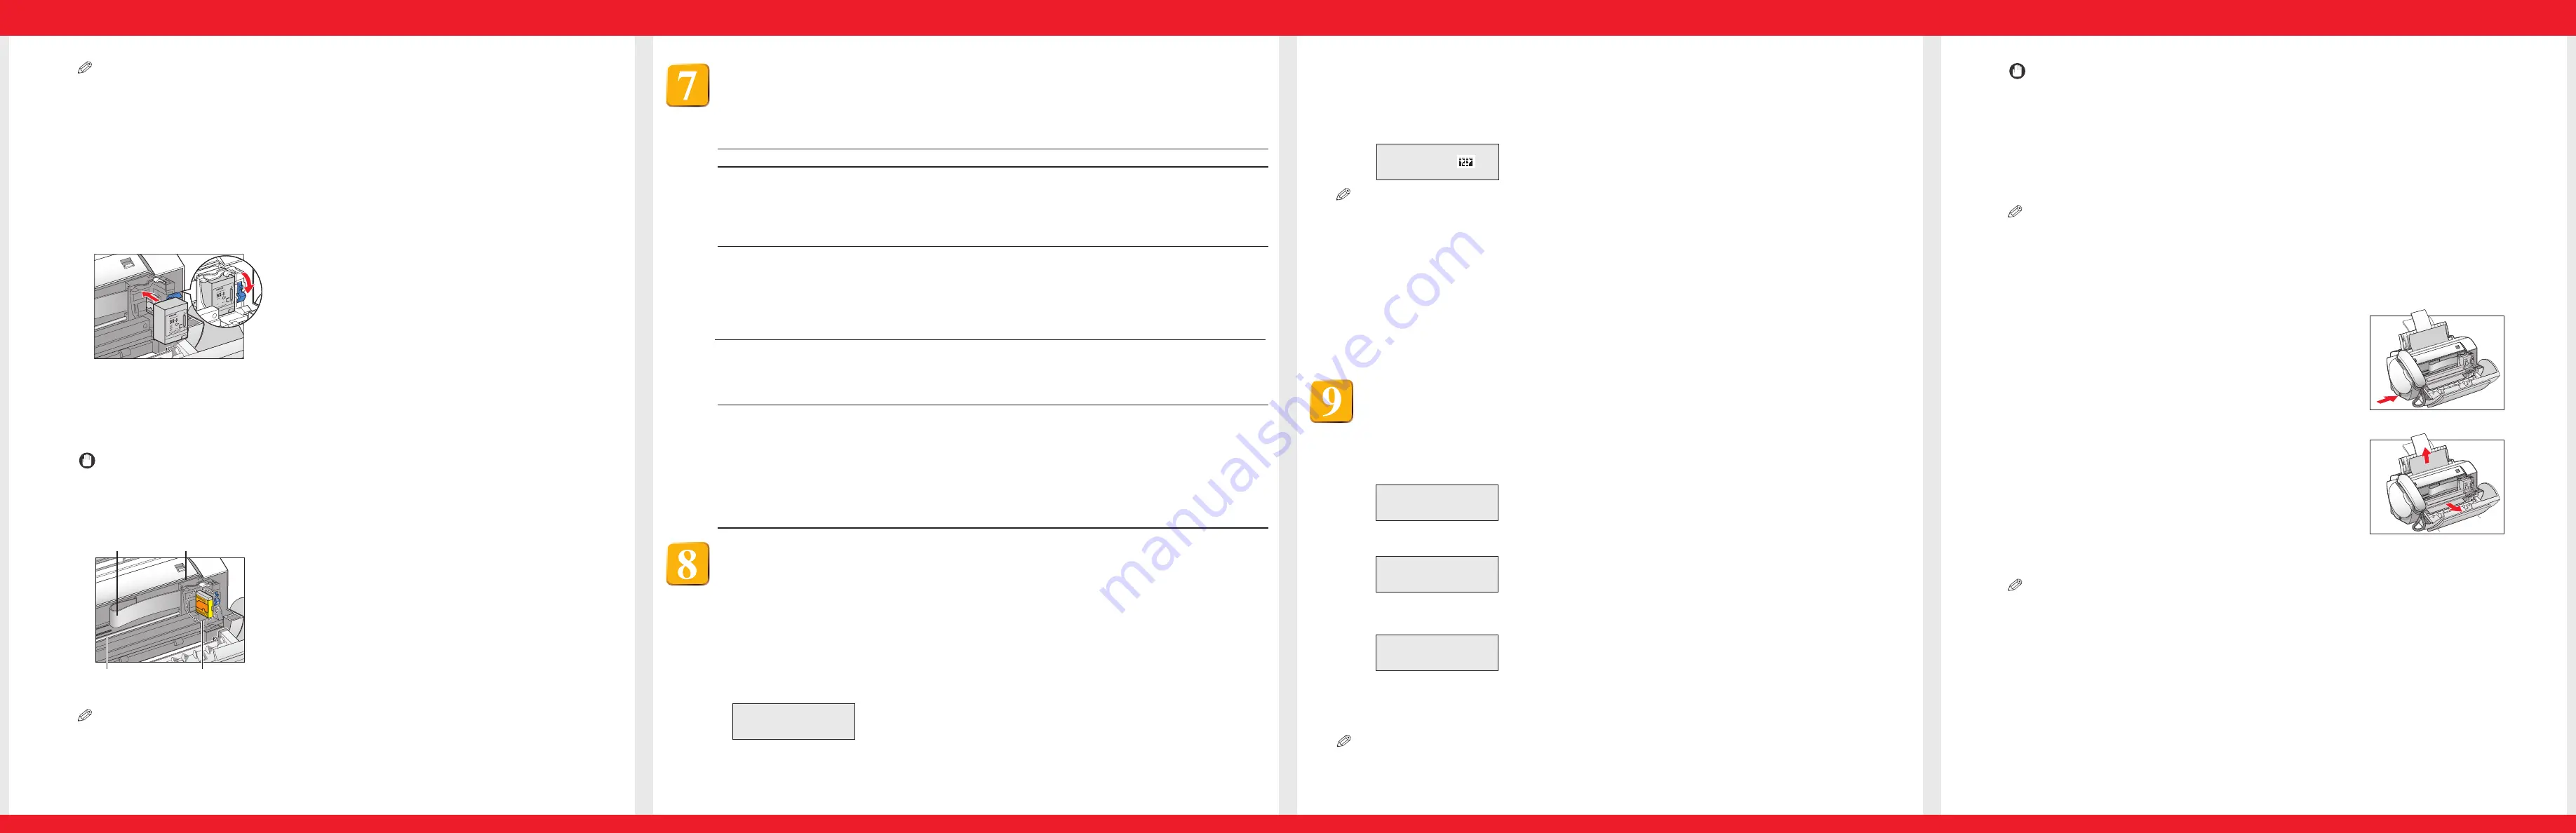
5 Align the slot in the cartridge with the yellow post in the fax, and with the label facing
outwards, insert the BJ cartridge into the cartridge holder. Lower the cartridge lock
lever until you hear a click to lock the cartridge in place.
NOTE
The yellow post (BJ cartridge guide) should be visible through the slot. The BJ cartridge tilts slightly to
the left before lowering the cartridge lock lever.
• Do not try to manually move or stop the cartridge holder.
• Do not touch the components shown below or any metal parts.
IMPORTANT
Set the fax receive mode.
Your fax provides you with several modes for receiving documents. Press [Receive Mode]
until the mode you want appears, then press [Start/Copy].
To determine which mode best suits your requirements, see the table below.
Receive Mode
Main Use Operation
Requirements
Details
FAX ONLY MODE
Fax
Answers all calls as fax calls.
Receives documents
automatically and
disconnects voice calls.
Separate telephone line for
fax use only.
If you want to be alerted
when a fax call is received,
connect the handset, or an
extension phone to the fax,
and enable the INCOMING
RING setting.
User’s Guide
p. 7-4
FAX/TEL AUTO SW
(Fax/Tel Mode)
Fax/Tel
Automatically switches
between fax and voice calls.
Receives documents
automatically and rings for
voice calls.
Handset or extension
phone connected to the
fax.
User’s Guide
p. 5-2
MANUAL MODE
Tel
Rings for every call,
regardless of whether the
call is a fax call or a voice
call. For a fax call, you have
to manually activate
reception of the fax.
Handset or extension
phone connected to the
fax.
User’s Guide
p. 5-4
DRPD
Fax/Tel
The fax rings differently
depending on whether a
call is a fax or voice call.
Subscription to a DRPD
service. Handset or
extension phone
connected to the fax.
User’s Guide
p. 5-5
4 Press [TAM Mode] to set TAM MODE.
• When you set TAM MODE, the TAM LED lights up and the outgoing message is played.
• When you cancel TAM MODE, the TAM LED switches off. If you have any new telephone messages, the
messages are played automatically.
• To cancel TAM MODE, press [TAM Mode] again.
12/20
:00
NOTE
• NO OGM is displayed on the LCD when no outgoing message has been recorded. You must record an
outgoing message.
• If you have any new telephone messages, the TAM LED blinks and the number of messages appears
on the LCD.
• The date and time when the telephone message was recorded, the number of telephone messages
and the number of the message being played are displayed whenever a message is played.
4 When you are finished, close the printer cover.
NOTE
Be sure to close the printer cover until it locks into place, or the fax will not function properly.
5 Press [Stop].
Part no. HT3-2140-000-V.1.
1
© 2003 Canon Inc.
Canon, FAXPHONE, and BJ are trademarks of Canon Inc.
All other products and brand names are registered
trademarks or trademarks of their respective owners.
Specifications subject to change without notice.
PRINTED IN THAILAND
Ribbon cable
Guide rail
Round shaft
Circuit board
6 Close the printer cover.
The fax automatically prints a test page. If you have problems printing, see Chapter 9
of the User’s Guide.
Set the built-in answering machine (TAM MODE).
Setting TAM MODE allows you to receive telephone messages and fax transmissions
while the fax is unattended. Before you use TAM MODE, you must record an outgoing
message. Use the microphone on the operation panel to record your outgoing message.
1 Use [
3
] or [
4
] to select OUTGOING MESSAGE.
2 Press [Record] and speak into the microphone to record your outgoing message.
The remaining recording time is displayed on the LCD. Only one outgoing message, no longer than 20
seconds, can be recorded.
TIME LEFT
19
3 Press [Stop] twice when recording is finished.
Select the Caller ID setting.
If you have subscribed to a Caller ID service with your telephone company, set
the CALLER ID setting to ON. The fax will display the caller’s name and
phone/fax number on the LCD when you receive a call.
1 Press [Function], then press [Start/Copy].
USER SETTINGS
2 Use [
3
] or [
4
] to select RX SETTINGS, then press [Start/Copy].
ECM RX
NOTE
Contact your local telephone company for detailed information.
3 Use [
3
] or [
4
] to select CALLER ID, then press [Start/Copy].
OFF
4 Use [
3
] or [
4
] to select ON, then press [Start/Copy].
5 Press [Stop] to return to standby mode.
Clearing document jams
When a document jams or misfeeds in the document tray, open the printer cover and see
FIG. 1 inside the cover. If the fax does not feed out the document after you press
[Start/Copy] for a few seconds, follow the procedures below to remove the document.
IMPORTANT
1 Open the printer cover by gently pulling it towards you.
NOTE
• If a multipage document is loaded, remove the non-jammed documents from the document
tray.
• Do not try to pull the jammed document out without opening the printer cover since you may
tear or smudge the document.
2 Push the document release button on the left-side
panel of the fax.
3 Remove the document.
• Pull it gently in either direction.


