


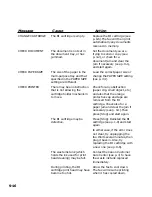
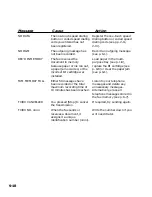


SOLUTIONS TO COMMON PROBLEMS
9
9-11
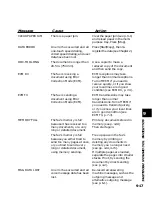
❏
The fax does not switch automatically between telephone and fax
reception.
The fax may not be set to switch automatically between telephone and fax reception.
• For the fax to switch automatically, the receive mode must be set to FAX/TEL AUTO SW
(Fax/Tel mode) (see Chapter 5).
An error may have occurred during reception.
• Check the LCD for an error message (see p. 9-15).
• Print an activity report and check for an error (see p. 7-7).
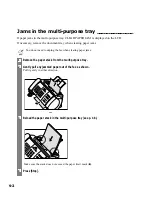
The multi-purpose tray may be empty.
• Make sure paper is loaded in the multi-purpose tray (see p. 1-8).
The sending fax machine may not send the CNG signal that tells the fax that the
incoming signal is a fax.
• Some fax machines cannot send the CNG signal that tells your fax the incoming call is from
a fax machine. In such cases, you will have to receive the document manually (see p. 5-4).
❏
Cannot receive a document manually.
You may have disconnected the call by pressing [Start/Copy] or dialing the remote
receiving ID after hanging up the handset of the extension phone.
• Always press [Start/Copy] or dial the remote receiving ID before hanging up the handset,
otherwise you will disconnect the call.
The remote receiving ID may be incorrect.
• Make sure you dialed the correct remote receiving ID.
❏
Print quality is poor.
You may not be using the correct type of paper.
• Make sure you load paper that meets the paper requirements for the fax (see Chapter 3).
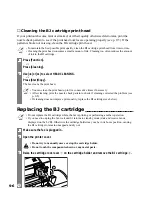
The BJ cartridge print head may need cleaning.
• Clean the BJ cartridge print head if necessary (see p. 9-6).
The sending fax machine may not be functioning properly.
• The sending fax machine usually determines the quality of the document. Call the sender and
have them make sure the top cover and scanning glass of their fax machine are clean.
Error Correction Mode (ECM) may be disabled.
• Make sure ECM is on (see ECM RX, p. 7-4).


