background image

1.3.3 USB interface

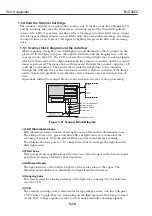
USB is a serial interface which connects up to 127 peripheral devices to a host
computer, and transmits data at a high-speed rate of 12Mbps. Hot plugging, in which
connecting/disconnecting devices while the host or the printer is in use, is supported.
Each device is connected to a hub's port, where each port's detection/disconnection
status is returned to the host.

Data transfer

The data transfer in USB is executed in terms of the transfer unit called a frame, a
time frame of approximately 1ms, into which the data is divided. Data is transferred
by piling up these frames.

All packets begin with a SYNC (synchronizing) field to synchronize with the local

clock, and are separated with an EOP (End of Packet) field.
Frame lines begin with an SOF (Start of Frame) packet. An SOF is composed of a PID
(Packet Identification Field) that represents the type of the packet and the direction,
frame number, and a CRC (Cyclic Redundancy Check) used for error-check.
Inside a frame is a packet line containing a token packet, data packet and a
handshake packet, which indicates the status of the flow control.
A token packet is composed of a PID, an address field which can specify up to 128
addresses, an ENDP (endpoint) field, and a CRC.
Inside a data packet are a PID, data field, CRC, and EOP.
Only a PID is present inside the handshake packet.

Encoding/Decoding the Data

In USB, data transfer lines are ultimately encoded with NRZI (Non Return to Zero
Invert) method. When the original data bit is 0, sent data bits are inverted; when the
original data bit is 1, the value is retained.
However, if the level of the transferred data remain unchanged for a certain period of
time, the receiving side may not be able to synchronize with the data sample position,
which will result in data bits being out of phase. This is prevented by a method called
bit stuffing; when data bit 1 is repeated 6 times, one 0 bit is added to the original data
before encoded with NRZI.

Part 5: Appendix

BJC-3000

5-8

SOF

1 Frame (approx. 1ms)

SOF

Printer

Other Function

SYNC

Frame
Number

CRC

SYNC

Token

Data

Handshake

PID ADDR ENDP CRC

EOP

EOP

SYNC PID

DATA

CRC EOP

SYNC PID

EOP

SOF

Frame Line

Frame Structure

Packet Line

Packet Structure

Time Lapse

Idle

Idle

NRZI

0

1

1

0

1

0

1

0

0

0

1

0

0

1

1

0

Data

Figure 5-7 USB Data Transfer

Figure 5-8 NRZI

Summary of Contents for BJC-3000 Series

Page 1: ...QY8 1365 000 REVISION 0 COPYRIGHT 1999 CANON INC CANON BJC 3000 0899 SC 0 30 0 PRINTED IN JAPAN IMPRIME AU JAPON AUG 1999 ...

Page 2: ...0899 SC 0 30 0 ...

Page 3: ......

Page 4: ...ks The product names and company names described in this manual are the registered trademarks of the individual companies Copyright This manual is copyrighted with all rights reserved Under the copyright laws this manual may not be copied reproduced or translated into another language in whole or in part without the written consent of Canon Inc except in the case of internal business use Copyright...

Page 5: ...ded Part 3 Operation This section explains how to operate the unit properly Operation procedures for service modes are explained Part 4 Troubleshooting This section explains how to find out possible causes of troubles and units parts to be replaced It is divided into two parts troubleshooting by error indications and by symptoms Part 5 Appendix This section includes block diagrams of the unit and ...

Page 6: ...E LIST Part 2 Maintenance 2 1 1 REGULAR REPLACEMENT AND MAINTENANCE 2 1 1 1 Parts for Regular Replacement 2 1 1 2 Periodic Maintenance 2 2 2 DISASSEMBLY REASSEMBLY 2 2 2 1 List of Tools 2 3 2 2 Disassembly Reassembly Precautions 2 3 2 2 1 Ink stain precautions ink path ink mist 2 4 2 2 2 Static electricity damage prevention 2 5 2 2 3 Transportation precautions 2 5 2 2 4 Spur deformation precaution...

Page 7: ... 1 3 BJ status monitor 3 5 1 2 Operations from the Computer 3 5 1 2 1 Function settings using the printer driver 3 6 1 3 Operations from the Printer 3 6 1 3 1 Cleaning 3 6 1 3 2 Nozzle check pattern print 3 6 1 3 3 Roller cleaning 3 8 2 SERVICE FUNCTIONS 3 8 2 1 Service Mode Operations 3 9 2 2 Service Factory Test Print 3 10 2 3 EEPROM Information Print 3 11 2 4 Resetting the EEPROM 3 11 2 5 Model...

Page 8: ... USB interface 5 9 1 3 4 Automatic interface switching function 5 9 1 3 5 Detection functions with sensors 5 10 1 4 About the BJ Cartridge 5 10 1 4 1 BJ cartridge structure 5 10 1 4 2 BJ cartridge print drive control 5 10 1 4 3 BJ cartridge identification 5 11 1 4 4 List of printing modes 5 12 1 5 About the Scanner Cartridge 5 12 1 5 1 Scanner block diagram and the data flow 5 13 1 5 2 Scan modes ...

Page 9: ... 9 Figure 2 10 Position of Spurs in the Spur Base Unit Bottom View 2 10 Figure 2 11 Removing the ASF Unit 2 10 Figure 2 12 Head Gap Adjustment Board 2 11 Figure 2 13 Grease Application Points 2 13 Figure 2 14 Print Position Adjustment Patterns 2 14 Figure 2 15 Carriage Belt Tension Adjustment 2 15 Figure 2 16 ASF Drive Gear Initial Position 2 15 Figure 2 17 ASF Gear Initial Position Adjustment 2 1...

Page 10: ... 7 USB Data Transfer 5 8 Figure 5 8 NRZI 5 9 Figure 5 9 Sensor Positions 5 10 Figure 5 10 Nozzle Arrangement 5 12 Figure 5 11 Scanner Block Diagram 5 15 Figure 5 12 Control Board 5 15 Figure 5 13 Printer Diagram 5 19 Figure 5 14 Carriage Board 5 20 Figure 5 15 BJ Cartridge 5 21 Figure 5 16 Scanner Cartridge 5 22 Figure 5 17 AC Adapter 5 22 Figure 5 18 DC Power Supply Cable 5 23 Figure 5 19 Carriag...

Page 11: ...ion 3 2 TABLE 3 1 STATUS INDICATIONS BY THE LED Part 4 Troubleshooting 4 4 TABLE 4 1 ERROR DISPLAY Part 5 Appendix 5 4 TABLE 5 1 INK CONSUMPTION AMOUNT DURING CLEANING REFERENCE 5 11 TABLE 5 2 LIST OF PRINTING MODES 5 13 TABLE 5 3 SCAN MODES 5 14 TABLE 5 4 SCANNING TIME AND DATA SIZE REFERENCE VII ...

Page 12: ...VIII This page intentionally left blank ...

Page 13: ...ns 1 5 2 3 BJ Cartridge Specifications 1 6 2 4 Scanner Cartridge Specifications 1 7 2 5 Interface Specifications 1 8 2 6 Printer Scanner Driver Types 1 9 3 PRINTER PACKING 1 10 4 INSTALLATION 1 10 4 1 Installation Location 1 10 4 2 Setup Procedures 1 11 5 NAME OF THE PARTS AND THEIR FUNCTIONS 1 12 6 PRODUCT CODE LIST Part 1 PRODUCT SPECIFICATIONS ...

Page 14: ......

Page 15: ...ieved by separating the BJ cartridges and ink tanks realizing separate ink tanks for all colors 1 1 BJC 3000 Part 1 Product Specifications Product Specificatons Operation Panel Front Cover Paper Output Tray Paper Selector Lever Auto Sheet Feeder Cartridge Container BJ Cartridges Black optional Color optional Photo optional Scanner Cartridge Paper Support Paper Guide USB Interface Connection Parall...

Page 16: ... nozzles Bk C M Y 48 nozzles 4 in a vertical line Separate ink tanks for all colors Pigment Black Cyan Magenta and Yellow Photo Color BJ Cartridge 192 nozzles PBk PC PM Y 48 nozzles 4 in a optional vertical line Separate ink tanks for all colors Dye Photo Black Photo Cyan Photo Magenta and Yellow 2 Ink out detection function with both optical and dot count methods transparent ink tanks enable visi...

Page 17: ... functions Presence of BJ cartridge Available BJ cartridge distinction Available Ink out Available Print position None Paper out Available Waste ink amount Available Paper width None Operation noise Approx 45dB A in conformance to the sound pressure level ISO 9296 Environmental During operation Temperature 5 C to 35 C 41 F to 95 F conditions Humidity 10 to 90 RH no condensation Non operation Tempe...

Page 18: ...h resolution paper HR 101 A4 LTR 10mm or less Up Glossy photo paper GP 301 A4 LTR 10 pages Up Glossy film HG 201 A4 LTR 1 page Up OHP film CF 102 A4 LTR 30 pages or less Up Back print film BF 102 A4 LTR 10 pages or less Up Banner paper BP 101 A4 LTR 1 page Down T shirt transfers TR 201 A4 LTR 1 page Down Glossy postcard FM 101 120mm 216mm 1 page Up Envelopes COM 10 241mm 105mm 10 pages or less Dow...

Page 19: ...t ink tank 72g without ink tanks 75g without ink tanks Service life Approx 5 000 pages Approx 3 000 pages Printable pages Approx 500 pages Approx 300 pages pages cartridge standard 1 500 characters 7 5 duty per color print in black as determined with the printable area of A4 paper 1 5 BJC 3000 Part 1 Product Specifications Product Specificatons Recommended print area Printable area 1 Printing with...

Page 20: ...25 mm or less 2 4 1 Scannable area For scanning be sure to use the scanning holder to avoid paper jams Place the image to scan in the scanning holder with the upper left corner fitted to the placement point Paper Size width height mm Scannable area width height mm Postcard 100 0 148 0 93 2 138 0 A5 148 0 210 0 141 2 200 0 B5 182 0 257 0 175 2 247 0 A4 210 0 297 0 203 2 287 0 Letter 215 9 279 4 8 5...

Page 21: ...RS AND PIN LAYOUT Page 5 15 for details 2 5 2 Serial interface 1 Interface type USB Interface Universal Serial Bus USB Specification Release Number 1 10 2 Data transfer Control transfer method Bulk transfer method 3 Signal voltage level Input Input difference sensitivity 0 2V Max Common mode difference 0 8V to 2 5V Output Static output high 2 8V to 3 6V Static output low less than 0 3V 4 Input out...

Page 22: ...sh fully fully supported supported Support for USB is provided and the operation is guaranteed with Windows 98 preinstalled computers Supported by iMac and Power Macintosh G3 Mac OS 8 1 installed iMac is necessary to be upgraded by iMac Update 1 0 for full support of USB Common driver for Windows 95 98 NT 4 0 1 Windows Drivers Win95 98 BJ Raster Printer Driver IEEE 1284 compatible 8 bit parallel U...

Page 23: ...he items below are included 1 9 BJC 3000 Part 1 Product Specifications Product Specificatons Printer BJ Cartridge Container BJ Cartridge Documentation Power Cord Ink Tanks Packing Packing Tape Documentation Paper Output Tray Tape Tape Tape Figure 1 4 Packing ...

Page 24: ...nter and the computer are turned off 2 Connect the interface cable to the interface connector on the printer and lock in place with the connector clips 3 Connect the other end of the interface cable to a computer and secure in place 4 2 2 Connecting the power 1 Connect the AC power plug to the AC outlet 2 Press the POWER button on the printer to turn it on Initialization will be carried out while ...

Page 25: ...cifications Product Specificatons 5 NAME OF THE PARTS AND THEIR FUNCTIONS The different parts of the printer and their functions are shown below Figure 1 6 Name of the Parts and Their Functions Approx 418 mm Approx 480mm Approx 243 mm ...

Page 26: ...171 Cyan BCI 3C F47 2181 Magenta BCI 3M F47 2191 Yellow BCI 3Y F47 2201 Photo Black BCI 3PBK Photo F47 2231 Photo Cyan BCI 3PC Photo F47 2211 Photo Magenta BCI 3PM Photo F47 2221 Cartridge container SB 30 Q70 4040 Scanner cartridge IS 32 Q70 4070 Scanning holder for A4 LTR Scanning Holder SH 101 Q70 3640 White Calibration sheet Packed with BJC 3000 are the BC 33 BCI 3BK BCI 3C BCI 3M BCI 3Y SB 30 ...

Page 27: ...of Tools 2 3 2 2 Disassembly Reassembly Precautions 2 7 2 3 Disassembling and Reassembling the Printer 2 11 2 4 Grease Application 2 12 2 5 Adjustments and Settings after Disassembly Reassembly 2 18 3 VERIFYING OPERATIONS AFTER DISASSEMBLY REASSEMBLY 2 18 3 1 Methods 2 19 4 TRANSPORTING THE PRINTER 2 19 4 1 Preparation for Transportation Part 2 MAINTENANCE ...

Page 28: ......

Page 29: ...dge BC 30 Color BJ Cartridge BC 33 Photo BJ Cartridge BC 34Photo Black BJ Cartridge ink tank Black BCI 3BK Color BJ Cartridge ink tank Black BCI 3BK Cyan BCI 3C Magenta BCI 3M Yellow BCI 3Y Photo BJ Cartridge ink tank Black BCI 3BK Photo Cyan BCI 3C Photo Magenta BCI 3M Photo Yellow BCI 3Y Service Personnel None 1 2 Periodic Maintenance Level Periodic Maintenance User None Service Personnel None ...

Page 30: ...l springs Tweezers For installing and removing flexible cables Flat brush For applying grease Multi meter For troubleshooting Special Tools Parts Number Use Gap gauge 2 3mm QY9 0054 000 For adjusting the head gap see Page 2 10 Figure 2 12 Qty 1 Tension spring QY9 0043 000 For adjusting the carriage belt tension see Page 2 14 Figure 2 15 Grease MOLYKOTE PG 641 CK 0562 000 For application to the spe...

Page 31: ...ack ink Glycerin 56 81 5 diethyleneglycol 111 46 6 Yellow ink Glycerin 56 81 5 isopropyl alcohol 67 63 0 Cyan Magenta Photo cyan Photo Magenta Photo black inks Glycerin 56 81 5 isopropyl alcohol 67 63 0 ethyleneglycol 107 21 1 diethyleneglycol 111 46 6 Do not get ink in your eyes and mouth If any ink gets in your eyes wash with plenty of water and consult a doctor immediately If a large amount of ...

Page 32: ...er As ink mist can contaminate printing paper and during servicing hands and clothing clean any contaminated parts with soft moist cloth 2 2 2 Static electricity damage prevention The static charge that accumulates from clothing etc can damage or change the electrical characteristics of electrical components Never touch the electrical contact sections of the ink sensor and BJ cartridge Part 2 Main...

Page 33: ...not deform the tips of the spurs The spurs come into contact with the paper after printing As the actual contact surface is small any ink adhering to the spurs is minute and wiped off by the spur cleaners and is not enough to contaminate the paper However if the spurs are deformed their contact surface with the paper increases causing more ink to adhere to each spur Since the spur cleaner is unabl...

Page 34: ...ularly the feed drive gear and the feed roller gear during disassembly reassembly Even a minute scratch on the gears may result in irregular paper feed during high resolution printing Part 2 Maintenance BJC 3000 2 6 Figure 2 5 Feed Gear Section Precautions Feed Roller Gear Feed Drive Gear ...

Page 35: ...he carriage will be unlocked However when the printer does not operate properly it may be necessary to unlock the carriage manually The carriage lock can be released by removing the cartridge and while pressing the lever of the purge unit moving the carriage toward the left 2 3 2 Removing tap screws The printer unit and the base are attached with tap screws Mold scrap from the tapping process may ...

Page 36: ...the printer unit Procedures to remove the printer unit are shown below 1 Remove the screws which fasten the printer unit to the bottom case 2 Release the 2 claws on the bottom case on the back side of the printer unit Arrows 1 and 2 3 Holding the handles on both sides of the printer shift and raise the printer unit as by Arrow 3 Part 2 Maintenance BJC 3000 2 8 2 1 Figure 2 7 Reattaching and Removi...

Page 37: ...f the printer 2 3 6 Position of spurs in the spur base unit The positions of spurs on the spur base unit are shown below seen from the bottom from which the spurs will be re installed Re install the spurs in the correct position if they are accidentally dislocated 2 9 BJC 3000 Part 2 Maintenance Maintenance Figure 2 9 Removing the Pressure Roller Unit Figure 2 10 Position of Spurs in the Spur Base...

Page 38: ...oards are fixed to the printer frame and adjust the head gap between the nozzle head of the BJ cartridge and the platen to ensure high printing quality When the fixing screws attaching the head gap adjustment boards to the printer frame have been loosened it is necessary to adjust the head gap The fixing screws are painted red so that they are not loosened by mistake If the screws are loosened by ...

Page 39: ...s not contact the wiper or the head cap Figure 2 13 Grease Application Points CAUTION Carriage Shaft Sliding Surface apply the proper amount of grease so as not to drop Approx 200mg Molykote PG 641 Carriage Guide Frame Back Surface apply a thin coat of grease over the entire surface Approx 200mg Molykote PG 641 Feed Roller Sliding Surface 3 locations at the back of the platen Approx 14mg each Moly...

Page 40: ...ervice Personnel level Required when Reinstalling the ASF Reinstalling the idler pulley Replacing the logic board and the waste ink absorber Removing and replacing parts related to the carriage Loosening the screws fixing the head to paper distance Adjustment Points Initial positions of the ASF gear and the purge unit Belt tension EEPROM setting BJ cartridge print position adjustment Head gap Time...

Page 41: ...dge is installed Set a sheet of A4 LTR sized plain paper and perform the head position adjustment pattern in Test print in the printer driver s Maintenance Be sure to set A4 LTR sized paper in the ASF before printing the head position adjustment pattern Using printing paper smaller than the printing area of the data when performing the head position adjustment print will contaminate the platen wit...

Page 42: ...Reset the EEPROM s total waste ink amount to zero After the EEPROM is reset the data it contained cannot be confirmed with the test printout Be sure to check the stored data before resetting the EEPROM When the stored data is reset the various settings such as the total count of sheets passed and the total waste ink amount will be reset however the model setting will remain Data on the EEPROM befo...

Page 43: ...ion stops To confirm the position gently move the ASF drive gear vertically with your fingers Make sure that the gear is at the position where click can be felt 3 If the gear has passed the click position rotate the gear in the arrow s direction to return to the correct position Adjustment Procedures 1 Rotate the pick up roller to place the ASF unit s cam and the mark in the position shown in Figu...

Page 44: ... reinstall the bottom case 3 Loosen the red fixing screws on both sides of the printer chassis by a half turn from the fixed position 4 Lower the paper selector lever to the thick paper position Make sure that the gap gauge is not deformed and no foreign matter is attached to the gap gauge or the platen before performing the adjustment Part 2 Maintenance BJC 3000 2 16 CAUTION Figure 2 18 Head Gap ...

Page 45: ...lign the left edge of the carriage with the edge of the ink sensor s cover 9 Install a black BJ cartridge with no ink tank in the carriage 10 Move the paper selector lever up and down 2 or 3 times and then with the lever raised in the plain paper position tighten the left fixing screw 11 Remove the black BJ cartridge 12 Loosen the right fixing screw by a half turn and execute procedures 1 through ...

Page 46: ...nk absorber have been replaced the following confirmations must be made in addition Replacement of the Control Board ROM version machine name is to be correct on the service factory test printout and the amount of sheets passed and the total waste ink absorbed are to be cleared The nozzle check pattern can be printed using the printer driver Replacement of the Waste Ink Absorber Total amount of th...

Page 47: ...e power is turned on The carriage will move to the cartridge replacement position 2 Remove the cartridge from the carriage and put it in the container 3 Turn off the printer by pressing the POWER button 4 Disconnect the interface cable 5 Remove the AC power plug from the outlet 6 Fix the carriage in the cartridge replacement position with tapes Fix the cartridge lock lever with tapes as well 7 Clo...

Page 48: ...Part 2 Maintenance BJC 3000 2 20 This page intentionally left blank ...

Page 49: ...puter 3 6 1 3 Operations from the Printer 3 8 2 SERVICE FUNCTIONS 3 8 2 1 Service Mode Operations 3 9 2 2 Service Factory Test Print 3 10 2 3 EEPROM Information Print 3 11 2 4 Resetting the EEPROM 3 11 2 5 Model Settings with EEPROM 3 11 2 6 Ink Presence Check 3 11 2 7 Power Off Carriage Lock Part 3 OPERATION ...

Page 50: ......

Page 51: ...omputer and operation from the printer itself 1 1 Status Indications The indicator shows the status of the printer In particular errors are indicated on the printer itself by the combination of blinks in orange and in green 3 1 BJC 3000 Part 3 Operation Operation g POWER Button Indicator RESUME Button Figure 3 1 Operation Panel ...

Page 52: ...age 4 14 Mis installed Cartridge error 5 times in orange Page 4 15 No cartridge error 6 times in orange Page 4 15 Cartridge error 7 times in orange Page 4 15 Waste ink warning 8 times in orange Page 4 5 Unrecoverable by Users ROM error 1 time in orange green Page 4 5 RAM error 2 times in orange green Page 4 5 EEPROM error 3 times in orange green 6800 Page 4 5 Home position error 4 times in orange ...

Page 53: ...sensor broken circuit or the home position of the carriage cannot be detected 12 Temperature sensor error The temperature sensor on the control board TH501 is irregular broken circuit etc 13 Waste ink full error The total waste ink amount stored in EEPROM exceeds the defined capacity 100 14 Head temperature error The temperature in the BJ cartridge is irregular This error invariably occurs before ...

Page 54: ...imple recovery methods 3 Displays the type of BJ cartridge installed and ink out warnings with names and icons 4 Cancels the printjob in progress 2 Items Indicated on the BJ Status Monitor 1 Printer name 2 Document name 3 Status Error codes and simple measures also appears during error 4 Printout starting date and time 5 Progress status 6 Number of pages printed 7 Cancel printout 8 Installed cartr...

Page 55: ...pecial menu user specific and service modes Selecting Custom Setting while pressing the Shift key will display the user specific special menu Economy cleaning disabled by default Disables the cleaning operations performed during the initial power on after the AC power input This reduces the amount of ink consumed during service or when the printer is connected to the computer s interlocking power ...

Page 56: ...ck pattern print While the power is turned on press and hold the RESUME button and release it after the green indicator has blinked twice to execute the nozzle check pattern print In the event that print defects appear perform cleaning operations on the BJ cartridge If print quality does not improve even after the cartridge is cleaned five times replace the BJ cartridge The nozzle check pattern pr...

Page 57: ...ted with the first nozzle Printed with the 48th nozzle 180 dpi bi directional 360 dpi bi directional Small drop Large drop Yellow 48th nozzle Magenta 48th nozzle Cyan 48th nozzle Black 48th nozzle Figure 3 4 Nozzle Check Pattern Print Color Sample ...

Page 58: ...l settings 3 times Lights in Orange Waste ink counter reset 4 times Lights in Green Model setting for details see below 5 times Lights in Orange Ink presence check Readout data print 6 times Lights in Orange Power off carriage lock or more 4 Execute the function you have selected by pressing the POWER button The indicator will light in green and the operation will be executed The printer will turn...

Page 59: ...the EEPROM is reset Also it cannot be overwritten with any value 3 9 BJC 3000 Part 3 Operation Operation g Installed cartridge Model name Total number of pages passed with the Color BJ cartridge ROM version Total number of pages passed with the Photo BJ cartridge Total waste ink amount the amount of ink absorbed by the waste ink absorber in Serial number when using USB Not used Total number of pag...

Page 60: ...ge displaced error 5600 35 36 30 30 Ink sensor error 35 39 31 30 ASF sensor error 5700 35 37 30 30 0 1 2 3 4 5 6 7 8 9 A B C D E F 20 03 0B 00 02 06 00 00 80 BA 0B 00 00 00 00 00 C8 AE 11 09 78 8F 07 23 18 BD D2 20 D2 C4 52 20 00 00 00 00 00 00 00 00 00 00 00 00 00 00 00 00 00 00 00 00 00 00 00 00 00 01 00 00 02 00 00 00 00 00 00 00 92 00 00 00 C8 00 00 00 C4 04 00 00 B8 07 00 00 11 00 00 00 00 00...

Page 61: ...pond with the machine After setting the model perform the service factory test print to confirm the settings 2 6 Ink Presence Check The printer will scan the carriage to detect the amount of ink remaining in the ink tank and print the result The operation of the ink sensor can be verified with this function 1 Install an empty ink tank into the BJ cartridge 2 Using the Ink Presence Check function p...

Page 62: ...Part 3 Operation BJC 3000 3 12 This page intentionally left blank ...

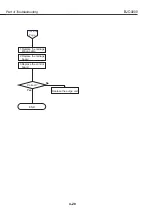
Page 63: ... ERROR INDICATIONS 4 1 1 1 Initial Flow Chart 4 4 1 2 List of Errors Indicator error codes 4 5 1 3 Troubleshooting by Error Indications 4 17 2 TROUBLESHOOTING BY SYMPTOMS 4 17 2 1 Troubleshooting by Symptoms Part 4 TROUBLESHOOTING ...

Page 64: ......

Page 65: ...roubleshhotin Connect the AC power Power on EEPROM read DRAM check ROM check MPU and printer controller initial check Ink sensor check waste ink check temperature sensor TH501 check Power input Power on with the POWER button Indicator blinks Next Page Ink sensor error error not displayed see Page 4 4 ...

Page 66: ...r inside the printer Head temperature sensor check Home position error Head temperature sensor error seven orange green blinks and one long green blink repeated see Page 4 4 five orange green blinks and one long green blink repeated see Page 4 4 six orange green blinks and one long green blink repeated see Page 4 4 two orange blinks with an interval repeated see Page 4 4 one orange blink with an i...

Page 67: ...see Page 4 4 BJ The open close status of the front cover will be detected BJ cartridge check Yes No OK Cleaning five orange blinks one long green blink repeated see Page 4 4 six orange blinks one long green blink repeated see Page 4 4 Misinstalled cartridge error No cartridge error Previous Page ASF sensor check Yes No OK on ten orange green blinks and one long green blink repeated see Page 4 4 AS...

Page 68: ... in orange Page 4 15 Waste ink warning 8 times in orange Page 4 5 Unrecoverable by Users ROM error 1 time in orange green Page 4 5 RAM error 2 times in orange green Page 4 5 EEPROM error 3 times in orange green 6800 Page 4 5 Home position error 4 times in orange green 5100 Page 4 6 Temperature sensor error 5 times in orange green 5400 Page 4 5 Waste ink full error 6 times in orange green 5B00 Page...

Page 69: ...er Measures Replace the control board In the event of ROM or RAM errors errors may not be properly displayed Cause Thermistor is abnormal Suspected Parts Thermistor Measures Replace the control board Cause The waste ink absorber s estimated waste ink amount has reached 100 or 95 Suspected Parts Waste ink absorber control board Measures 1 Reset the EEPROM and replace the waste ink absorber 2 Replac...

Page 70: ...the cover opened Carriage motor check CN402 Pin No 1 3 2 4 Measuring points Normal Reading Approx 3 3 Next Page Go to Page 4 8 1 Check for paper jams wear deterioration dislocation of the carriage belt deformation of the carriage guide frame scratching bending of the guide shaft etc Move the carriage manually and check that it moves smoothly and there is no abnormal noise or there is no major dama...

Page 71: ...iage ribbon cable Released 1 Replace the purge unit Replace the paper feed motor Visually check that the carriage lock is released Visual check of the paper feed section s operation Previous Page Paper feed motor check Yes No OK Go to Page 4 8 1 CN403 Pin No 1 3 2 4 Measuring points Normal Reading Approx 2 4 Disconnect the paper feed motor cable to check 1 4 ...

Page 72: ...Part 4 Troubleshooting BJC 3000 4 8 1 Replace the control board Replace the AC adapter Yes No OK 24V output check Check for 24V output during operation CN401 Replace the DC cable GND GND 5V 24V ...

Page 73: ...000 Part 4 Troubleshooting Troubleshhotin 7 HeadTemperature Error HeadTemperature SensorError Yes No Error displayed The temperature of the BJ cartridge head may be too high 2 Replace the control board Power on Leave for a few minutes with power turned off Visual check of the ink tank Yes No Ink present Is printing being conducted with an empty ink tank END 1 Replace the BJ cartridge Replace the i...

Page 74: ...dge replacement position Suspected Parts Cartridge control board carriage board carriage ribbon cable Measures 8 Cartridge Displaced Error Reinstall the cartridge END Yes No Error displayed 2 Replace the control board 3 Replace the carriage ribbon cable 4 Replace the carriage board 1 Replace the cartridge ...

Page 75: ...Sensor Error required Yes No OK Replace the pick up roller ASF gear position adjustment Yes No END Error recurred ASF gear adjustment properly executed Remove the ASF gear and re execute the adjustment 2 Replace the control board 1 Replace the purge unit Check for any cracks or chips on the pick up roller sensor flag Visually check pick up roller See Part 2 2 5 5 When the ASF gear initial position...

Page 76: ...e 1 4 Check for any abnormal contamination wear deterioration of the pick up roller s rubber ring or separation sheet cam dislocation gear deformation or damage mylar damage etc Repair replace faulty parts Power on with the cover opened No Yes No Correct Auto sheet feeder unit check Paper feed check Check for the proper paper feed from the auto sheet feeder when the pick up roller rotates Yes Corr...

Page 77: ...d Measuring points IC201 Pin No 203 Normal Reading Low level with paper High level without paper Replace paper end sensor arm Visual check of the ASF drive gear parts in the purge unit Yes No Correct Replace the purge unit ASF gear position adjustment See Part 2 2 5 5 When the ASF gear initial position adjustment is required Page 2 15 Check for any gear dislocation missing cogs parts damage and de...

Page 78: ...asures Part 4 Troubleshooting BJC 3000 4 14 Replace the ink sensor Visually check the ink tank installation Yes No Correct Install the ink tank Visually check the ink tank Yes No Any ink Replace the ink tank Is the ink tank empty Replace the control board 11 Ink Out Error ...

Page 79: ...tter on the contact section Cartridge lock lever is in the locking position No scratch or damage of the carriage ribbon cable etc Visually check the cartridge installation Yes No Correct 1 Replace the control board Repair replace the appropriate parts Replace the cartridge Reinstall the cartridge Yes No 2 Replace the carriage ribbon cable 3 Replace the carriage board END Error recurred Yes No END ...

Page 80: ...print Measures Part 4 Troubleshooting BJC 3000 4 16 Yes No Error recurred Turn the printer off and on again away from strong light sunlight Pin No 2 3 1 2 Measuring points Normal Reading Approx 1 2 V Approx 0V Ink sensor check Yes No Correct Replace the ink sensor END Power the printer off on Visual check Ink tank present Ink tank dislocated If so install it properly Replace the control board 1 3 ...

Page 81: ... does not perform initialization even when the POWER button is pressed Cause Faulty AC adapter control board or DC cable Measures 4 17 BJC 3000 Part 4 Troubleshooting Troubleshhotin 1 The Power Does Not Turn On Check the AC adapter output voltage 5V 24V Yes No Correct Replace the AC adapter Replace the DC cable Replace the control board 5V 24V GND ...

Page 82: ...Troubleshooting BJC 3000 4 18 2 Faulty Printing No Printing Yes No Replace the purge unit 2 Replace the BJ cartridge Cleaning Nozzle check pattern Print defects Yes No Any defects Recurrence END END Execute cleaning five times See Part 3 1 3 2 Nozzle check pattern print Page 3 6 Visual check Check that the orange cap or tape is not on the BJ cartridge head 1 Replace the appropriate ink tank ...

Page 83: ...rd carriage board faulty ink tank Measures 4 19 BJC 3000 Part 4 Troubleshooting Troubleshhotin Yes No 2 Replace the BJ cartridge Cleaning Nozzle check pattern Print defects Yes No Problem recurrence END Next Page Execute cleaning five times See Part 3 1 3 2 Nozzle check pattern print Page 3 6 1 Replace the appropriate ink tank END 3 Faulty Printing Blank Lines Appear ...

Page 84: ...Part 4 Troubleshooting BJC 3000 4 20 1 Replace the carriage ribbon cable 2 Replace the carriage board Yes No END Correct 3 Replace the control board Previous Page Replace the purge unit ...

Page 85: ...time it reaches the platen The spur tips are deformed The paper selector lever is not set in the appropriate position Check for misalignment in the nozzle check pattern print Grease application on the guide shaft Carriage motor status Measures Clean with a soft moist cloth Disassemble and clean the paper feed section with a soft moist cloth Pass a few sheets Replace the spur unit Set the lever to ...

Page 86: ...o Correct Replace the ink sensor No Yes Correct Replace the BJ cartridge END No ink tank or ink tank is dislocated or empty Is there an ink tank Is it dislocated Is there ink Is there a problem with the ink tank Replace the BJ cartridge with the correct one Pin No 2 3 1 2 Measuring points Normal Reading Approx 1 2V Approx 0V Replace the control board Problem END 1 3 5 No Error Indication When Ther...

Page 87: ... 1 4 About the BJ Cartridge 5 12 1 5 About the Scanner Cartridge 5 15 2 CONNECTORS AND PIN LAYOUT 5 15 2 1 Control Board 5 19 2 2 Carriage Board 5 20 2 3 BJ Cartridge 5 21 2 4 Scanner Cartridge Optional 5 22 2 5 AC Adapter 5 22 2 6 DC Power Supply Cable 5 23 2 7 Carriage Motor 5 23 2 8 Paper Feed Motor 5 23 2 9 Ink Sensor Part 5 APPENDIX ...

Page 88: ......

Page 89: ...r type be selected with a mechanical paper selection lever etc When the paper is sensed by the photo interrupter type paper end sensor it is fed automatically by the paper feed roller until it reaches the print start position on the platen During printing the paper is fed by the rotation of the paper feed roller After printing the paper is delivered by the eject roller 5 1 BJC 3000 Part 5 Appendix...

Page 90: ... feed roller When printing on resilient paper like envelopes as the paper is stiffer than the return force of the paper separator s spring the paper separator is pressed down to feed the paper b Paper feed section Paper feeding during printing is controlled by the rotation of the paper feed roller Paper is fed in increments of 1 720 inch Between the pressure roller paper feed roller and the spurs ...

Page 91: ...below this function will move the paper automatically to the correct print start position a When the paper end sensor does not detect the paper until the pick up roller has been rotated more than the prescribed number of pulses the printer will determine that the paper is not at the correct print start position In this case the rotation of the paper feed roller is reversed to perform the form alig...

Page 92: ...onnected capped Approx 0 16g When powered on the first time after AC power is connected uncapped Approx 0 32g When the dot count exceeds the specified amount Approx 0 16g When the power is turned on after more than 72 hours since the last cleaning Approx 0 16g When cleaning is executed by button operation Approx 0 16g At BJ cartridge replacement Approx 0 32g At ink tank replacement Approx 0 32g Wh...

Page 93: ... Photo BJ cartridge cap side Reverse direction of paper feed the purge drive gear rotates clockwise for suction on the Black BJ cartridge cap side b Capping unit Two caps are provided for use according to the type of BJ cartridge installed in the carriage Facing the purge unit the left cap is for the Color Photo BJ cartridges and the right cap is for the Black BJ cartridge The capping unit is conn...

Page 94: ...operations When the carriage moves from left to right the carriage moves the purge unit s wiper flag and while raising and setting the wiper caps the cartridge When the carriage moves from right to left the wiper wipes after which the carriage moves the wiper release unit to unlock the wiper latch and the wiper is lowered ...

Page 95: ......

Page 96: ... packet which indicates the status of the flow control A token packet is composed of a PID an address field which can specify up to 128 addresses an ENDP endpoint field and a CRC Inside a data packet are a PID data field CRC and EOP Only a PID is present inside the handshake packet Encoding Decoding the Data In USB data transfer lines are ultimately encoded with NRZI Non Return to Zero Invert meth...

Page 97: ... sensors as shown below The home position sensor has two functions it also operates as the purge sensor to detect the operation of the purge unit The home position sensor senses the home position edge and detects the carriage position After the edge is detected the carriage moves to the right a specified number pulses to identify the home position Also at the capping position it works as a purge s...

Page 98: ...ter provides the function to detect the both BJ cartridge currently installed and the head rank using five signals HCLK pin 13 HDATA pin 9 HLAT pin 19 HRESET pin 29 and DIR pin28 of the cartridge signal contacts to communicate serially with the bubble jet head unit Depending on the heater property variations of the bubble jet head unit generated in manufacturing all BJ cartridges can be classified...

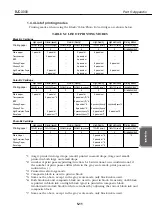
Page 99: ...ion dpi 1 2 2 2 4 2 2 Gradation dot Plain paper 1 pass bi 1 pass bi 2 pass bi 4 pass uni 2 Transparencies 2 pass uni 4 pass uni BPF 4 pass uni Glossy Paper 4 pass uni 8 pass uni 8 pass uni Glossy Film 4 pass uni 8 pass uni High Resolution Paper 2 pass bi 4 pass uni 4 pass uni 4 pass uni Envelope 1 pass uni 4 pass uni 4 pass uni Color BJ Cartridge High speed Normal speed Normal Quality High Quality...

Page 100: ...anner block are shown below in order of data processing 1 LED Illumination Lens LED illumination lens consists of the light source LED and the illumination lens The LED part uses red green and blue LEDs as light sources to illuminate the scanning document Only the green LED is used for monochrome scanning The illumination lens part is a D shaped lens which converges the light from the LED light so...

Page 101: ...56 gradation data converts the output resolution and carries out the edge emphasis function It has a 1 bit 2 gradation image procession function and built in SRAM used for output buffer memory f I F Controller The I F controller controls the serial interface between the scanner cartridge in the carriage and the printer unit Two types of transfer clock 4MHz and 2MHz are supported for the data trans...

Page 102: ...re sampled to be used as a reference in scanning to create the calibration data The scanner driver on the host computer retains the past 5 calibration data samples and saves them in a file When a scanner operation is performed a value from the compiled temperature data that is within 5 C of the printer s internal temperature at present is downloaded to the scanner controller The scanner driver req...

Page 103: ...405 ASF Unit CN2 CN1 CN302 CN301 Paper Feed Motor Paper Feed Roller CN501 CN401 Paper End Sensor Pick up Roller Sensor Paper Feed Drive Switching Unit AC Adapter Temperature Sensor 24V DC Interface Control AC 5V DC Control Unit Indicator Control Button Front Cover Switch Indicator Control Ink Sensor Carriage Unit Parallel USB Mechanical Unit Control Motor control 3 3V DC Home Position Sensor CN3 P...

Page 104: ...FEED XT HostBusy HostAck 15 N C Undefined Undefined 16 GND Gnd Gnd 17 GND Gnd Gnd 18 5 0V Vcc Vcc 19 STROBE RET GND Signal Gnd Signal Gnd 20 DATA1 RET GND Signal Gnd Signal Gnd 21 DATA2 RET GND Signal Gnd Signal Gnd 22 DATA3 RET GND Signal Gnd Signal Gnd 23 DATA4 RET GND Signal Gnd Signal Gnd 24 DATA5 RET GND Signal Gnd Signal Gnd 25 DATA6 RET GND Signal Gnd Signal Gnd 26 DATA7 RET GND Signal Gnd ...

Page 105: ...e Motor Phase A 4 CRB OUT Carriage Motor Phase B Pin No Signal Name IN OUT Function 1 24V IN 24V DC 2 Not used 3 HGND GND 4 5V GND GND 5 5V IN 5VDC Pin No Signal Name IN OUT Function 1 LFA OUT Paper Feed Motor Phase A 2 LFB OUT Paper Feed Motor Phase B 3 LFA OUT Paper Feed Motor Phase A 4 LFB OUT Paper Feed Motor Phase B Pin No Signal Name IN OUT Function 1 PWM1 OUT Ink sensor s photo LED drive si...

Page 106: ...for even nozzle within the head block 16 15 HENB0 OUT Rear heater drive signal for 1 to 168 1 to 112 nozzles within the head 15 16 BENB1 OUT Signal to generate output signal for heater enable decoder 14 17 HENB2 OUT Rear heater drive signal for 169 to 192 113 to 160 nozzles within the head 13 18 HENB1 OUT Front heater drive signal for 1 to 168 1 to 112 nozzles within the head 12 19 DIR OUT Control...

Page 107: ... Carriage Ribbon Cable Connector Refer to Page 5 18 Description of the Carriage Ribbon Cable Pins for CN302 CN3 Cartridge 5 19 BJC 3000 Part 5 Appendix Appendix 1 29 1 29 CN1 CN2 1 3 2 4 33 31 34 32 CN3 Figure 5 14 Carriage Board Pin No Signal Name IN OUT Function 1 32 Refer to Page 5 20 Description of the BJ Cartridge Pins 33 34 N C ...

Page 108: ...ion signal for odd nozzle within the head block 21 EVEN OUT Heater selection signal for even nozzle within the head block 22 BENB0 OUT Signal to generate output signal for heater enable decoder 23 BENB1 OUT Signal to generate output signal for heater enable decoder 24 HENB0 OUT Rear heater drive signal for 1 to 168 1 to 112 nozzles within the head 25 HENB1 OUT Front heater drive signal for 1 to 16...

Page 109: ... LNST N C DT1 DT2 DT3 N C RST DIA DIK IN OUT IN IN OUT IN IN IN OUT IN IN IN IN IN IN IN IN IN IN OUT OUT Function 24V for LED Not used GND Not used GND Serial data of scanned images GND Right clock for internal register setting 5V Serial data clock of scanned images GND Enable signal for internal register setting GND Internal register setup data Scanner cartridge detection and recognition Scan st...

Page 110: ...3 5 6 Figure 5 17 AC Adapter Pin No Signal Name IN OUT Function 1 N C 2 N C 3 24V 24V DC 4 N C 5 5V OUT 5V DC 6 5 GND GND 7 N C 8 HGND GND 3 4 1 2 5 5 1 3 Figure 5 18 DC Power Supply Cable Pin No Signal Name IN OUT Function 1 24V OUT 24V DC 2 3 HGND GND 4 5V GND GND 5 5V OUT 5V DC ...

Page 111: ...age Motor Phase B 1 3 1 3 1 3 Figure 5 21 Ink Sensor Pin No Signal Name IN OUT Function 1 PWM1 IN Ink sensor s photo LED drive voltage 2 GND 3 INKS OUT Voltage value varied by the amount of reflected light 1 4 Figure 5 19 Carriage Motor 1 4 Figure 5 20 Paper Feed Motor Pin No Signal Name IN OUT Function 1 LFA IN Paper Feed Motor Phase A 2 LFB IN Paper Feed Motor Phase B 3 LFA IN Paper Feed Motor P...

Page 112: ...Part 5 Appendix BJC 3000 5 24 This page intentionally left blank ...

Page 113: ... 65 66 67 68 69 70 71 72 73 74 75 76 77 78 79 80 81 82 83 84 85 86 87 88 89 90 91 92 93 94 95 96 97 98 99 100 101 102 103 104 208 207 206 205 204 203 202 201 200 199 198 197 196 195 194 193 192 191 190 189 188 187 186 185 184 183 182 181 180 179 178 177 176 175 174 173 172 171 170 169 168 167 166 165 164 163 162 161 160 159 158 157 156 155 154 153 0 1 1 3 2 1 2 2 3 152 151 150 149 148 147 146 145 ...

Page 114: ...02 C2 02 E2 05 C5 05 D3 02 B2 02 E2 05 D5 05 C3 02 B2 02 E2 05 D5 05 C3 02 B2 02 E2 05 D5 05 C3 02 B2 02 E2 05 D5 05 C3 02 B2 02 D2 05 B3 05 D5 02 E1 02 D2 02 B2 05 B3 05 E5 02 A3 04 A4 05 B6 05 D3 05 E7 02 D2 02 E1 05 D7 05 E3 02 C3 02 E4 05 D7 05 E3 02 C5 04 A4 05 E7 05 B6 05 D3 02 E5 02 F1 02 F2 05 D3 05 C5 02 E4 02 F2 02 E1 05 D3 05 C5 02 E1 02 D2 02 C5 05 B3 05 E5 02 E4 02 E2 05 D3 05 C5 02 E...

Page 115: ...B BK32164S601 FB402 FB404 FB411 FB412 FB413 FB414 FB405 BK32164S601 BK1608HS601 BK1608HS601 BK1608HS601 BK1608HS601 BK1608HS601 BK1608HS601 BK1608HS601 BK1608HS601 BK1608HS601 BK1608HS601 BK1608HS601 R436 R435 R434 R433 R432 R423 R422 1 2 3 4 8 7 6 5 8 7 6 5 8 7 6 5 8 8 8 7 6 5 1 2 3 4 1 2 3 4 1 2 3 4 1 2 3 4 1 2 3 4 5V 5V GND HGND 24V R401 FU401 ZD401 D401 FCC3220202 D1FS4A 0 1A CN401 3 2 1 4 5 2...

Page 116: ...ES SW501 POWER SKQNLA POWER GREEN RESUME ORANGE RESUME SKQNLA FRONT COVER SKHVLH SW502 SW503 1K 1 16W 180 1 10W R502 180 1 10W R520 1K 1 16W R521 1K 1 16W 3 2 1 3 2 1 01 E1 01 C1 04 E4 04 E4 04 E4 01 D1 01 D1 01 C1 PWM1 THERMO 03 B4 04 B5 03 C5 04 A5 02 A6 1 1 2 1 2 1 2 3 5 2 01 A3 01 F3 PD 6 0 0 USB PW C IF PW C SNS PW C1 CVDC PW C SNS PW C1 MOT SET CVDC PW C VHC PW C TH501 FB503 FB502 BK1608HS60...

Page 117: ...5 02 C2 05 C5 02 E2 02 D5 02 C2 05 C5 02 D4 02 E2 02 C2 05 C5 02 D5 02 E2 02 B2 05 D5 02 C2 02 E2 02 B2 05 C5 02 D5 02 E2 02 B2 05 D5 02 D4 02 E2 02 B2 05 D5 02 D5 02 E2 02 B2 05 D5 02 D4 02 E2 02 B2 05 D5 02 D2 02 D4 02 B2 05 D5 02 E2 02 D5 02 B2 05 D5 02 D2 02 C4 02 B2 05 D5 02 D2 02 C5 02 B2 05 D5 02 F6 02 C4 02 A2 05 E5 02 E6 02 C5 02 A2 05 E5 02 E1 02 D2 02 C5 02 B2 05 E5 2 1 2 4 1 3 HPSEN1 H...

Page 118: ......

Page 119: ...PRINTED IN JAPAN IMPRIME AU JAPON CANON INC The printing paper contains 70 waste paper ...

Reviews: