background image

10 of 17

13)

Set the Iris (F-Stop).

Adjust the 

Iris

 (F-Stop)for proper exposure.

•  Zoom Lenses.


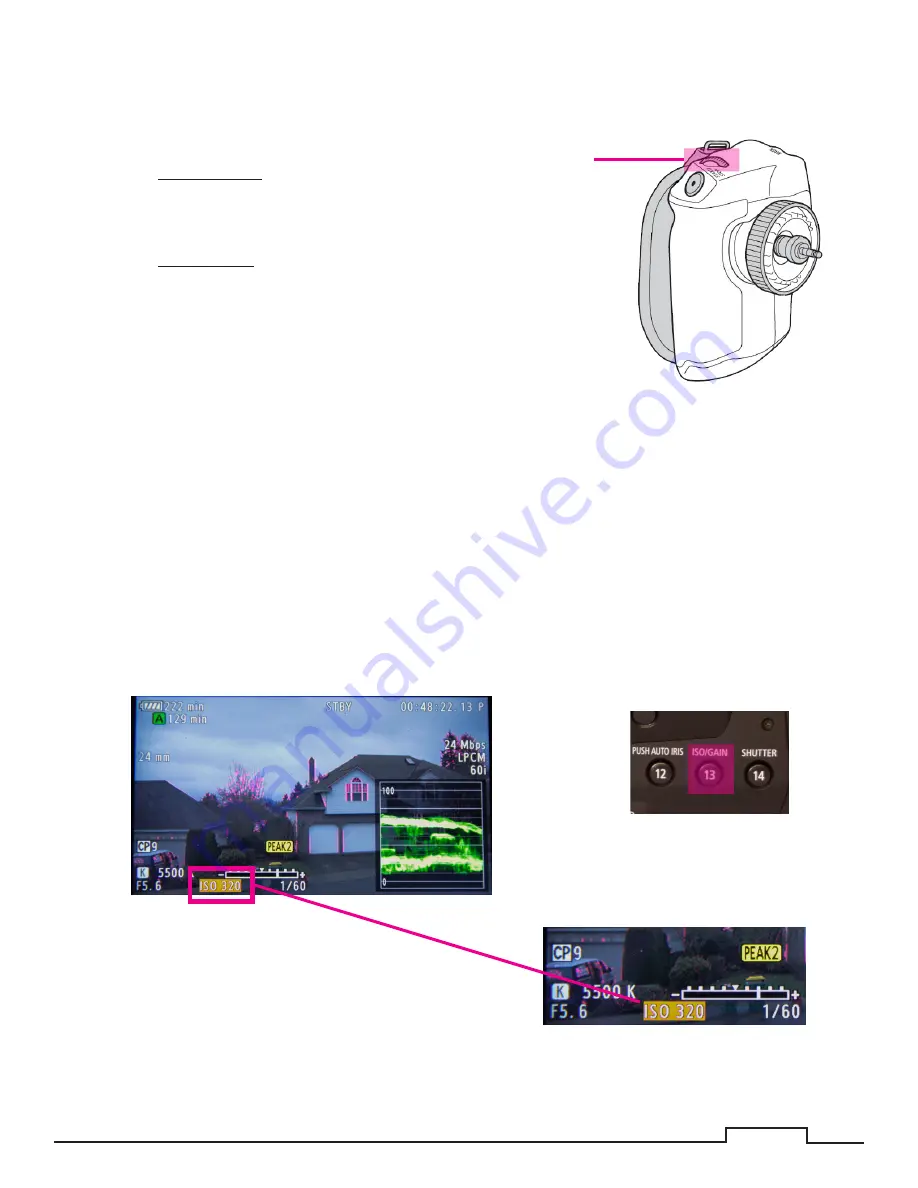
•  Use the Control Dial, located on the 

grip of the camera.


•  Zeiss Lenses.

•  Use the 

IRIS Ring located on the lens

.

Control Dial

Set ISO / Gain (If Needed ).

NOTE: You may need to increase the ISO/Gain which will brighten your scene in low light conditions, 

but it will increase the amount of noise to your video.

1.  Press the 

ISO/GAIN

 (13) button.

2.  Use the Joystick (pushing up / down) to raise or lower the ISO.

Summary of Contents for C-100 MK I

Page 1: ...Community College Video Production Canon C 100 MK I Canon C 100 MK I Student Handout ...

Page 2: ...e AVCHD Codec Records video to standard class 10 or better SD SDHC SDXC memory cards One 32GB card can hold 3hrs record time Two card slots that support continuous relay recording or dual recording Can use a wide range of Canon EF EF S or EF Cinema lenses or Cinema lenses with appropriate adapters Expanded Professional Capabilities include HDMI output with Embedded Time Code Support for External R...

Page 3: ...u feel a click Reverse to remove the memory card NOTE It is recommended to use only class 10 or higher SD cards Faster cards will download to your hard drive faster Insert Battery Insert battery into the slot on the back of the camera The battery contacts are pointed to the left Slide battery to the left The battery will click into place Remove Battery Push the battery release forward Slide the ba...

Page 4: ...ist lens COUNTER CLOCK WISE 3 Remove the lens 4 Install the cover on the camera 5 Install the cover on the back of the lens 3 Zeiss Lens Installation 1 Remove Rear cover on the Lens 2 Line up Red Dots on the Lens Adapter and the camera 3 Insert lens adapter into the camera 4 Twist lens adapter CLOCKWISE until adapter locks into place You ll hear a Click 5 Line up Zeiss lens to the adapter 6 Insert...

Page 5: ...t stops 3 Remove the lens 1 1 2 2 3 Press down and hold Remove the Zeiss adapter from the lens 1 Press downward and continue to hold the release lever located on the lens adapter 2 Twist the lens adapter Clockwise and the lens Counter Clockwise NOTE Removing the adapter can be troublesome as it is tight and awkward to handle ...

Page 6: ...t 5 Press Enter 6 Select your Frame Rate 7 Press Enter 8 Press Menu to exit the Menu 1 6 4 Turn on power Turn power switch to the ON position by sliding the power switch to the right After a few moments the camera with power up Set EF S Lens Setting If using an EF S lens set the EF S lens setting to On 1 Press the Menu button 2 Arrow down to EF S Lens 3 Press Enter 4 Select ON 1 3 6 ...

Page 7: ...lect the microphone inputs from the INT internal microphones to EXT external Select CH 1 CH 2 48v Mic Phantom power to ON if needed to power the micro phone XLR 1 XLR 2 LINE MIC Focus Switch should be set to MF For manual focus This allows the outer ring on the lens to manually control the focus NOTE Auto focus only works on the zoom lenses The Zeiss lenses are only Manually focused Auto Focus Man...

Page 8: ...ecording Frame Rate User Bit Audio Output Channel Audio Level Meter Focus Peaking On Indicator Current F Stop White Balance Icon Icon will change depending on current White Balance settings Kelvin Setting This is the Kelvin setting that the White Balance is currently using ISO Setting Gain Shutter Speed Exposure Bar EF S Setting On Indicator ...

Page 9: ...the Shutter Select Button 2 The Shutter setting will highlight in Orange on the screen 3 Use the Control Dial located on the grip to select disired Shutter setting Shutter Select Button Control Dial Set Custom Picture C7 EOS Std Reproduces the image quality and look high contrast vibrant colors of EOS digital SLR camera with its picture style set to Standard C8 Wide DR Applies a gamma curve with a...

Page 10: ...amera Zeiss Lenses Use the IRIS Ring located on the lens Control Dial Set ISO Gain If Needed NOTE You may need to increase the ISO Gain which will brighten your scene in low light conditions but it will increase the amount of noise to your video 1 Press the ISO GAIN 13 button 2 Use the Joystick pushing up down to raise or lower the ISO ...

Page 11: ... Pressing the ZEBRA button repeatedly will cycle the ZEBRA through its presets OFF ZEBRA1 ZEBRA2 OFF 75 for Caucasian Skin Highlights 100 will show areas that are approaching over exposure and losing detail Wave Form Monitor Use this to graphically view how lit your scene is Blacks Crushed Over Exposed 100 50 0 ...

Page 12: ...tings are user definable allows you to manually set the white balance to a setting between 2 000K and 15 000K is a user definable setting is a second user definable setting 12 of 17 14 Set your White Balance AWB To manually White Balance re ferred as Kelvin Temperature Focus on and fill the screen with a white piece of paper or bounce card in the light at where your subject will be Press the AWB b...

Page 13: ...r audio recording will be distorted 13 of 17 Target Level PEAK LEVEL Audio Control Knobs Ch 1 Ch 2 Optical Image Stabilizer OIS Use the Optical Image Stabilizer OIS to reduce the effects of camera shake when shooting by hand NOTE It is not needed for tripod work Stabilzer On Off 15 Set the Focus Zoom in on the subject as close as possible Adjust the Focus until the subject is in focus by using the...

Page 14: ... Enter 10 Press Menu to exit the Menu 18 19 Set the Audio Input Source The camera audio inputs can be set for Stereo CH1 CH2 Mono CH1 or CH2 Mono with Safety CH1 CH1 or CH2 CH2 1 Press the Menu button 2 Arrow down to Audio Setup 3 Press Enter Push joystick inward 4 Arrow down to Audio Output 5 Press Enter 6 Arrow down to Channel 7 Press Enter 8 Select your Input Choice 9 Press Enter 10 Press Menu ...

Page 15: ...separate hard drive to store the your footage To do this you ether Use the camera as a SD Card reader to transfer your footage Remove the SD Card from the camera and use an external card reader to transfer the footage NOTE If you use this method proceed to step 11 to remove the footage from the SD Card This brings up a problem with the SD Cards and using the computer to delete the files from them ...

Page 16: ...has been saved to your Hard Drive before following these steps will result in the loss of your video footage 14 Select OK on Will completely erase all data from the SD card then press Enter 15 Initializing screen will appear 16 After a few moments Process completed suc cessfully will be displayed 17 Press MENU button to exit the Menu screen LAST CHANCE This is your last chance to make sure that yo...

Page 17: ... Hook up External Microphones pg 7 Settings For The Scene 10 Set Custom Picture pg 9 11 Set ND Filter If Necessary pg 9 12 Set the Shutter pg 9 13 Adjust Iris F Stop pg 10 Set ISO Gain pg 10 Check Zebra Pattern pg 11 Check Wave Form Monitor pg 11 14 Set the White Balance pg 12 15 Focus on subject pg 12 16 Adjust Zoom If Necessary Compose Shot pg 12 17 Adjust AUDIO LEVELS pg 13 18 Set Optical Image...

Reviews: