COPYRIGHT © 1999 CANON INC. CANON CLC1120/1130/1150 REV.0 MAR. 1999 PRINTED IN JAPAN (IMPRIME AU JAPON)
10-31
CHAPTER 10 PAPER DECK
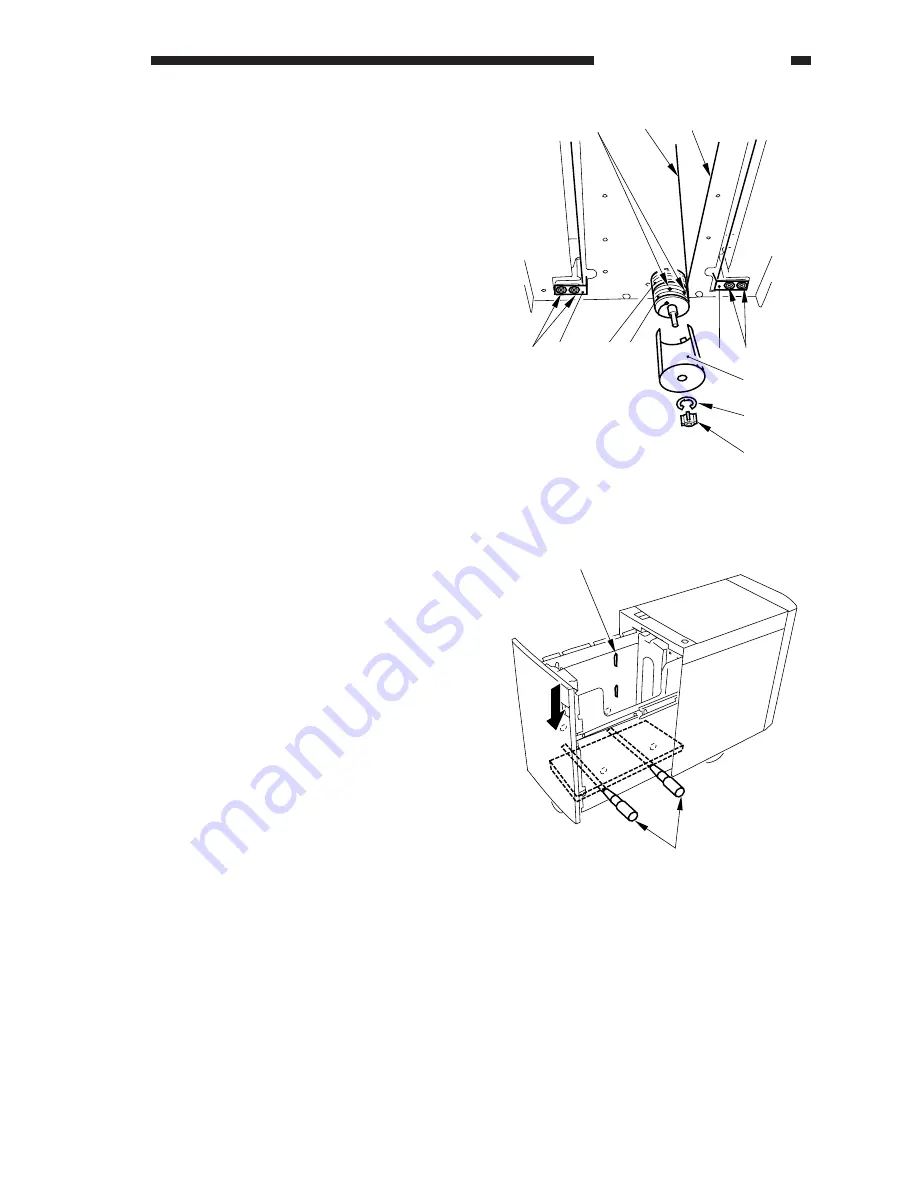
6) Remove the coupling [5] and the E-ring
[6]; then, detach the pulley cover [7].
7) Remove the two screws [8] and the cable
fixing plate [9] on the left side; then,
detach the lifter cable [10] on the outside.
8) Remove the two screws [11] and the cable
fixing plate [12] on the right side; then,
detach the lifter cable [13] on the inside.
9) To remove the lifter cable [13] from the
pulley [14] on the inside, remove the two
set screws [16] of the pulley [15] on the
outside to detach the pulley [15] on the
outside in advance.
Figure 10-330
5. Removing the Lifter Cable (deck
rear)
1) Open the compartment of the deck, and
remove all copy paper.
2) Remove the screw, and detach the paper
rear end guide plate of the compartment.
3) Push the sensor lever [1] of the paper
supply position inside the compartment to
lower the lifter so that the left and right
holes in the compartment side plate and
the left and right holes in the lifter match;
then, insert two long screwdrivers [2]
through the holes. At this time, try
matching the top face of the lifter against
the scribe line on the compartment left
side plate to facilitate the work.
Figure 10-331
[16]
[10]
[13]
[8] [9]
[14] [15]
[12] [11]
[7]
[6]
[5]
[1]
[2]
Summary of Contents for CLC 1120
Page 6: ......
Page 20: ......
Page 22: ......
Page 48: ......
Page 94: ......
Page 96: ......
Page 114: ......
Page 134: ......
Page 136: ......
Page 152: ......
Page 242: ......
Page 346: ......
Page 374: ......
Page 376: ......
Page 412: ......
Page 452: ......
Page 454: ......
Page 517: ......
Page 881: ......
Page 893: ......
Page 895: ......
Page 899: ......


