background image

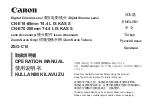
Digital Cinema Lens/

数字电影镜头

/Dijital Sinema Lensi

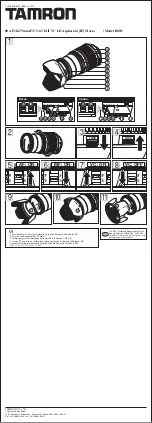
CN-E18-80mm T4.4 L IS KAS S

CN-E70-200mm T4.4 L IS KAS S

取扱説明書

OPERATION MANUAL

使用说明书

KULLANIM KILAVUZU

ご使用の前に必ずこの取扱説明書をお読みください。

なお、取扱説明書は必要に応じてご覧になれるように大切に保管して

ください。

Read this operation manual before using the product.

Keep the manual in place for future reference.

在使用本产品之前, 请务必先仔细阅读本使用说明书。
请务必妥善保管好本书, 以便日后能随时查阅(保留备用)。


请在充分理解内容的基础上, 正确使用。

Ürünü kullanmadan önce bu kullanım kılavuzunu okuyun. 

Daha sonra baş vurabileceğiniz şekilde kılavuzu saklayın.
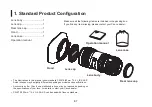
Lens Accessory/

镜头配件

/Lens Aksesuarı

ZSG-C10

Zoom Servo Grip/

伺服变焦手柄

/Zum Servo Tutucu

日本語

ENGLISH

中 文

Türkçe

Русский язык

Қазақша

Summary of Contents for CN-E18-80mm

Page 1: ... ください Read this operation manual before using the product Keep the manual in place for future reference 在使用本产品之前 请务必先仔细阅读本使用说明书 请务必妥善保管好本书 以便日后能随时查阅 保留备用 请在充分理解内容的基础上 正确使用 Ürünü kullanmadan önce bu kullanım kılavuzunu okuyun Daha sonra baş vurabileceğiniz şekilde kılavuzu saklayın Lens Accessory 镜头配件 Lens Aksesuarı ZSG C10 Zoom Servo Grip 伺服变焦手柄 Zum Servo Tutucu 日本語 ENGLISH 中 文 Türkçe Русский язык...

Page 2: ...lains the handling of three following products Refer to the operation manual of the product which you purchased Digital Cinema Lens CN E18 80mm T4 4 L IS KAS S CN E70 200mm T4 4 L IS KAS S Lens Accessory Zoom Servo Grip ZSG C10 ...

Page 3: ...quipment does cause harmful interference to radio or television reception which can be determined by turning the equipment off and on the user is encouraged to try to correct the interference by one or more of the following measures Reorient or relocate the receiving antenna Increase the separation between the equipment and receiver Connect the equipment into an outlet on a circuit different from ...

Page 4: ...equipment EEE Improper handling of this type of waste could have a possible negative impact on the environment and human health due to potentially hazardous substances that are generally associated with EEE At the same time your cooperation in the correct disposal of this product will contribute to the effective usage of natural resources For more information about where you can drop off your wast...

Page 5: ...14 4 Turning on the Power E16 Table of Contents 5 Back Focus Adjustment E17 6 Zoom Operation E18 6 1 Manual Servo Zoom Operation E18 6 2 Operation by Zoom Demand E19 7 Focus Operation E20 7 1 Manual Auto Focus Operation E20 7 2 Operation by Focus Demand E21 8 Manual Auto Iris Operation E22 9 Operating IS Image Stabilizer Function E23 10 Specifications E24 Reference Information E26 Appendix DEPTH O...

Page 6: ...Grip 1 Standard Product Configuration E29 2 Names of Parts E30 3 Attaching Zoom Servo Grip to the Lens E31 4 Zoom Operation E32 5 Other Functions E33 Appendix DEPTH OF FIELD Table apx 1 External view apx 13 Index apx 17 Lens Accessory Zoom Servo Grip ZSG C10 ...

Page 7: ...tices for preventing accidents and protecting the safety of the customer and others WARNING This indicates a potentially hazardous situation which if not heeded may result in death or serious injury to you or others Be sure to heed all warning notices to ensure safe operation at all times CAUTION This indicates a potentially hazardous situation which if not heeded may result in a minor injury to y...

Page 8: ... securely tightened If a mounting becomes loose parts may fall off and cause injury 4 When this product is used under a blazing sun the inside of the unit may be heated to high temperature When it is expected that the unit is exposed to elevated temperature take measures against heat as appropriate on the customer s side NOTE 1 Striking or dropping the lens may cause the malfunction of the product...

Page 9: ... use a clean cotton cloth moistened with commercial lens cleaning fluid or use lens cleaning paper Gently wipe in a spiral pattern from the center of the lens Be careful not to rub dust across the lens which may scratch the lens surface 2 Routine inspection about once a year is recommended depending on the conditions and environment of use Request overhaul if needed MAINTENANCE AND INSPECTION WARN...

Page 10: ...e 6 Note that Canon may be unable to undertake servicing or repair of a product if it is modified without consulting Canon or your Canon sales representative CANON INC 30 2 Shimomaruko 3 chome Ohta ku Tokyo 146 8501 Japan Canon Europe Ltd 3 The Square Stockley Park Uxbridge Middlesex UB11 1ET UK All rights reserved No part of this operation manual may be reproduced or copied in any form or by any ...

Page 11: ...Digital Cinema Lens CN E18 80mm T4 4 L IS KAS S CN E70 200mm T4 4 L IS KAS S ...

Page 12: ...purchasing Canon products This operation manual is applicable for the following models CN E18 80mm T4 4 L IS KAS S CN E70 200mm T4 4 L IS KAS S For the camera models that can be used with this product contact your Canon dealer ...

Page 13: ...ou find any item missing please contact your Canon dealer The illustrations in this manual show standard CN E18 80mm T4 4 L IS KAS S Actual shapes may be slightly different depending on models and specifications Accessories other than those mentioned above may be required depending on the specifications of your lens For details contact your Canon dealer CN E70 200mm T 4 4 L IS KAS S can be used wi...

Page 14: ...Operation Change over Knob Zoom Ring Iris Ring IS Image Stabilizer Mode Switch IS Image Stabilizer Switch Auto Manual Focus Change over Switch Iris Auto Manual Change over Switch F B Adjuster EF Mount External Power Input Zoom Focus Remote Connector Zoom Operation Switch Wide Angle Side Zoom Operation Switch Telephoto Side ...

Page 15: ... 2 Mount the lens on the camera 1 1 To the customer who purchased CN E70 200mm T4 4 L IS KAS S The following Canon extenders can be used with CN E70 200mm T4 4 L IS KAS S Extender EF1 4 Ⅲ EF2 Ⅲ NOTE When attaching the extender first attach the extender to the lens then attach it to the camera To detach it follow the same procedure in reverse Attaching the camera before attaching the extender to th...

Page 16: ...ead wrench included separately contact your Canon dealer Lens Holder Holes Lens Holder 1 After attachiing the extender attach the lens holder into the lens holder holes of the lens using the hexagon socket head wrench 2 Attach the lens to the camera Refer to the operation manual of the camera for the details of attaching the lens to the camera 3 Attach the rig rod available in the market to the le...

Page 17: ... the lens place the lens with the rear end up to prevent the lens surface and contacts from getting scratched If the contacts get soiled scratched or have fingerprints on them corrosion or faulty connections can result The camera and lens may not operate properly If the contacts get soiled or have fingerprints on them clean them with a soft cloth ...

Page 18: ...n the lens 2 Turn the hood until the red index mark on the lens and the stop position mark on the hood are aligned Then tighten the hood lock knob Detaching the hood 1 Loosen the hood lock knob 2 Turn the hood in the detaching direction Attaching Detaching Stop Position Mark Hood Lock Knob Red Index Mark Attaching Position Mark Hood ...

Page 19: ...E13 A variety of accessories are available by using the cinema lens adaptor with φ15 in rod diameter 3 4 Available Accessories ...

Page 20: ... drive gear Iris drive gear Number of teeth 109 162 162 Module 0 8 0 5 0 5 P C D φ 87 2 φ 81 0 φ 81 0 Angular rotation Endless Operation range 130 90 90 3 5 Dimensions of Parts 161 1 86 1 182 3 39 4 φ 84 φ 79 5 154 6 77 2 58 3 5 4 6 CN E18 80mm T4 4 L IS KAS S ...

Page 21: ...ar specifications Focus drive gear Zoom drive gear Iris drive gear Number of teeth 109 162 162 Module 0 8 0 5 0 5 P C D φ 87 2 φ 81 0 φ 81 0 Angular rotation Endless Operation range130 90 90 161 1 154 6 77 2 58 3 86 1 182 3 46 4 φ 84 φ 79 5 5 4 6 6 5 ...

Page 22: ...pply input has the positive and negative polarities Make sure to connect the power cable to the correct polarity when connecting the batteries or the adaptors Connecting the cable to the incorrect polarity may cause the damage to the product Power supply from the camera can be reduced by supplying the power to the external power supply input of the lens When the power is supplied from the external...

Page 23: ...lephoto angle by turning the zoom ring 5 Bring the object into focus by turning the focus ring 6 Set the lens to the widest angle by turning the zoom ring 7 Turn the F B adjusting screw silver clockwise or counterclockwise to bring the object into focus 8 Repeat steps 4 to 7 a few times until the object is brought into focus both at hte widest end and the telephoto end 9 After the back focus adjus...

Page 24: ...r Knob Zoom Ring 6 1 Manual Servo Zoom Operation Servo Zoom Operation 1 Set the zoom operation change over knob of the lens to SERVO position 2 Press the zoom operation switch WIDE TELE to start zoom operation Zoom Operation Switch WIDE Zoom operation can be performed by the zoom ring or the zoom operation switch of the lens Zoom speed can be adjusted by the zoom speed adjusting volume Zoom Operat...

Page 25: ...00D can be connected Shtl Memo RET switches become ineffective Frame switch functions as one shot AF Auto Focus switch 2 Attach the baseplate which is available on the market and is suitable to the camera to the camera securely before mounting the camera onto the tripod when connecting the demand cable to the zoom focus remote connector The demand cable might not be connected to the connector if t...

Page 26: ...n camera side 2 Focusing becomes in focus status based on the focus command from the camera Auto focus function is activated by using the lens with Canon Digital Cinema Camera 7 1 Manual Auto Focus Operation Manual Focus Operation 1 Set the auto manual focus change over switch of the lens to MF position 2 Turn the focus ring to bring the near or far object into focus Focus operation by the focus r...

Page 27: ...nd becomes ineffective Operation by focus demand can be performed while auto focus is operated unless camera side sends the different command 2 Attach the baseplate which is available on the market and is suitable to the camera to the camera securely before mounting the camera onto the tripod when connecting the demand cable to the zoom focus remote connector The demand cable might not be connecte...

Page 28: ...peration Auto Iris Operation Auto iris function is activated by using the lens with Canon Digital Cinema Camera 1 Set the iris auto manual change over switch of the lens to AUTO position 2 Iris operation starts based on the command from the camera When switching from auto iris operation to manual iris operation iris operation is performed based on the value of the iris ring Iris operation by the i...

Page 29: ...of 3 A B C modes can be assigned Mode A Standard mode recommended for the shooting with the hand carried lenses Mode B Maximum image stabilization mode recommended for the shooting with the hand carried lenses IS performance of this mode is higher than that of Mode A Image fluctuation after panning operation is large due to higher IS performance Mode C Recommended mode for the shooting with the le...

Page 30: ...17 5 x 9 9 at 80mm 72 1 x 41 9 at 18mm 18 6 x 9 9 at 80mm Minimum Object Distance M O D 0 5m 1 7ft from the image sensor Object Dimensions at M O D 43 4 x 24 3cm at 18mm 9 5 x 5 3cm at 80mm 46 2 x 24 3cm at 18mm 10 1 x 5 3cm at 80mm Focus Angular Rotation Endless Operation range 130 Focus Gear Module 0 8 Zoom Angular Rotation 90 Zoom Gear Module 0 5 Iris Angular Rotation 90 Iris Gear Module 0 5 Fr...

Page 31: ... V 19 9 x 11 3 at 70mm 7 0 x 4 0 at 200mm 21 2 x 11 3 at 70mm 7 5 x 4 0 at 200mm Minimum Object Distance M O D 1 2m 4ft from the image sensor Object Dimensions at M O D 31 3 x 17 5cm at 70mm 11 5 x 6 4cm at 200mm 33 3 x 17 5cm at 70mm 12 2 x 6 4cm at 200mm Focus Angular Rotation Endless Operation range 130 Focus Gear Module 0 8 Zoom Angular Rotation 90 Zoom Gear Module 0 5 Iris Angular Rotation 90...

Page 32: ...ill images Therefore when using both types of lens together adjust the color balance redo the white balance etc as necessary In general the depth of field becomes shallow and the focusing range becomes extremely narrow near the widest aperture and when shooting a subject at close range In addition this tendency increases for lenses with longer focal lengths When shooting images carefully check the...

Page 33: ...Lens Accessory Zoom Servo Grip ZSG C10 ...

Page 34: ...E28 Forward Thank you for purchasing Canon products This operation manual is applicable for the following model ZSG C10 ...

Page 35: ...d wrench 1 Operation Manual 1 Standard Product Configuration Operation manual Zoom servo grip body Make sure all the following items are included in the packing box If you find any item missing please contact your Canon dealer Grip case Grip attachment Lens holder Hexagon socket head wrench ...

Page 36: ...E30 2 Names of Parts Grip Attachment Start Stop Switch One shot AF Auto Focus Switch Slotted head Screw for Attaching Grip Zoom Operation Switch 3 2 4 5 1 ...

Page 37: ...he grip attachment The attaching angle of the zoom servo grip can be adjusted by changing the mating position of the rose joints 5 Attach the lens supporter available on the market to the lens holder For the procedure of attaching the lens supporter to the lens holder refer to the operation manual of the lens supporter 6 Connect the cable connector of the zoom servo grip to the zoom focus remote c...

Page 38: ...oom speed changes depending on how deep the switch is pressed The deeper the switch is pressed the faster the zoom speed becomes 4 Zoom Operation Zoom Operation Change over Knob Zoom speed adjusting volume becomes ineffective while zoom operation switch is operated Zoom operation can be performed by the zoom operation switch Zoom Operation Switch ...

Page 39: ...ual of the camera for the setting on the camera side 2 Set the auto manual focus change over switch of the lens to AF position 3 One shot AF operation is activated by pressing one shot AF switch Start Stop Switch Start stop switch becomes effective when the zoom servo grip and the lens are connected to Canon degital cinema camera The start and stop of recording on the camera side is switched every...

Reviews: