Chapter 8
8-10
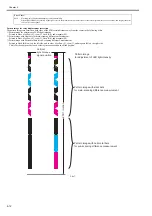
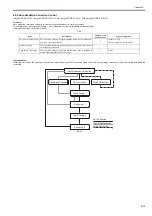
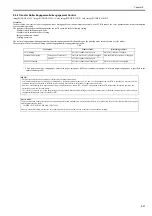
A pattern image for image gradation correction
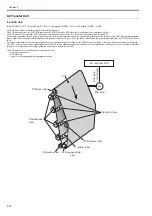
Image gradation correction pattern is formed on the position away from ETB center to right and left in the following order.
ETB 1st round
1) Pattern image for adjustment of LED light intensity
Y, C, M pattern is printed on the left side only.
This pattern is to adjust the light intensity of the LED for the color displacement/image density sensor (left).
2) Pattern for timing reference
Bk pattern is printed on the same position at right and left.
This pattern is to measure the timing of step 3), 4) and 5).
3) ETB base
The machine measures the ETB base condition of the same position with the halftone patch that is measured at the 2nd round of ETB.
This is to measure the density of halftone patch accurately. The timing is determined with using the pattern printed at step 2).
ETB 2nd round
4) Pattern for density condition
Halftone patch of Bk, Y, C, M is printed on the left side only.
Measures the density condition of each color. The timing is determined with using the pattern printed at step 2).
5) Pattern for turn-on density detection
Halftone patch of Bk, Y, C, M is printed on the right side only.
This is to detect the turn-on density of each color (the printable minimum density). The timing is determined with using the pattern printed at step 2).
F-8-15
Vertical synchronous
signal position
Vertical synchronous
signal position
1) Pattern image for adjustment
of LED light intensity
2) Pattern for timing reference
3) ETB base
ETB 1st round
ETB 2nd round
4) Pattern for
density condition
5) Pattern for turn-on
density detection
The pattern printed
at ETB 1st round
Summary of Contents for Color imageRUNNER C1022
Page 2: ......
Page 6: ......
Page 19: ...Chapter 1 Introduction ...
Page 20: ......
Page 93: ...Chapter 2 Installation ...
Page 94: ......
Page 96: ......
Page 111: ...Chapter 3 Basic Operation ...
Page 112: ......
Page 114: ......
Page 119: ...Chapter 4 Main Controller ...
Page 120: ......
Page 122: ......
Page 135: ...Chapter 5 Original Exposure System ...
Page 136: ......
Page 138: ......
Page 151: ...Chapter 6 Original Feeding System ...
Page 152: ......
Page 154: ......
Page 170: ......
Page 171: ...Chapter 7 Laser Exposure ...
Page 172: ......
Page 174: ......
Page 184: ......
Page 185: ...Chapter 8 Image Formation ...
Page 186: ......
Page 188: ......
Page 222: ......
Page 223: ...Chapter 9 Pickup and Feed System ...
Page 224: ......
Page 259: ...Chapter 10 Fixing System ...
Page 260: ......
Page 262: ......
Page 268: ...Chapter 10 10 6 ...
Page 279: ...Chapter 11 External and Controls ...
Page 280: ......
Page 311: ...Chapter 12 e Maintenance imageWARE Remote ...
Page 312: ......
Page 314: ......
Page 323: ...Chapter 12 12 9 F 12 27 ...
Page 349: ...Chapter 13 Maintenance and Inspection ...
Page 350: ......
Page 352: ......
Page 354: ......
Page 355: ...Chapter 14 Measurement and Adjustments ...
Page 356: ......
Page 358: ......
Page 361: ...Chapter 15 Correcting Faulty Images ...
Page 362: ......
Page 364: ......
Page 385: ...Chapter 16 Error Code ...
Page 386: ......
Page 388: ......
Page 399: ...Chapter 16 16 11 ...
Page 400: ......
Page 401: ...Chapter 17 Special Management Mode ...
Page 402: ......
Page 404: ......
Page 411: ...Chapter 17 17 7 ...
Page 412: ......
Page 413: ...Chapter 18 Service Mode ...
Page 414: ......
Page 492: ......
Page 493: ...Chapter 19 Upgrading ...
Page 494: ......
Page 496: ......
Page 500: ...Chapter 19 19 4 3 Click Next F 19 4 4 Select a USB connected device and click Next F 19 5 ...
Page 501: ...Chapter 19 19 5 5 Click Start F 19 6 6 Click Yes F 19 7 Download will be started F 19 8 ...
Page 504: ...Chapter 19 19 8 4 Select a USB connected device and click Next F 19 12 5 Click Start F 19 13 ...
Page 506: ...Chapter 19 19 10 ...
Page 507: ...Chapter 20 Service Tools ...
Page 508: ......
Page 510: ......
Page 514: ......
Page 515: ...Appendix ...
Page 516: ......
Page 532: ......
Page 533: ...Oct 29 2010 ...
Page 534: ......

