Chapter 2
2-33
2.6.3 Installation Procedure in the
imageWARE Accounting Manager
(henceforth: iWAM) environment
1) Check to see that 'ID00000001 to ID00001000'
have been created in '[Initial Settings /
Registration] > [System Administration Settings]
> [Department ID management] > [Count
Management]' (In the case of entering '1' as the
first number in 'Service mode > COPIER >
FUNCTION > INSTALL > CARD')
2) Press [Reset] to exit from [Initial Settings/
Registration].
3) Select: [Initial Settings / Registration] > [System
Administration Settings] > [Network Settings] >
[TCP/IP Settings] > [IP Address], and make
settings of [IP Address], [Gateway Address], and
[Subnet Mask] suitable for the user's
environment.
4) Press [Reset] to exit from [Initial Settings /
Registration].
5)
Be sure that without selecting: [Initial Settings /
Registration] > [System Administration Settings] >
[System Administrator Information Settings] and
then registering [System Administration Department
ID] and [System Administration Password], 'Card
Registration to the Device' cannot be executed in the
iWAM settings.
Select: [Initial Settings / Registration] > [System
Administration Settings] > [System Administrator
Information Settings], and then enter given numbers
for [System Administration Department ID] and
[System Administration Password].
6) Press [Reset] to exit from [Initial Settings /
Registration].
7) Turn OFF the power supply following the shut-
down sequence.
2.7 Installing the Original Tray
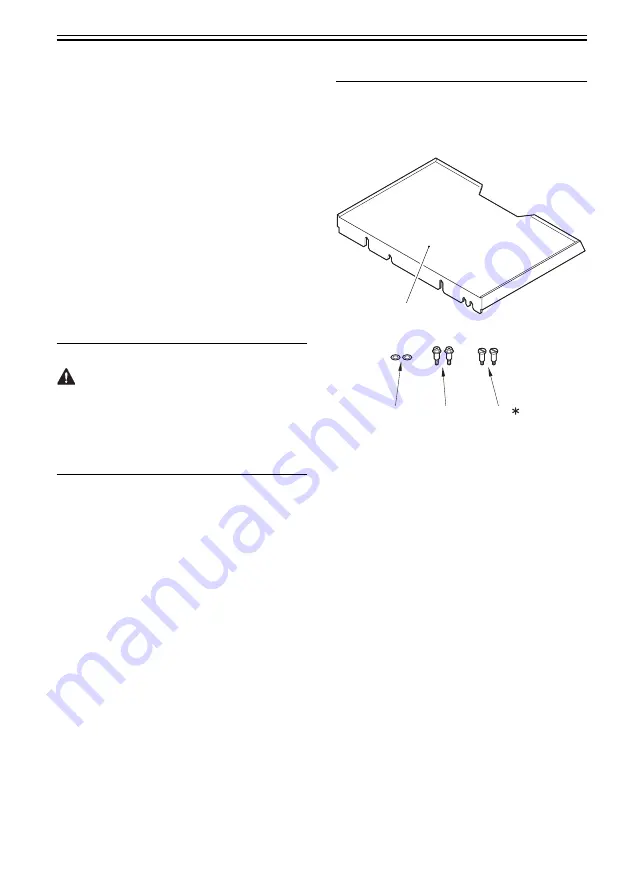
2.7.1 Checking Contents (Document
Tray-J1)
F-2-91
[1]
Document Tray-J1
1 pc.
[2]
Washer
2 pc.
[3]
Stepped screw (M4)
2 pc.
[4]*
Stepped screw
2 pc.
* Not use for the machine.
[1]
[3]
[2]
[4]
Summary of Contents for Color imageRUNNER C5180 Series
Page 22: ...Chapter 1 INTRODUCTION...
Page 64: ...Chapter 2 INSTALLATION...
Page 110: ...Chapter 3 BASIC OPERATION...
Page 119: ...Chapter 4 BASIC OPERATIONS AS A PRINTER...
Page 129: ...Chapter 5 MAIN CONTROLLER...
Page 138: ...Chapter 5 5 8 F 5 8 CPU HDD ROM access to the program at time of execution...
Page 165: ...Chapter 6 ORIGINAL EXPOSURE SYSTEM...
Page 209: ...Chapter 7 IMAGE PROCESSING SYSTEM...
Page 212: ...Chapter LASER EXPOSURE 8...
Page 239: ...Chapter 9 IMAGE FORMATION...
Page 324: ...Chapter 10 PICKUP FEEDING SYSTEM...
Page 435: ...Chapter 11 FIXING SYSTEM...
Page 460: ...Chapter 11 11 23 F 11 13 SEN3 SEN2 SEN1 SEN2 SEN3 SEN1 SEN2 SEN3 SEN1...
Page 491: ...Chapter 12 EXTERNALS CONTROLS...
Page 498: ...Chapter 12 12 5 F 12 2 FM1 FM7 FM9 FM2 FM13 FM14 FM12 FM11 FM10 FM5 FM3 FM4 FM8 FM6...
Page 512: ...Chapter 12 12 19 2 Remove the check mark from SNMP Status Enabled F 12 10...
Page 553: ...Chapter 13 MEAP...
Page 557: ...Chapter 14 RDS...
Page 569: ...Chapter 15 MAINTENANCE INSPECTION...
Page 578: ...Chapter 16 STANDARDS ADJUSTMENTS...
Page 597: ...Chapter 17 CORRECTING FAULTY IMAGES...
Page 612: ...Chapter 17 17 14 F 17 7 PLG1 ELCB1 SP1 H4 H3 H2 H1 H1 H2 LA1...
Page 617: ...Chapter 18 SELF DIAGNOSIS...
Page 644: ...Chapter 19 SERVICE MODE...
Page 778: ...Chapter 20 UPGRADING...
Page 823: ...Chapter 21 SERVICE TOOLS...
Page 828: ...APPENDIX...
Page 851: ......


