background image

Mar 18 2004

UFR


Quick Setup Guide for

Windows XP

Canon Color
Color Network UFR Printer Kit-C1

Summary of Contents for Color Network UFR Printer Kit-C1

Page 1: ...Mar 18 2004 UFR Quick Setup Guide for Windows XP Canon Color Color Network UFR Printer Kit C1 ...

Page 2: ......

Page 3: ... need arises In the event of major changes in the contents of this manual over a long or short period Canon will issue a new edition of this manual The following paragraph does not apply to any countries where such provisions are inconsistent with local law Trademarks The product names and company names used in this manual are the registered trademarks of the individual companies Copyright This ma...

Page 4: ...quiring care to avoid combustion fire Indicates an item prohibiting disassembly to avoid electric shocks or problems Indicates an item requiring disconnection of the power plug from the electric outlet Indicates an item intended to provide notes assisting the understanding of the topic in question Indicates an item of reference assisting the understanding of the topic in question Provides a descri...

Page 5: ...sed to indicate Low The voltage value however differs from circuit to circuit In addition the asterisk as in DRMD indicates that the DRMD signal goes on when 0 In practically all cases the internal mechanisms of a microprocessor cannot be checked in the field Therefore the operations of the microprocessors used in the machines are not discussed they are explained in terms of from sensors to the in...

Page 6: ......

Page 7: ... Before Making Settings 5 1 5 Installing the Printer Drivers 11 1 6 Difference Between LPR Port and Standard TCP IP Port 23 1 7 Installing the LPR Port UNIX Print service Components 24 1 8 Canon LPR2 33 1 9 Installing Canon LPR2 36 1 10 Useful Operations 46 1 11 Switching Between RAW and LPR 50 1 12 Remedy for Faults Caused by the Environment 30 client PCs or more 52 ...

Page 8: ...Contents ...

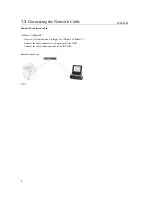
Page 9: ...Chapter 1 UFR Setup Guide for WinXP ...

Page 10: ...f the iR C6800 this function will become available when a Canon Color Network UFR Printer Kit C1 optional is installed The function comes as standard with the iR C6800N RAW mode is used for printing through port 9100 If the network uses firewall software or uses a router or it is a WAN or VPN you must make settings so that port 9100 is valid for use of RAW mode The appropriate settings will automa...

Page 11: ... C1 optional for iR C6800 standard for iR C6800N User Software CD ROM included with Canon Color Network UFR Printer Kit C1 For more information see the following documentation that comes with the iR C6800 iR C6800N iR C6800 C6800N Reference Guide iR C6800 C6800N Network Quick Start Guide iR C6800 C6800N Printer Guide Included in User Manual CD ROM ...

Page 12: ...06 2900 Connect the network cable 10Base T 100Base T Have a LAN cable on hand straight for 10Base T 100Base T Connect the cable connector to an open port of the HUB Connect the other cable connector to the iR C6800 Sample Connection F 1 1 ...

Page 13: ...ing the IP Address F 1 2 2 Use the IP address when setting up the network connection on the PC later Check the Settings Made on the iR C6800 by Printing a User Data List make the following selections Ad Func Report Settings Network User s Data List Yes see that a user data list network has been printed Note You can also check the IP address using the printed data list If no IP address has been set...

Page 14: ...Setting RAW F 1 3 If the notation of RAW Settings was Off click On then OK to change the setting Note Leave Use Bidirectional as it is hen you have changed the settings turn off the power turn off the main power and then turn on the main power Windows PC Opening Properties for the Network Connection Windows XP Display standard at install at time of category display start Control Panel Network and ...

Page 15: ... Display Start Settings Control Panel Network and Dial up Connections Properties Check to see that the network interface card name here 3com 3C918 Integrated Fast Ethernet Controller 3C905B TX Compatible and TCP IP are indicated 1 Make the following selections start Control Panel F 1 4 2 Select and click Network and Internet Connections ...

Page 16: ...8 F 1 5 3 Select and click Network Connections F 1 6 4 Select and double click Local Area Connection ...

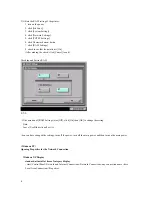
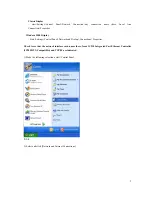
Page 17: ...9 F 1 7 5 Click Properties F 1 8 6 Check the name of the network interface card and TCP IP ...

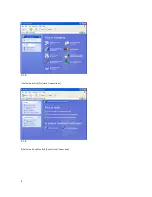
Page 18: ...10 F 1 9 ...

Page 19: ... CD ROM Setup screen has appeared select and click Install Printer Drivers Note If the UFR CD ROM Setup screen does not automatically appear after inserting the User Software CD ROM in the drive find the Setup executable labeled Setup or Setup exe and double click the executable from the CD ROM F 1 10 2 Click Next ...

Page 20: ...12 F 1 11 3 Select I accept the terms in the license agreement and click Next F 1 12 4 Select Manually Set Port to Install and click Next ...

Page 21: ...3 F 1 13 5 Check to see that Install Printer Driver through a USB Connection is not checked not selected then click Next F 1 14 6 Check to see that UFR Printer Driver is checked selected then click Next ...

Page 22: ...14 F 1 15 7 Click Add Delete F 1 16 8 Select Canon iR C6800 UFR then click Add to the Printer List for Driver Installation ...

Page 23: ...15 F 1 17 9 Check to see that Canon iR C6800 UFR has been added then click OK F 1 18 10 Select Canon iR C6800 UFR and click Next ...

Page 24: ...16 F 1 19 11 Select Add Port and click Settings F 1 20 12 Select Standard TCP IP Port and click OK ...

Page 25: ... found out in the pervious chapter i e Collecting Information Before Making Settings or that is indicated on the printout Note By default the name of the port is IP_ IP address with the port name filled automatically When you have entered the correct IP address go to step 16 If there is a fault in the network connection go to step 15 The screen will appear in response to the presence of a fault ...

Page 26: ...e checks according to the instructions on the screen check the connection of the cable on the side of the iR C6800 and PC check to see that the device is on check to see if that IP address is correct Note In the case of the iR C6800 connection to the network is made in about 1 min F 1 24 ...

Page 27: ...To check the TCP IP communication using PING enter the IP address of the iR C6800 in response to the prompt as follows EX Type C ping 172 16 1 100 then press Enter the connection is correct if the following is indicated Reply from 172 16 1 100 bytes 32 time 1 ms TTL 64 If a time out condition occurs the printer is not responding check the settings and the cable once again F 1 26 ...

Page 28: ...t click Back to return to step 14 of printer driver installation 16 When a list has appeared check that the settings are all correct then click Finish F 1 27 17 Check to see that the port has been set up then click Next F 1 28 18 Check the settings then click Start ...

Page 29: ...21 F 1 29 19 Click Yes Note If you click No installation will not start F 1 30 20 See that installation starts ...

Page 30: ...n has appeared select Restart my computer now and click Exit The PC will restart Note If any other application is running you may select Restart my computer later and click Exit Later restart the PC manually after ending the application F 1 32 ...

Page 31: ... for the following reason In the case of the LPR port OS standard jobs spooled on the PC will not be sent to the printer as when about 10 jobs are being printed in succession In a while printing will resume but newly added jobs may be printed skipping the jobs that have been left out e g resulting in missing sets In the case of the LPR port additional installation of software is needed Printer Por...

Page 32: ...ice if such is the case you need to separately install it as it does not come as part of the standard installation Note The discussions herein are based on Windows XP more or less the same steps may be used for Windows 2000 1 Set the Windows XP CD ROM in the CD ROM drive Select Install optional Windows components Note In the case of Widows 2000 select Install Add On Components F 1 34 2 Select Othe...

Page 33: ... Components Wizard see that Other Network File and Print Services has appeared select the check box to the left of Print Services for Unix and click OK when the screen you saw in step 2 has returned click Next and go to step 4 F 1 36 4 Click Browse ...

Page 34: ...26 F 1 37 5 Select CD ROM drive from Look in dropdown list F 1 38 6 Select I386 in the CD ROM disk and click Open ...

Page 35: ...27 F 1 39 7 Check that LPDSVC DL_ is displayed in File name field and click Open F 1 40 8 Click OK ...

Page 36: ...reen click Finish Click Exit on the Windows setup screen and remove the CD ROM disk of the Windows XP F 1 42 Changing from Standard TCP IP Port to LPR Port UNIX print service 1 Right click the printer icon then select and click Properties of the short cut menu ...

Page 37: ...29 F 1 43 2 Select the Ports tab then click Add port F 1 44 3 Select LPR Port and click New Port ...

Page 38: ... or address of server providing lpd then type lp for Name of printer or print queue on that server Thereafter click OK F 1 46 5 Click Close F 1 47 6 Check to see that the check box of the LPR port that has been newly added is checked selected then click Apply ...

Page 39: ...31 F 1 48 7 Click OK F 1 49 ...

Page 40: ...32 ...

Page 41: ...n a printer connected to a TCP IP network from Windows 95 98 Me NT4 0 2000 XP In the case of Windows XP 2000 Canon LPR2 may be used F 1 50 Canon LPR2 has the following functions Support of Multiple Ports Canon LPR2 permits selection of the following protocols LPR RAW IPP ...

Page 42: ... Monitor is displayed to suit the print instructions sent to the printer showing the job status from the client and the status of the printer connected by way of the port monitor The program used for the Print Monitor screen is part of the port monitor Print Monitor Screen F 1 52 ...

Page 43: ...35 ...

Page 44: ...need to select Canon LPR2 install it as follows 1 Set the User Software CD ROM in the CD ROM drive When the UFR CD ROM Setup screen has appeared click the close box to close the screen Note If the UFR CD ROM Setup screen does not appear when you have set the User Software CD ROM go to step 2 2 Click start and then My Computer F 1 53 3 Double click the CD ROM drive Double click the SETUP EXE icon i...

Page 45: ...37 F 1 54 4 Click Next F 1 55 5 Select I accept the terms in the license agreement then click Next ...

Page 46: ...ce If you check select the check box Print Monitor and click Next the files needed for the Print Monitor functions mentioned under Canon LPR2 will be installed to enable these functions as necessary check select the check box F 1 57 ...

Page 47: ... 7 See that the installation starts F 1 58 8 Click Finish F 1 59 Changing from Standard TCP IP Port to Canon LPR2 Port 1 Right click the printer icon then select and click Properties of the short cut menu ...

Page 48: ...40 F 1 60 2 Select the Ports tab then click Add Port F 1 61 3 Select Canon LPR 2 0 then click New Port ...

Page 49: ...information for IP address or Host Name Note If you directly typed for IP address or Host Name click OK after dong so then go to step 5 F 1 63 Reference At this point you may obtain information from the device automatically and indicate the IP address by clicking Browse without directly typing in IP Address to do so go through the following 1 Click Browse ...

Page 50: ...t a screen has appeared to indicate that information is being colleted from the device F 1 65 3 See that the device information that has automatically been collected is indicated IP Address Device Name Model Name Click OK ...

Page 51: ...43 F 1 66 4 Check that the IP address or host name has automatically been collected and indicated then click OK and go to step 5 F 1 67 5 Click Close ...

Page 52: ...44 F 1 68 6 Check to see hat the check box is checked selected for the Canon LPR Plugin as a newly added port and that the port has been changed Then click Apply F 1 69 7 Click OK ...

Page 53: ...45 F 1 70 ...

Page 54: ...ters and Faxes printer to open right click Properties Print Test Page Classic Display make the following selections start Settings Control Panel Printers and Faxes printer to open by right click Proprieties Print Text Page Windows 2000 Display make the following selections Start Settings Printers printer to open by right click Properties Print Test Page Windows XP Category Display 1 Click start an...

Page 55: ...47 2 Select and click Printers and Other Hardware F 1 72 3 Select and click Printers and Faxes F 1 73 4 Right click the printer icon ad select and click Properties ...

Page 56: ...appeared click the General tab and Print Test Page if you want to execute text printing F 1 75 Checking the Printer of First Choice To find out which printer is selected as the printer of first choice make the following selections and see which ...

Page 57: ...ght click the icon of the printer you want to use then put a check mark under Printer of First Choice To Display Help The Printer Driver Display screen offers a Help guide To display the Help guide click the symbol found in the upper right corner of the Windows screen point the cursor to the item you want to check and left click it F 1 77 ...

Page 58: ...e desired item the currently selected printer is checked Configure Port 2 Specify either operation for RAW procedure under Raw and LPR within Protocol or operation for LPR RAW Type 9100 for Port Number RAW Setting F 1 78 LPR Type lp for Queue Name in the case of an iR C6800 Make the appropriate setting for LPR Byte Counting Enabled Type appropriate settings for SNMP Status Enabled Community Name a...

Page 59: ...51 LPR Setting F 1 79 ...

Page 60: ...t 30 min go through the following start Control Panel Printers and Other Hardware Printers and Faxes right click the printer icon Prosperities Ports tab Standard select Standard TCP IP Port by putting a check mark in the check box Configure Port deselect by removing the check mark from SNMP Status Enabled OK click F 1 80 ...

Page 61: ...Mar 18 2004 ...

Page 62: ......

Reviews: