background image


12

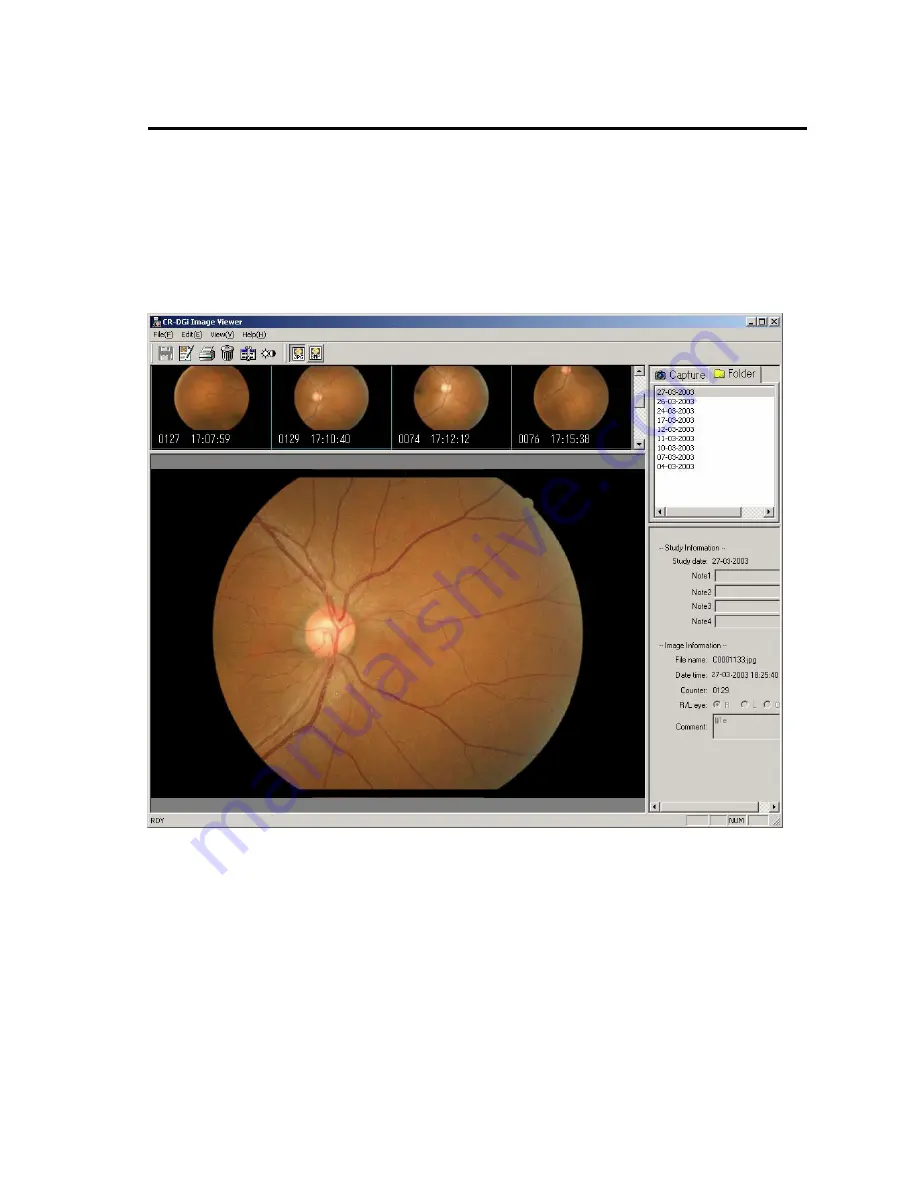
3.2 Thumbnail Window


Thumbnails are displayed from left to right and top to bottom in the order that they were captured. 
Left-click the mouse to select an image. The selected thumbnail is indicated with a blue frame. 
The selected thumbnail image is displayed in the main image display area below the thumbnails. 
Press the right arrow key to move the selected image to the right. Press the left arrow key to go back. 
Pressing the down key moves selection to the thumbnails in the lower row. Pressing the up key moves the 
selection to the thumbnails in the upper row. 
Pressing the Home key moves the selection to the first image, and pressing the End key moves the selection 
to the last image. 
Double-clicking the thumbnail opens a pop-up window. More than one pop-up window can be opened. 


Summary of Contents for CR-DGi

Page 1: ...riatic Retinal Camera CR DGi Image Viewer User s Manual Version 1 00 Be sure to always read this user s manual before using this product Keep this manual in a safe easily accessible place for future reference ...

Page 2: ...tion for this product are subject to change without notice Canon and EOS are trademarks of Canon Inc Microsoft Windows and the Windows logo are registered trademarks or trademarks of Microsoft Corporation USA in the United States and other countries Ethernet is a trademark of Xerox Corporation Pentium is a registered trademark or trademark of Intel Corporation or its subsidiaries in the United Sta...

Page 3: ...ing 9 2 4 2 Viewing 10 2 4 3 Printing 10 3 Screen Operations 11 3 1 Capture Mode and View Mode 11 3 2 Thumbnail Window 12 3 3 Main Window 14 3 4 Entering and Correcting Image Information 15 3 4 1 Entering Image Information 15 3 4 2 Correcting Image Information 16 3 5 Comparing Images Pop up Windows 17 3 6 Adjusting Images 18 3 7 Printing 19 3 8 Deleting Images 19 3 9 Setup Dialog Box 20 3 10 Menus...

Page 4: ...rosoft Windows select Display Properties go to Settings and then check that the Colors is set to True Color 24 bit or 32 bit 4 Use the CR DGi Image Viewer in a system environment with the proper security protection The CR DGi Image Viewer itself does not have any security protection functions 5 In CR DGi Image Viewer the study information and image information are saved to the image in clear text ...

Page 5: ...can be captured Images can be saved in JPEG BMP and RAW formats Study information is saved inside the JPEG file Images can be magnified and reduced in size and the brightness and contrast can be adjusted Images can be printed with the study information Images can be managed using dated folders Images can be managed by the counter number for each date Images can be compared 1 2 Operating Environmen...

Page 6: ... the appended information of the JPEG image and the image is saved to a folder with the capture date Under the standard settings only JPEG images are saved but it is also possible to save uncompressed image formats such as BMP and original images captured by the retinal camera in formats set by the digital camera jpeg Save folder CR DGi Image Viewer bmp original Option Option CR DGi Image processi...

Page 7: ... image file This format can be viewed from this software Study information and image information are not recorded in this file The file name begins with B 7 digit number RXXXXXXX jpg RXXXXXXX crw These are original images captured by the digital camera The file format is identical to the format set by the digital camera The file name begins with R 7 digit number Note The original image does not un...

Page 8: ...e Start menu select Programs Canon CR DGi Image Viewer CR DGi Image Viewer V1 00 to start the software The main window of the software opens Click the Setup button The Setup dialog box opens Select the Save tab Select Date order Insert a check mark for bmp if saving in an uncompressed image format ...

Page 9: ...5 2 2 Main Window ...

Page 10: ...s for the Connect button and Release button 13 Date folder This is the folder for the date when the study was conducted 14 tab This switches to View mode This is selected to view the images saved in the date folders 15 Main image display area This displays the image selected in the Thumbnail Image Display Area 16 Information display area This displays the study and image information 17 Study Infor...

Page 11: ...e Off ISO speed 400 Shutter speed 1 60 sec White balance Flash Auto power off OFF Quality Recording size User selected Quality Compression ratio User selected Turn on the digital camera The Event on Device window opens Click the Cancel button without selecting any registered applications Select the Capture tab of the CR DGi Image Viewer and then click the Connect button The connection was made pro...

Page 12: ...OS xxx Properties dialog box insert a check mark for Disable device events and then click the OK button Windows XP Go to Start My Computer and then right click EOS xxx to open the Properties dialog box Open the Events tab in the EOS xxx Properties dialog box select Take no action under the Actions section and then click the OK button If there are multiple selections for the Select an event option ...

Page 13: ...g capture When capture is started the connection status changes to Downloading and the transfer of the captured image from the digital camera is started When the transfer is complete the captured image is displayed in the thumbnail display area and main image display area Click the button to save Once the image is saved it no longer appears on the screen ...

Page 14: ...ge that you want to view and then select the image to display it in the main image display area 2 4 3 Printing Images can be printed from either the Capture tab or Folder tab Select the image to be printed and then click the button Printing is performed in single pages Clicking the Print button displays the Print dialog box Select the printer to be used set the printing paper orientation and other...

Page 15: ...een Operations 3 1 Capture Mode and View Mode Capture mode is started when the tab is selected Select the Capture tab when capturing images Select the tab to start View mode This is used to display saved images ...

Page 16: ...a below the thumbnails Press the right arrow key to move the selected image to the right Press the left arrow key to go back Pressing the down key moves selection to the thumbnails in the lower row Pressing the up key moves the selection to the thumbnails in the upper row Pressing the Home key moves the selection to the first image and pressing the End key moves the selection to the last image Dou...

Page 17: ...nge the number of displayed thumbnails by moving the boundary up or down for the thumbnail image display area and main image display area Enlarge the thumbnail display area when there are large numbers of thumbnails ...

Page 18: ... enlarged by adjusting the borders Pressing the key enlarges the image and pressing the key reduces the image To view the image at its original size select the Original size command from the View menu To view the image so that it matches the main window select the Fit image to window command under the View menu Double clicking the image opens a pop up window at the displayed zoom percentage ...

Page 19: ...information when three images are captured in a single study and the Study Information and Image Information are entered and saved Information Field Image File File name C0000004 jpg C0000005 jpg C0000006 jpg Note 1 1000123 Note 2 1 999 123 Note 3 XYZ Study Information Note 4 M Counter 0001 0002 0003 R L eye R R L Image Information Comment ABCD EFGH IJKLMN Image Information 1 Study Information Ima...

Page 20: ...ormation in the Information screen can be entered Correct or add the Study Information Click the button The fields for Study Information and Image Information in the Information screen are grayed out to indicate that corrections can no longer be performed To cancel the corrections either press the ESC key or select Undo from the Edit menu Corrections are cancelled if the date folder is moved while...

Page 21: ...If comparing with a previous image select another date folder and then open a pop up window for the image that you want to compare When the zoom percentage of the main window is changed the pop up window is opened at that zoom percentage The images in the pop up windows cannot be printed or retouched All pop up windows are closed when exiting the DGi Image Viewer ...

Page 22: ...Adjust Image screen Click the Cancel button to abort the image adjustment The adjusted image is displayed in the main window The image is still unsaved when displayed in this way and so the adjusted image will return to its original state if you switch to another image To save the adjusted image select the Save retouched image command from the File menu The original image is not overwritten when y...

Page 23: ...ing The fields that can be printed are Note 1 to Note 4 R L eye direction and Capture date and Capture time For some paper sizes it may not be possible to print all the information 3 8 Deleting Images Images can be deleted in Capture mode and View mode Select the image and then click the button A dialog box is opened Click OK to delete the image To abort the delete operation click the Cancel butto...

Page 24: ...e folder This folder temporarily stores the digital camera images The default setting is the Temp folder under the installation folder Date and time setting from PC This resets the clock in the digital camera to match the PC clock Image processing CR DGi is selected and this setting cannot be changed Mask file Mask file exclusive for the CR DGi is selected and this setting cannot be changed ...

Page 25: ...ile under the standard settings when a checkmark is inserted in this option the BMP file and the original file before image adjustment are saved at the same time BMP files are saved as BXXXX bmp and original files are saved as RXXXX crw jpg The XXXX portion is the same number as the JPEG file Limit for displaying message A warning will be displayed when the storage capacity of the disk where Save ...

Page 26: ... the Adjust Image screen Edit image information This corrects the study information Delete This deletes the selected image Setup This displays the Setup dialog box View menu Zoom in This provides an enlarged view Zoom out This provides a reduced view The view cannot be reduced smaller than the size of the main window Fit image to window This displays the main screen size to fit the main window Ori...

Page 27: ... indicates that the available hard disk space where the Save folder was set is less than the specified amount Immediately move the images to obtain more disk space This indicates that the available hard disk space where the Capture folder was set is less than the specified amount Immediately move the images to obtain more disk space This is displayed when there is an unsaved image This is displaye...

Page 28: ...ert the card into a CF card reader connected to the PC 3 The PC recognizes the CF card as a removable disk 4 Open Explorer and display the list of images in the CF card 5 Start the CR DGi Image Viewer select the Capture tab and then switch to Capture mode 6 From Explorer drag each retinal image in the order that it was captured to the thumbnail window or main window of the CR DGi Image Viewer If y...

Page 29: ...ercial backup utility When the amount of available space on the hard disk containing the save folder and capture folder becomes less than 500 MB an alert is displayed when starting the software and when saving an image In this case you should immediately free space on your hard disk Possible methods of freeing disk space are shown below Move old date folders that are not viewed in Explorer to anot...

Page 30: ......

Page 31: ......

Page 32: ...Telephone 1 949 753 4162 CANON EUROPA N V Medical Products Division Bovenkerkerweg 59 61 P O Box 2262 1180 EG Amstelveen The Netherlands Telephone 31 20 545 8926 CANON SINGAPORE PTE LTD No 1 Jalan Kilang Timor 03 01 Pacific Tech Centre Singapore 159303 Telephone 65 6276 6038 CANON AUSTRALIA PTY LTD Optical Products Division 1 Thomas Holt Drive North Ryde Sydney N S W 2113 Australia Telephone 61 2 ...

Reviews: