5. Basic Photography
-28-
11
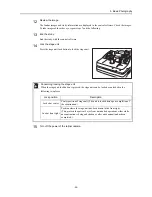
Take the image.
Check that the photography ready lamp lights green.
In a flare-free condition, check the focus again, and press the shutter release button.
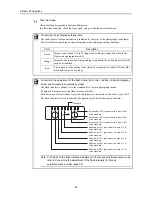
Concerning the photography ready lamp
The ready status of the fundus camera is indicated by the color of the photography ready lamp.
This status differs depending on the photography mode and image-taking conditions.
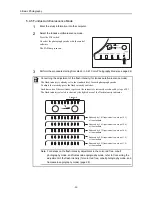
Concerning the adjustment of the flash intensity (for color, red free, cobalt photography
mode, and fluorescein angiography mode)
The flash intensity is already set to the standard level for each photography mode.
To adjust the intensity, press the flash intensity switches.
Each time one of these switches is pressed, the intensity is increased or reduced by steps of 0.3.
The flash intensity selected is shown by the lighted area of the flash intensity indicator.
Note: For details on the flash intensity adjustment in the fundus autofluorescence mode,
refer to Concerning the adjustment of the flash intensity (for fundus
autofluorescence mode) (page 32).
Color
Description
Green
Images can be taken. (Up to 10 images can be taken continuously when in the
fluorescein angiography mode.)
Orange
Images can be taken, but if image-taking is continued, the getting ready status will
soon be established.
Red
The camera is in the getting ready status (no images can be taken). Wait until the
lamp lights up green or orange.
Increased by 87% (equivalent to a step of 0.9)
of the standard
Standard
Increased by 52% (equivalent to a step of 0.6)
of the standard
Increased by 23% (equivalent to a step of 0.3)
of the standard
Reduced by 19% (equivalent to a step of 0.3)
of the standard
Reduced by 34% (equivalent to a step of 0.6)
of the standard
Reduced by 47% (equivalent to a step of 0.9)
of the standard
Reduced by 56% (equivalent to a step of 1.2)
of the standard
Reduced by 65% (equivalent to a step of 1.5)
of the standard


