Chapter 3
3-4
F-3-18
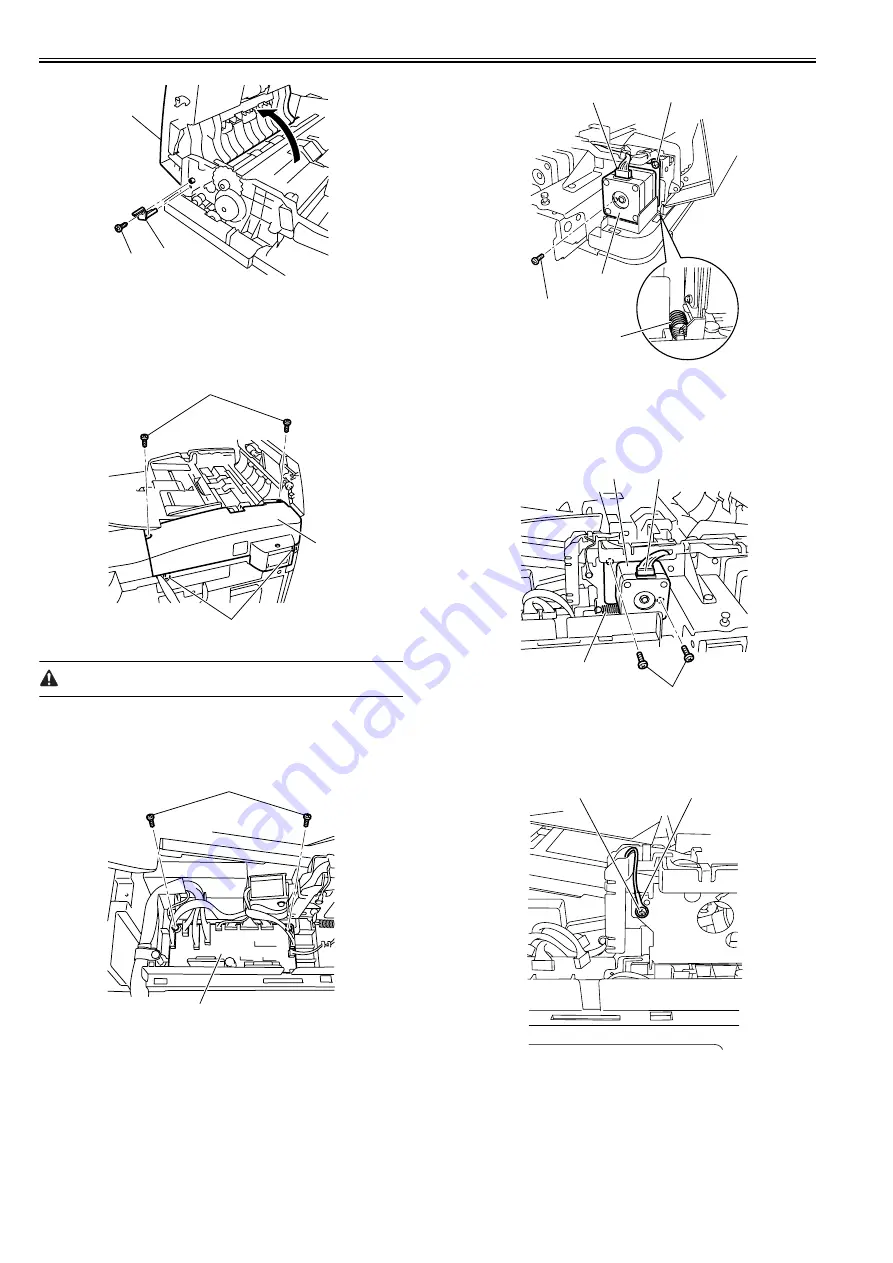
3.3.3.3 Removing the Rear Cover
0010-6192
1) Open the feeder cover.
2) Move to the back of the machine, remove the two screws [1], and then
detach the rear cover [2].
F-3-19
Remove the rear cover with the two claws [3] released.
3.3.3.4 Removing the ADF Driver PCB
0011-3230
1) Disconnect all connectors from the ADF driver PCB. (10 connectors)
2) Remove the two screws [1], and then remove the ADF driver PCB [2].
F-3-20
3.3.3.5 Removing the Pickup Motor
0010-6196
1) Disconnect the connector [1], and then remove the tension spring [2].
2) Remove the two screws [3], and then remove the pickup motor [4]
together with the adjusting plate.
F-3-21
3.3.3.6 Removing the Feed Motor
0010-6197
1) Disconnect the connector [1], and then remove the tension spring [2].
2) Remove the two screws [3], and then remove the feed motor [4] together
with the adjusting plate.
F-3-22
3.3.3.7 Removing the Timing Belt
0010-3971
1) Remove the screw [1], and then disconnect the ground cable [2].
F-3-23
2) Disconnect the two sensor connectors [1].
3) Remove the harness from the harness guide [2].
4) Remove the screw [3], and remove the harness guide [2].
5) Remove the two screws [4], and then remove the metal plate [5].
6) Remove the four screws [6], and then remove the left hinge [7].
[3]
[2]
[1]
[1]
[3]
[2]
[2]
[1]
[3]
[4]
[1]
[3]
[2]
[1]
[4]
[2]
[3]
[2]
[1]
Summary of Contents for DADF-P1
Page 1: ...Sep 14 2005 Service Manual Feeder DADF P1 ...
Page 2: ......
Page 6: ......
Page 12: ......
Page 13: ...Chapter 1 Specifications ...
Page 14: ......
Page 16: ......
Page 19: ...Chapter 2 Functions ...
Page 20: ......
Page 22: ......
Page 35: ...Chapter 3 Parts Replacement Procedure ...
Page 36: ......
Page 72: ......
Page 73: ...Chapter 4 Maintenance ...
Page 74: ......
Page 76: ......
Page 83: ...Chapter 5 Error Code ...
Page 84: ......
Page 86: ......
Page 88: ......
Page 89: ...Sep 14 2005 ...
Page 90: ......


