Chapter 4
4-2
4.2 Maintenance and Inspection
4.2.1 Periodically Replaced Parts
4.2.1.1 Periodically Replaced Parts
0010-3934
This machine does not have parts that must be replaced periodically.
4.2.2 Durables
4.2.2.1 Durables
0010-3935
This machine does not have durables.
4.2.3 Periodical Servicing
4.2.3.1 Periodic Service Items
0010-3936
This machine does not have periodic service items.
4.3 Adjustment
4.3.1 Basic Adjustment
4.3.1.1 Outline
0010-3940
This machine has the following adjustment items. Carry out each adjustment
after replacing the relevant parts.
T-4-2
Carry out the adjustment of above all after removing the ADF from the
reader unit.
4.3.1.2 Height Adjustment
0010-3942
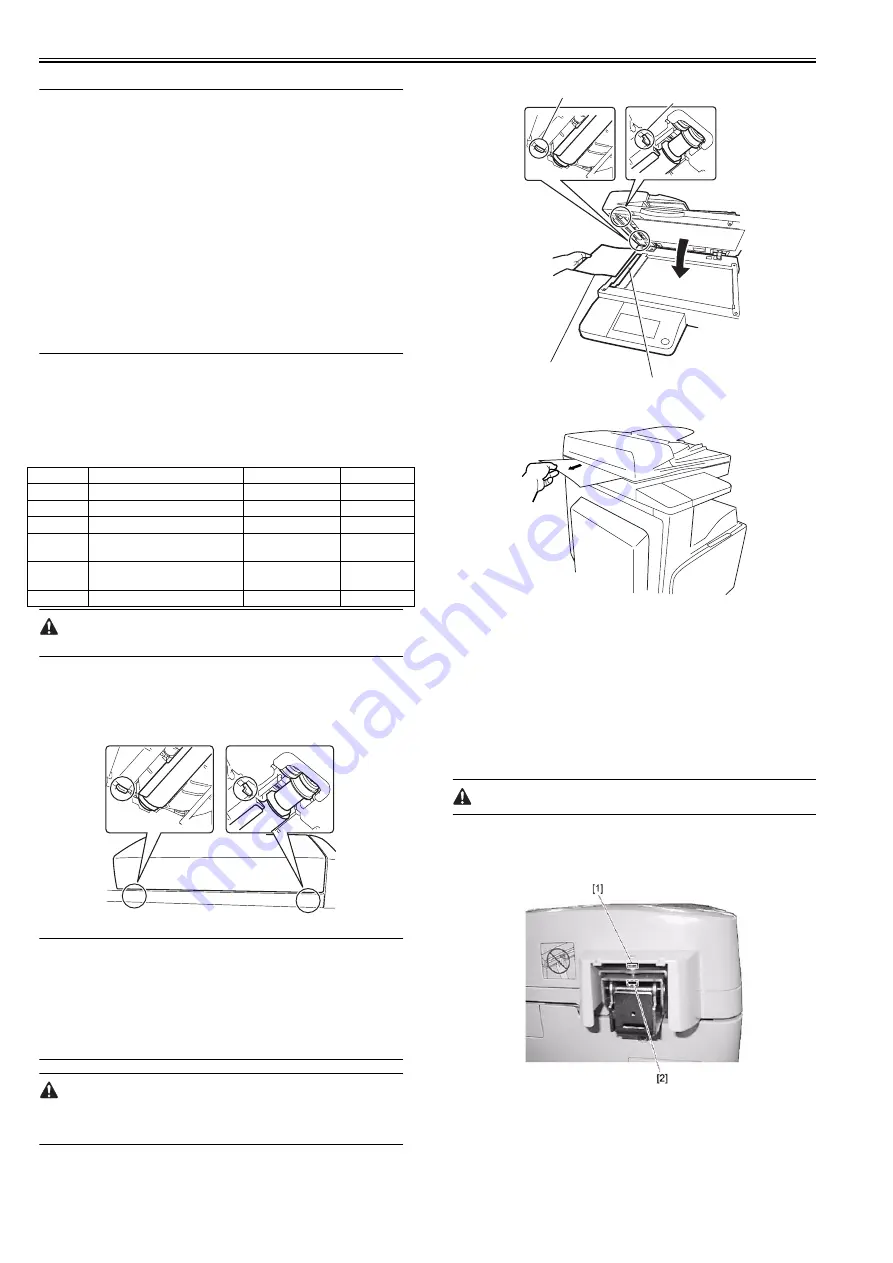
1. Pre-check
Check that the front and rear feet on the pickup side of the DADF are close
contact with the document glass when the DADF is closed.
F-4-4
MEMO
Insert a sheet of paper between the ADF's document glass and the feet (two)
and pull the paper in the direction of the arrow to check that you feel slight
resistance.
The recommended way of making this check is as follows:
First, insert a sheet of paper between the front foot [1] and the ADF's docu-
ment glass, and then pull it.
Next, insert a sheet of paper between the rear foot [2] and the ADF's docu-
ment glass, and then pull it.
- Use plain paper for this adjustment.
- Insert the paper [3] in such a manner that the sheet portion [4] of the docu-
ment glass is covered.
F-4-5
F-4-6
2. Adjustment Sequence
* When the front foot or rear foot is floating
1) Adjust the left hinge. (See 3.)
2) Adjust the right hinge. (See 4.)
3) Adjust the left hinge (see 3) or check the left hinge (see 1).
* When both feet are floating
1) Adjust the left hinge. (See 3.)
2) Adjust the right hinge. (See 4.)
3) Adjust the left hinge. (See 3.)
4) Adjust the right hinge (see 4) or check the right hinge (see 4).
3. Adjusting the Left Hinge Height
1) Adjust the left hinge height using the left height adjusting screw [1].
Loosen the nut [2] before adjustment, and tighten it after adjustment.
* If the front foot is floating, turn the adjusting screw clockwise to lower the
front foot until it touches the glass.
* If the rear foot or both feet are floating, turn the adjusting screw counter-
clockwise to lower the rear foot until it touches the glass.
F-4-7
4. Adjusting the Right Hinge Height
1) When closing the DADF, perform the following checks:
- The rib [1] on the bottom of the ADF must contact the copyboard glass
holder (right) [2]. (Gap A should not exist.)
- Check that the document pressure sheet [2] touches the document glass.
No.
Adjustment type
Replaced parts
Remarks
[1]
Height adjustment
Hinge
[2]
Perpendicularity adjustment
Hinge
[3]
Magnification adjustment
Motor/roller
[4]
Side registration adjustment
-
During
installation only
[5]
Leading edge registration
adjustment
-
During
installation only
[6]
Reading position adjustment
White roller
[1]
[3]
[2]
[4]
Summary of Contents for DADF-P1
Page 1: ...Sep 14 2005 Service Manual Feeder DADF P1 ...
Page 2: ......
Page 6: ......
Page 12: ......
Page 13: ...Chapter 1 Specifications ...
Page 14: ......
Page 16: ......
Page 19: ...Chapter 2 Functions ...
Page 20: ......
Page 22: ......
Page 35: ...Chapter 3 Parts Replacement Procedure ...
Page 36: ......
Page 72: ......
Page 73: ...Chapter 4 Maintenance ...
Page 74: ......
Page 76: ......
Page 83: ...Chapter 5 Error Code ...
Page 84: ......
Page 86: ......
Page 88: ......
Page 89: ...Sep 14 2005 ...
Page 90: ......


