background image

Basic Operation

19

Chapt

er 2

2-2 Document Feed and Eject Tray 

Prepare the document feed tray and document eject tray according to the 
paper size and feed/eject method.

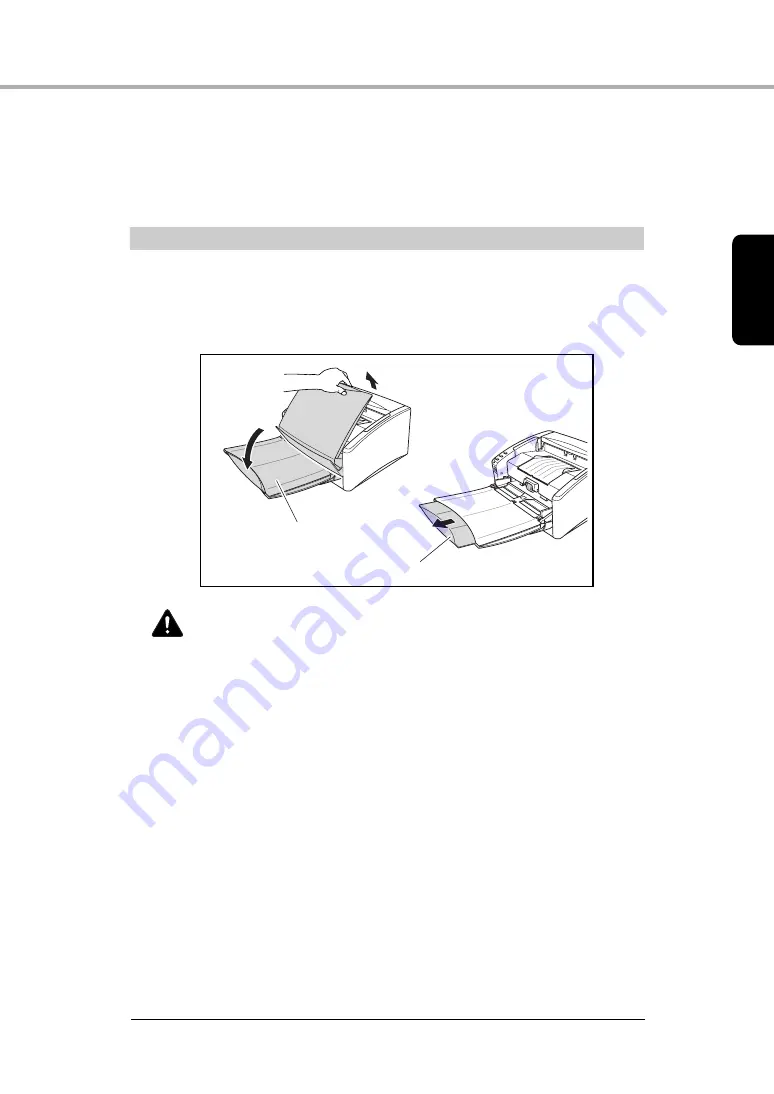
Preparing the Document Feed Tray

1

Grasp the middle of the document feed tray and slowly open it 

toward you. If the documents slide off the tray, pull out the document 

feed tray extension. 

CAUTION

Do not place anything other than documents on the document 

feed tray. Doing so may damage the scanner, reduce scanning 

quality, or cause the tray to fall off, resulting in personal injury 

or damage to the scanner.

Document Feed Tray

Document Feed Tray Extension

Summary of Contents for DR-4010C - imageFORMULA - Document Scanner

Page 1: ...Document Scanner Reference Guide Please read this manual before operating this scanner After you finish reading this manual store it in a safe place for future reference...

Page 2: ...nnected Consult the dealer or an experienced radio TV technician for help Use of shielded cables are required to comply with Class B limits in Subpart B of Part 15 of FCC Rules Do not make any changes...

Page 3: ...from the date you purchased the same as evidenced by a receipt or otherwise The limited warranty does not apply if the failure of the diskette resulted from accident abuse or misapplication of the SO...

Page 4: ...poration in the United States Intel and Pentium are registered trademarks of Intel Corporation ENERGY STAR is a U S registered mark Adobe is the registered trademark of Adobe Systems Incorporated in t...

Page 5: ...folders during software installation User Manual CapturePerfect 3 0 Operation Guide Easy Start Guide Describes the procedures for setting up the scanner and instaling the software Follow the steps in...

Page 6: ...g operations that may lead to injury to persons or damage to property if not performed correctly To use the machine safely always pay attention to these cautions IMPORTANT Indicates operational requir...

Page 7: ...ing the Document Feed Tray 19 Preparing the Document Eject Tray 20 2 3 Placing Documents 22 Feeding in the Page Separation Mode 22 Feeding in the Bypass Mode 25 2 4 Scanning 27 What Is the Job Functio...

Page 8: ...space around the scanner for operation maintenance and ventilation If scanned documents are ejected to the back tray of the scanner provide adequate space behind the scanner for documents ejected afte...

Page 9: ...ated voltage and power supply frequency 120 V 60 Hz or 220 240 V 50 60 Hz depending on your region Do not use a power supply that is not rated for the specified voltage Doing so might cause a fire or...

Page 10: ...inner aerosol sprays or any other highly flammable substance near the scanner Do not cut damage or modify the power cord Do not place heavy objects on the power cord and do not pull or excessively ben...

Page 11: ...the power switch OFF and disconnect the power plug from the power outlet CAUTION Do not install the scanner on a surface that is unstable or tilted or in an area subject to excessive vibrations as thi...

Page 12: ...he power cord from the power outlet for safety when the machine will not be used for an extended period of time such as during consecutive holidays Do not wear loose clothing or jewelry that may get c...

Page 13: ...canning Modes The scanner supports the following scanning modes depending on the document type Single sided double sided mode Single sheet dual feeding path U Turn Path Documents are fed and ejected f...

Page 14: ...The scanner is equipped with a Dropout Color function that enables you to specify a color for the scanner to omit from the scanned image Color Enhancement The scanner is equipped with a Color Enhance...

Page 15: ...cument Compatibility You can scan documents up to 39 2 inches 1000 mm long by setting the Long Document mode Compatible with Carbonless Duplicating Paper The scanner is able to scan carbonless duplica...

Page 16: ...edge of the eject tray See p 20 Document Eject Tray Scanned documents are ejected here See p 20 Document Guides Adjust these guides to fit the width of the document See p 23 Feed Selection Lever Use...

Page 17: ...cable and a SCSI cable at the same time Doing so may cause a malfunction Document Eject Tray 2 Open this tray to use the scanner in a straight path configuration See p 20 1 ON 2 USB Connector Connect...

Page 18: ...ed models SCSI cards made by Adaptec for PCI bus AHA 2930U AHA 2940AU ASC 19160 ASC 29160N SCSI card made by Adaptec for Card bus APA 1480 An ISIS compatible application or a TWAIN compatible applicat...

Page 19: ...ing when installing a SCSI card in your computer The overall length of the SCSI cable you can use is determined by the SCSI standards Refer to the manual for the SCSI card you are using for more infor...

Page 20: ...irection 1 U Turn Path Straight Path Width 2 08 to 8 62 53 mm to 219 mm 2 08 to 8 62 53 mm to 219 mm Length 2 2 75 to 14 70 mm to 356 mm 2 75 to 14 70 mm to 356 mm Weight 3 Feeding documents are separ...

Page 21: ...aper together can cause the scanner to jam Scanning documents before the ink is dry can cause problems with the scanner Always make sure that the ink on a document is dry before scanning it Scanning d...

Page 22: ...rectly or functions such as paper size detection and deskew may not function properly when scanning these types of documets due to reflected light When scanning business cards make sure to select the...

Page 23: ...he middle of the document feed tray and slowly open it toward you If the documents slide off the tray pull out the document feed tray extension CAUTION Do not place anything other than documents on th...

Page 24: ...can switch between these methods by opening or closing the document eject tray 2 Select an eject method according to your needs U turn Path Document Eject Tray 2 Straight Path Document Eject Tray Doc...

Page 25: ...sing the straight path the pages are stacked in the reverse order from which they were fed IMPORTANT Be sure there is enough space for documents that are ejected at the back of the scanner when using...

Page 26: ...continuously scanning documents on thin paper in the page separation mode the pages may become wrinkled or folded and cause a paper jam If this happens scan the document in the bypass mode CAUTION Be...

Page 27: ...ner to align them Doing so may cause a malfunction When placing documents into the feed tray take care not to cut your hands on the edges of the paper 3 Adjust the document guides so that they are wid...

Page 28: ...ed or creased and that it is placed in the feed tray correctly Scanning an improperly placed curled or creased document may damage the document or cause a paper jam 6 Start scanning IMPORTANT If feedi...

Page 29: ...ge to the scanner while it is not being used Feeding in the Bypass Mode 1 Push the feed selection lever up 2 Place the document into the document feed tray one sheet at a time and adjust the position...

Page 30: ...ot fastened together into the feed tray at one time they will be fed together CAUTION Very thin or curled documents may not feed properly In this case lightly press on the leading edge of the document...

Page 31: ...d to suit your needs Example When you place a document in the scanner and press job button c scanning starts the DR 4010C monitor displays the progress and status of the job and the image data is auto...

Page 32: ...hes from the Programs menu For more information on the Job Registration Tool see the User Manual and Job Registration Tool Help Print Send the scanned image data to print on a specified printer Save a...

Page 33: ...ments are scanned with the preset scanning conditions the e mail software application is started and the scanned image data is attached to a new e mail message Scan Page Only one page of the document...

Page 34: ...nments such as conference halls where it can be connected to large displays or projectors CapturePerfect 3 0 is switched to full screen display the document is scanned and the scanned image is display...

Page 35: ...ft in the eject tray and close the eject tray guide IMPORTANT If a document stops in the eject tray remove the document before closing the document eject tray extension Attempting to force the documen...

Page 36: ...4 Close the upper unit slowly Make sure that the upper unit is completely closed by pushing on both edges with both hands until you hear a click CAUTION When closing the upper unit be careful not to...

Page 37: ...urs when Rapid recover system is enabled in the ISIS TWAIN driver settings the image data of the document is not saved and scanning stops This allows you to continue scanning from the document that ca...

Page 38: ...ge them Do not use spray type cleaners to clean the scanner Precision mechanisms such as the light source may get wet and cause a malfunction Never use paint thinner alcohol or other organic solvents...

Page 39: ...or Glass and the Rollers If scanned images have extraneous marks or if the scanned documents are dirty the sensor glass or rollers inside the scanner may be dirty Clean them periodically IMPORTANT Fee...

Page 40: ...rticles 3 Use a clean dry cloth to wipe dirt off the sensor glass Wipe both the top and bottom sensor glasses IMPORTANT Scratches on the sensor glass may cause marks on the images and could cause feed...

Page 41: ...t of the scanner Turning these rollers by force may damage them and lead to feeding errors 5 Remove the roller unit and the retard roller for cleaning See Cleaning the Roller Unit on p 38 and Cleaning...

Page 42: ...g the Roller Unit 1 Push the roller lock lever down While supporting the roller unit with your hand slide the roller lock lever to the right 2 Move the roller unit to the right a and then pull it out...

Page 43: ...th the shaft pin on the main unit Note If the cutout and pin do not fit rotate the roller until the parts are properly matched 5 Slide the roller lock lever to the left and raise the roller unit into...

Page 44: ...ler 1 Insert a finger of each hand into the grooves on both ends of the roller cover and remove the cover 2 Move the roller lock lever down and forward a and then slide it to the right b 3 Shift the r...

Page 45: ...roller with a cloth that has been moistened with water and throughly wrung out 5 Position the retard roller so the notch in the roller is facing the scanner s shaft 6 Slide the roller lock lever to t...

Page 46: ...nce 7 Push the roller lock lever towards the back of the scanner to lock the retard roller into place 8 Replace the roller cover 9 Push the center of the roller cover down and make sure that it clicks...

Page 47: ...em contact your local authorized Canon dealer or your service representative The Scanner Does Not Turn ON Check the following if the scanner does not turn ON Is the power cord connected correctly Is t...

Page 48: ...in the PC Solution Refer to the documentation for the SCSI card and the computer Make sure that the SCSI card is correctly installed in the computer and that it is enabled properly under the operatin...

Page 49: ...ally even if the scanner setup is OK a probable cause is that the scanner driver or application software is not running correctly Re install the scanner driver or application software When system erro...

Page 50: ...lution Remove the USB hub Documents Do Not Feed Properly The following are possible causes of a document failing to feed properly Check each possible cause Problem Static electricity etc is causing th...

Page 51: ...ses are as follows Symptoms A multi page TIFF file saved in CapturePerfect 3 0 cannot be opened by other applications Problem The application you are using to open the TIFF file does not support multi...

Page 52: ...mptoms Text or images on the rear side of your document appear in the scanned image Problem The Brightness setting is too low or the paper is too thin Solution Set a higher Brightness setting If the p...

Page 53: ...such as Auto detection Deskew or Border Removal were used when scanning documents containing text or photos up to their edges The scanner cannot accurately process the edges of documents Solution Disa...

Page 54: ...06 mm to 0 15 mm Feed with bypass mode 11 to 144 lb bond 0 0020 to 0 026 42 to 546 g m2 0 05 mm to 0 66 mm Business cards are supported However scanning embossed cards is not guaranteed Size Thicknes...

Page 55: ...min 84 images min 84 images min 42 images min 24 images min 24 bit Color 200 200 dpi 300 300 dpi 600 600 dpi Speed priority 600 600 dpi Image quality priority 42 pages min 42 pages min 24 pages min 20...

Page 56: ...rmation about the replacement parts Options Bar code module product code 0434B003 Additional software to allow the ISIS TWAIN driver to recognize bar codes Contact your local authorized Canon dealer o...

Page 57: ...sions 52 F Features 9 H Handling 6 I Installation Location 4 Installation Requirements 14 J Job button 27 Job Function 27 Job Registration Tool 28 L Long document mode 17 M Manuals for the Scanner 1 M...

Page 58: ...P O BOX 2262 1180 EG AMSTELVEEN THE NETHERLANDS CANON LATIN AMERICA INC 703 WATERFORD WAY SUITE 400 MIAMI FLORIDA 33126 U S A CANON AUSTRALIA PTY LTD 1 THOMAS HOLT DRIVE NORTH RYDE SYDNEY N S W 2113...

Reviews: